Buttery Rolled Sugar Cookies Recipe

Soft & Sparkly Rolled Sugar Cookies Recipe for Sweet Smiles

Sweet moments often start with a classic rolled sugar cookies recipe that brings pure joy to any gathering.

The delicate texture and melt-in-your-mouth goodness make these cookies a true crowd-pleaser.

Rolling out the dough becomes an exciting culinary adventure where creativity meets deliciousness.

Each cookie promises a buttery, tender bite that sparks memories of childhood kitchens.

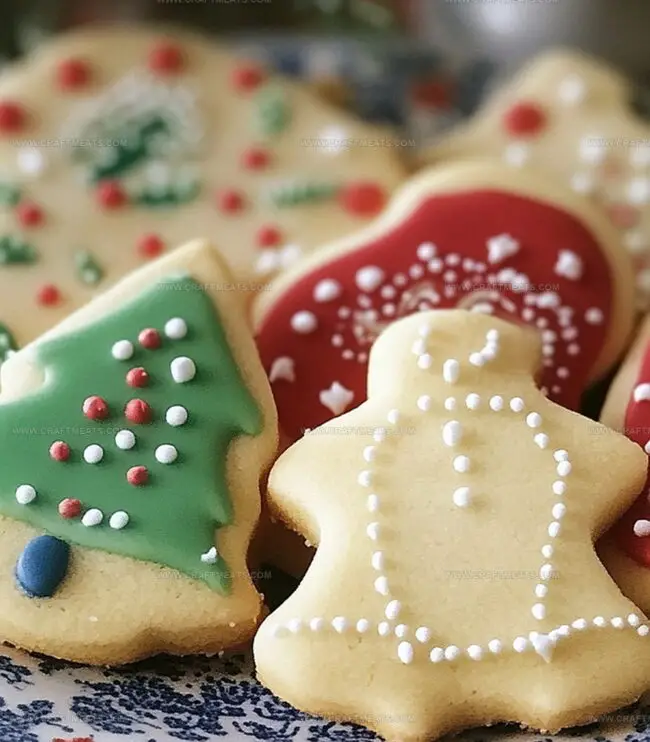
Decorating becomes an artistic expression with colorful frostings and sprinkles that turn simple cookies into edible masterpieces.

These cookies are more than just a treat – they’re a celebration of baking magic that connects generations.

Quick Recipe Overview

Prep Time: 15 minutes

Cook Time: 1 hour

Total Time: 1 hour 25 minutes

Calories: 150 kcal

Servings: 23

Everything In Rolled Sugar Cookies

For Base and Flavor:
  • Butter: Creamy richness that provides tender texture and deep flavor, choose high-quality unsalted butter for best results.
  • Granulated Sugar: Sweetens and helps create crisp, golden edges, look for fine, pure white sugar.
  • Egg: Binds ingredients together and adds structure, select fresh room-temperature eggs.
  • Vanilla Extract: Enhances overall sweetness with warm, complex notes, pure extract delivers superior taste.
  • Almond Extract: Optional aromatic boost that adds delicate nutty undertone, use sparingly.
For Dry Ingredients:
  • All-Purpose Flour: Foundation of cookie structure, sift to remove lumps and ensure smooth dough.
  • Baking Powder: Leavening agent that helps cookies rise slightly and maintains soft texture.
  • Salt: Balances sweetness and intensifies overall flavor profile, use fine sea salt.
For Decoration and Finishing:
  • Parchment Paper: Prevents sticking and ensures even baking, provides easy cookie removal.
  • Silicone Baking Mats: Reusable alternative to parchment, creates consistent baking surface.
  • Royal Icing, Buttercream Frosting, Sprinkles: Optional decorative elements for personalized cookie design.

Tools You Need For Rolled Sugar Cookies

  • Large mixing bowl: Essential for combining butter, sugar, and other wet ingredients smoothly.
  • Electric mixer or stand mixer: Perfect for beating butter and sugar until light and fluffy.
  • Whisk: Needed to blend dry ingredients evenly.
  • Plastic wrap: Crucial for wrapping and chilling dough.
  • Rolling pin: Key tool for rolling out cookie dough to even thickness.
  • Cookie cutters: Necessary for creating fun shapes from the dough.
  • Baking sheets: Used for baking cookies evenly.
  • Parchment paper or silicone baking mats: Prevents cookies from sticking and ensures easy cleanup.
  • Wire cooling rack: Helps cookies cool completely without getting soggy.
  • Measuring cups and spoons: Important for precise ingredient measurements.

Steps To Shape Rolled Sugar Cookies

  • Cookie Foundations

Create a soft, buttery base by blending creamy butter with sweet sugar until the mixture becomes light and airy. Introduce eggs and fragrant vanilla for rich flavor depth. Gently fold in dry ingredients until a smooth dough emerges.

  • Dough Relaxation

Transform your mixture into two flat discs, wrap them tenderly, and let them rest in the refrigerator. This quiet pause allows ingredients to meld and become more manageable.

  • Workspace Preparation

Warm up the oven to a cozy temperature. Cover baking sheets with protective mats to ensure smooth cookie release.

  • Dough Transformation

Sprinkle a light dusting of flour across your work surface. Roll out the chilled dough into a delicate, even layer. Select playful cookie cutters and create whimsical shapes that spark joy.

  • Baking Magic

Slide your cookie creations into the warm oven. Watch carefully as edges turn a gentle golden hue. Remove before they become too crisp, preserving a tender, melt-in-your-mouth texture.

  • Personal Touch

Once cooled, invite creativity by decorating with colorful icings or delicate sprinkles. Make each cookie a unique expression of your culinary spirit.

Helpful Hints For Rolled Sugar Cookies

  • Pro Rolling Technique: Dust your rolling pin and work surface with powdered sugar instead of flour to prevent the dough from drying out and maintain a tender cookie texture.
  • Make-Ahead Magic: Cookie dough can be prepared up to 3 days in advance and stored in the refrigerator, making party prep a breeze. For longer storage, freeze the dough disks for up to 3 months.
  • Gluten-Free Option: Swap traditional flour with a 1:1 gluten-free baking blend to create delicious cookies suitable for those with wheat sensitivities. Add an extra tablespoon of liquid to help bind the alternative flour.
  • Flavor Boost: Experiment with different extract variations like orange, lemon, or coconut to create unique flavor profiles. Swap vanilla for maple extract during holiday baking for a festive twist.
  • Low-Sugar Alternative: Reduce granulated sugar by 25% and replace with monk fruit sweetener for a lighter, less caloric version of the classic sugar cookie. The texture remains soft and delicate while cutting down on refined sugar.

How To Present Rolled Sugar Cookies

  • Holiday Festive Display: Arrange cookies on a decorative holiday platter with pine sprigs and cinnamon sticks for a stunning seasonal presentation that captures winter's magic.
  • Party Crowd-Pleaser Tray: Create a vibrant cookie board with multiple shapes and colors, mixing decorated and plain cookies for visual appeal and varied taste experiences.
  • Kids' Decorating Station: Set up a fun station with different colored frostings, sprinkles, and edible glitters so children can personalize their own sugar cookies, making baking an interactive family activity.
  • Gifting Gourmet Package: Stack cooled cookies in clear cellophane bags tied with festive ribbons, perfect as homemade gifts for teachers, neighbors, or holiday hosts with a personal touch.

Storage Tips For Rolled Sugar Cookies

  • Fridge-Friendly Storage: Seal cooled cookies in an airtight container, layering between parchment paper. These treats stay fresh for 5-7 days at room temperature, maintaining their delicate texture and flavor.
  • Make-Ahead Magic: Prepare cookie dough up to 3 days in advance and refrigerate. Wrapped tightly in plastic, the dough remains perfect for spontaneous baking sessions, saving precious time during busy weeks.
  • Freezer Happiness: Undecorated cookies freeze beautifully for up to 3 months. Place in freezer-safe containers with wax paper between layers. Thaw at room temperature for 1-2 hours before serving or decorating.
  • Smart Portion Planning: Roll and cut extra dough into individual cookies, then freeze unbaked on a baking sheet. Transfer frozen cookie shapes to freezer bags for quick, customized baking whenever sweet cravings strike.
Print
clock clock iconcutlery cutlery iconflag flag iconfolder folder iconinstagram instagram iconpinterest pinterest iconfacebook facebook iconprint print iconsquares squares iconheart heart iconheart solid heart solid icon
Buttery Rolled Sugar Cookies Recipe

Buttery Rolled Sugar Cookies Recipe


5 Stars 4 Stars 3 Stars 2 Stars 1 Star

4.7 from 23 reviews

  • Total Time: 1 hour 25 minutes
  • Yield: 23 1x

Description

Classic rolled sugar cookies blend buttery sweetness with delicate vanilla undertones. Crisp edges and tender centers invite bakers to create memories of festive baking traditions shared with loved ones.


Ingredients

Scale
  • 3 cups (375 g) all-purpose flour
  • 1 cup (230 g / 8 oz) unsalted butter, softened
  • 1 cup (200 g) granulated sugar
  • 1 large egg
  • 1 tsp vanilla extract
  • ½ tsp baking powder
  • ¼ tsp salt
  • ½ tsp almond extract (optional)
  • royal icing or buttercream frosting (optional)
  • sprinkles (optional)

Instructions

  1. Dough Preparation: Cream butter and sugar until fluffy, then blend in egg and extracts. Sift dry ingredients and fold into wet mixture, creating a smooth, pliable dough.
  2. Chilling Process: Divide dough into two disks, wrap in plastic, and refrigerate for at least one hour to firm up and enhance flavor development.
  3. Oven Preparation: Preheat oven to 350F and line baking sheets with parchment paper or silicone mats.
  4. Rolling and Cutting: Lightly flour work surface and roll out dough to 1/4-inch thickness. Use cookie cutters to create desired shapes, transferring delicately to prepared baking sheets.
  5. Baking and Cooling: Bake for 8-10 minutes until edges turn golden brown. Allow cookies to rest briefly on baking sheet before transferring to wire rack for complete cooling.
  6. Decorating: Once cooled, adorn cookies with royal icing, buttercream, or festive sprinkles, transforming them into edible masterpieces.

Notes

  • Chill Dough Thoroughly: Refrigerate dough for at least one hour to prevent cookies from spreading and maintain crisp shape during baking.
  • Roll Evenly and Carefully: Use consistent quarter-inch thickness and light flour dusting to ensure uniform baking and prevent tough texture.
  • Monitor Baking Time Closely: Watch cookies vigilantly between 8-10 minutes; golden edges indicate perfect doneness without burning delicate edges.
  • Customize for Dietary Needs: Substitute all-purpose flour with gluten-free blend or use alternative sweeteners for different dietary restrictions while maintaining tender cookie texture.
  • Prep Time: 15 minutes
  • Cook Time: 1 hour
  • Category: Desserts, Snacks
  • Method: Baking
  • Cuisine: American

Nutrition

  • Serving Size: 23
  • Calories: 150
  • Sugar: 7 g
  • Sodium: 30 mg
  • Fat: 7 g
  • Saturated Fat: 4 g
  • Unsaturated Fat: 2 g
  • Trans Fat: 0 g
  • Carbohydrates: 20 g
  • Fiber: 0 g
  • Protein: 1 g
  • Cholesterol: 20 mg
Liam O’Sullivan

Liam O’Sullivan

Founder & Culinary Content Creator

Expertise

Recipe Development​, Traditional Irish and European Cuisines, Food Styling and Photography, Culinary Education​

Education

Dublin Institute of Technology (DIT) – School of Culinary Arts and Food Technology

  • Degree: Bachelor of Arts in Culinary Arts
  • Focus: Comprehensive training in classical and modern cooking techniques, kitchen management, and menu development.​

Ballymaloe Cookery School

  • Program: 12-Week Certificate Course
  • Focus: Intensive, hands-on experience emphasizing farm-to-table cooking and sustainable practices.​

Isabella brings a global spark to the Craft Meats table. Born in Florence and trained at the Apicius International School of Hospitality, she blends classic Italian flavor with modern writing that’s easy to follow and hard to forget. 

Her additional training at the Italian Chef Academy fueled her love for well-crafted dishes, especially ones that spotlight beautiful cuts of meat.

She’s a food writer with heart, and a deep love for storytelling through single recipes. Her goal? To help you cook with more confidence and a little more joy, no matter where you start.

Leave a Reply

Your email address will not be published. Required fields are marked *

Recipe rating 5 Stars 4 Stars 3 Stars 2 Stars 1 Star