
Candy Cane Heart Bark Recipe That’s Festive and Crunchy
Sweet candy cane heart bark offers a delightful fusion of festive flavors and playful textures that dance across your palate.
Chocolate lovers will instantly fall in love with this charming confection.
Winter celebrations become magical when delicate peppermint notes intertwine with rich, smooth chocolate layers.
Crafting this treat requires minimal ingredients and simple techniques anyone can master.
Elegant yet effortless, this dessert brings whimsy and joy to holiday gatherings.
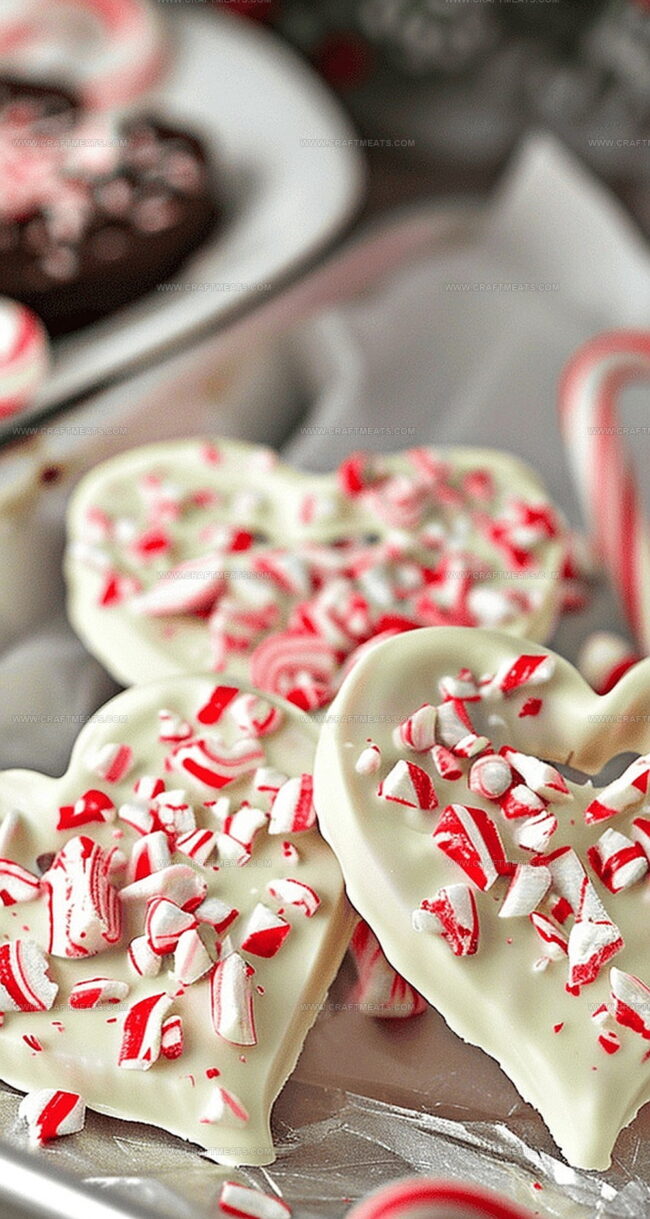
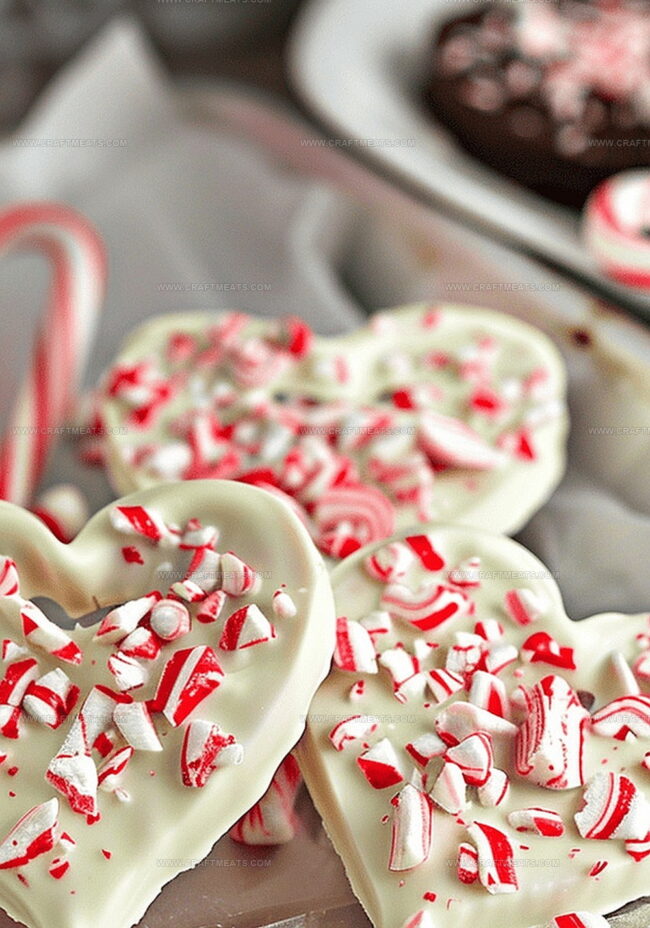
Decorative patterns and vibrant colors make each piece a miniature work of edible art.
The combination of smooth chocolate and crisp candy pieces creates an irresistible sensory experience you won’t be able to resist.
What Makes Candy Cane Bark So Irresistible
How to Gather the Ingredients for Festive Fun
Chocolate Base:Candy Cane Elements:Decorative Finishing:Melting and Spreading Tips That Matter
Step 1: Prepare Baking Workspace
Grab two baking sheets and line them with parchment paper or silicone mats. Preheat your oven to a gentle 250 degrees Fahrenheit (120 Celsius). This low temperature will help shape our candy cane hearts without burning.
Step 2: Craft Candy Cane Hearts
Carefully unwrap your candy canes, treating them like delicate treasures. Arrange each pair side by side on the prepared sheets, positioning their ends to form beautiful heart shapes. Patience is key here!
Step 3: Warm and Shape Candy Hearts
Slide the baking sheets into the oven for 5-8 minutes. Watch closely as the candy canes become soft and pliable. Once they’re bendy but not melted, gently press the ends together to create perfect heart shapes. If they start to stiffen, pop them back in the oven for a quick warm-up.
Step 4: Cool Heart Formations
Let the candy cane hearts rest and cool completely on the baking sheet. They need to be rock-solid before moving forward with our delicious creation.
Step 5: Prepare Crunchy Topping
Grab your miniature candy canes and transform them into a delightful crunch:Step 6: Melt Chocolate Coatings
Prepare two microwave-safe bowls for melting:Melt each chocolate separately using short 15-20 second bursts, stirring between each interval to prevent burning.
Step 7: Create Marbled Chocolate Hearts
Drizzle and swirl the melted chocolates over your candy cane hearts. Get creative with your design:Step 8: Set and Chill
Place your chocolate-covered candy cane hearts in the refrigerator. Let them chill for about an hour until the chocolate becomes firm and glossy. The wait will be worth every sweet moment!
Secrets to Snapping the Perfect Bark
Best Ways to Keep It Crisp
Sweet Matches to Serve Alongside
Unique Bark Combos to Try
Peppermint Bark FAQs
Bake candy canes for 5-8 minutes at 250°F. They should become soft and bendable but not completely melted. If they harden, just pop them back in the oven briefly.
Candy coatings work best for this recipe as they melt smoothly and set quickly. Regular chocolate might not give the same glossy finish and could be more challenging to work with.
Store in an airtight container in the refrigerator for up to a week. Keep them cool to prevent the chocolate from melting and the candy canes from becoming sticky.
Place candy canes in a zip-top bag and crush them using a rolling pin or meat mallet. This method helps control the size of the pieces and prevents candy from flying everywhere.
Print
Candy Cane Heart Bark Delight Recipe
- Total Time: 23 minutes
- Yield: 12 1x
Description
Sweet holidays sparkle with this Candy Cane Heart Bark, melting chocolate and peppermint into a festive seasonal treat. Crisp candy pieces and smooth chocolate create a magical dessert you can quickly share with friends and family.
Ingredients
Main Ingredients:
- 24 large candy canes
- 1½ cups miniature candy canes
Chocolate Coating:
- 12 ounces (340 grams) dark chocolate candy coating
- 12 ounces (340 grams) white candy coating
Instructions
- Prepare a low-temperature workspace by warming the oven to 250 degrees F (120 C). Cover two baking sheets with foil and apply a light nonstick spray or use silicone mats for effortless removal.
- Gently extract each large candy cane from its wrapper, taking care to prevent cracking. Position them in pairs on the prepared sheets, angling them to create heart-like configurations.
- Carefully transfer the sheets to the oven, allowing the candy canes to soften for 5-8 minutes. Watch closely to ensure they become pliable without fully melting. Immediately press the ends together to form heart shapes, reheating briefly if they begin to stiffen.
- Let the candy cane hearts rest undisturbed until completely cooled and rigid. Patience is crucial to maintain their delicate structure.
- Transform miniature candy canes into a crunchy topping by sealing them in a zip-top bag. Use a rolling pin to crush them into fine, textured fragments.
- Melt the dark and white candy coatings in separate microwave-safe containers. Use short heating intervals, stirring frequently to achieve a smooth, glossy consistency without scorching.
- Artfully drizzle the melted chocolate over the candy cane hearts, alternating between dark and white varieties to create an elegant marbled design. Generously sprinkle the crushed candy cane pieces across the surface while the chocolate remains liquid.
- Transfer the decorated hearts to the refrigerator, allowing them to solidify completely. The cooling process typically requires approximately one hour to achieve a perfect, crisp finish.
Notes
- Arrange parchment paper on baking sheets to prevent sticking and ensure easy removal of the bark.
- Position candy canes carefully into heart shapes on the lined baking sheet, creating a festive template for your chocolate base.
- Gently warm candy canes in a low-temperature oven to soften them slightly, making them easier to shape without fully melting.
- Melt white and dark chocolate separately using a double boiler or microwave, stirring carefully to achieve a smooth, glossy consistency.
- Drizzle and swirl melted chocolates over the candy cane hearts, creating a marbled effect that looks as delightful as it tastes.
- Allow the bark to cool completely at room temperature or chill in the refrigerator until firm, which helps the chocolate set perfectly.
- Prep Time: 15 minutes
- Cook Time: 8 minutes
- Category: Desserts, Snacks
- Method: Baking
- Cuisine: American
Nutrition
- Serving Size: 12
- Calories: 150
- Sugar: 14 g
- Sodium: 10 mg
- Fat: 8 g
- Saturated Fat: 5 g
- Unsaturated Fat: 2 g
- Trans Fat: 0 g
- Carbohydrates: 18 g
- Fiber: 1 g
- Protein: 1 g
- Cholesterol: 0 mg
Isabella Rossi
Founder & Culinary Content Creator
Expertise
Recipe Development, Traditional Irish and European Cuisines, Food Styling and Photography, Culinary Education
Education
Dublin Institute of Technology (DIT) – School of Culinary Arts and Food Technology
Ballymaloe Cookery School
Liam is the voice behind many of Craft Meats’ most flavorful features. With roots in Dublin’s smoky barbecue scene and a culinary degree from the Dublin Institute of Technology, he brings time-tested cooking techniques to life.
His training at Ballymaloe Cookery School sharpened his farm-to-table approach, giving him a deep respect for every ingredient he writes about.
He’s not about overcomplicating the process, just helping you cook meat that’s worth talking about. When he’s not writing or grilling, he’s out foraging or nerding out on regional spice blends to add to his next recipe.