Cheeseburger Spring Rolls Recipe for Family Fun
Cheeseburger spring rolls blend two culinary worlds in a surprising fusion that sparks instant curiosity.
Classic comfort food meets crispy Asian-inspired wrapping for an unexpected taste adventure.
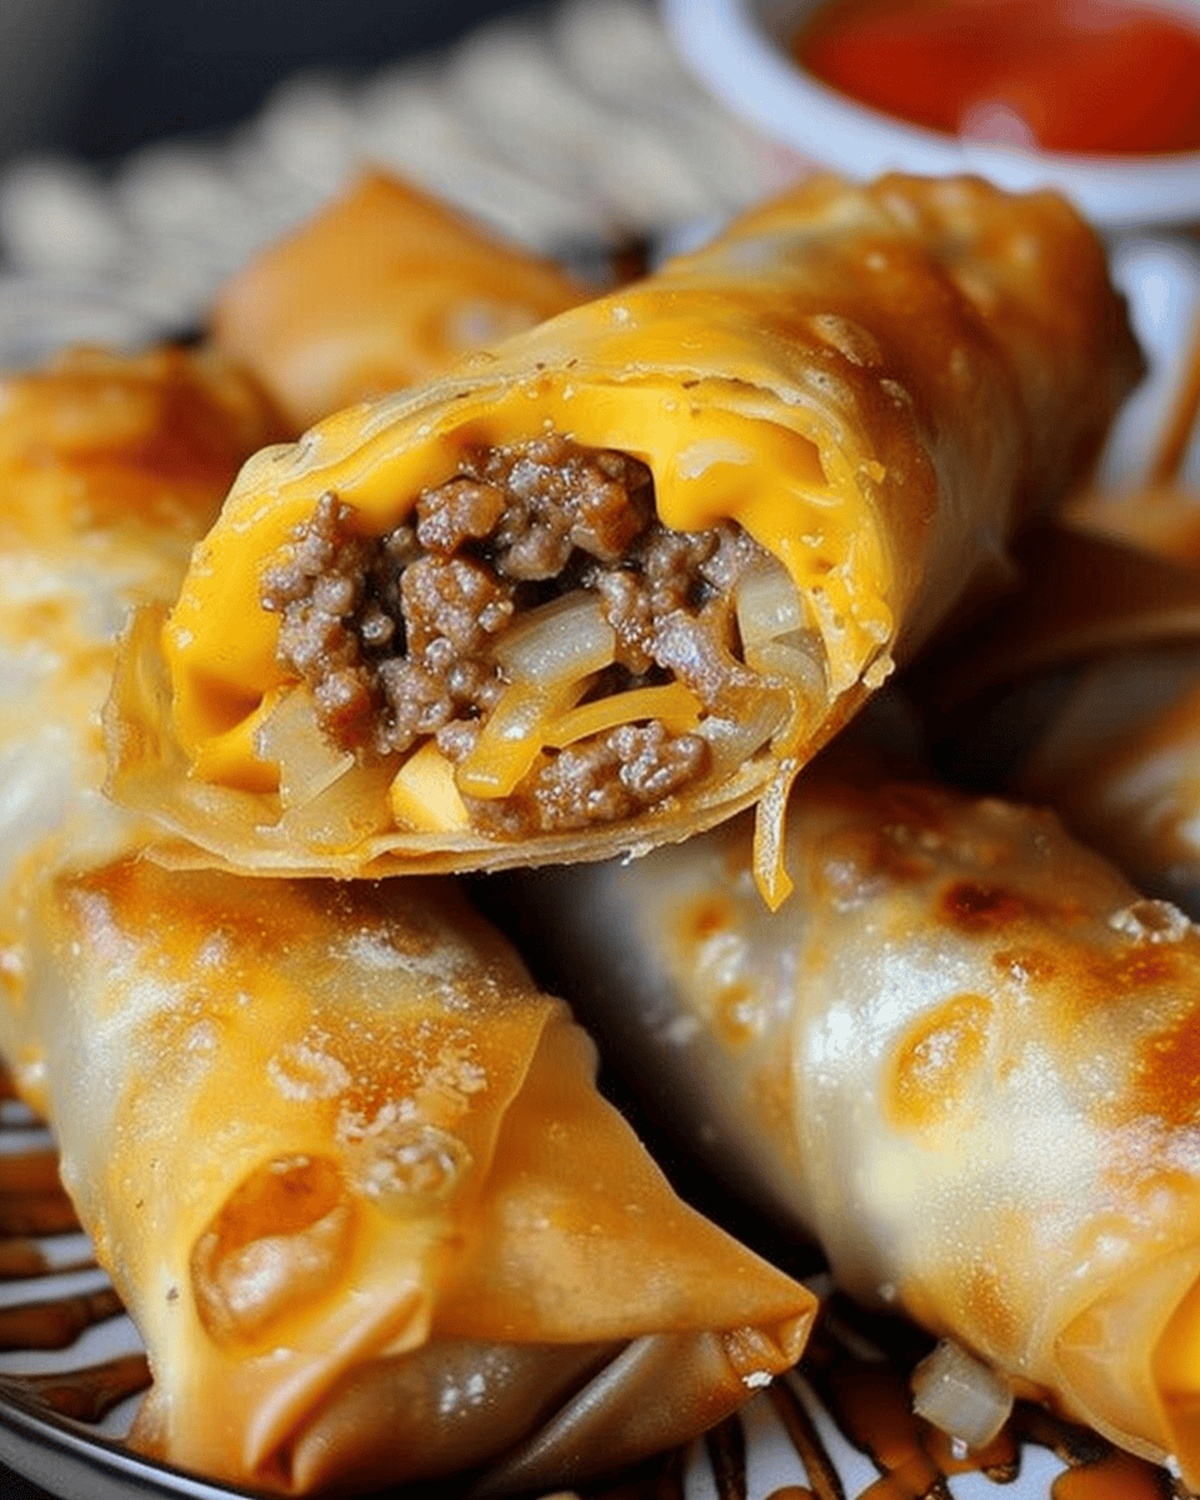
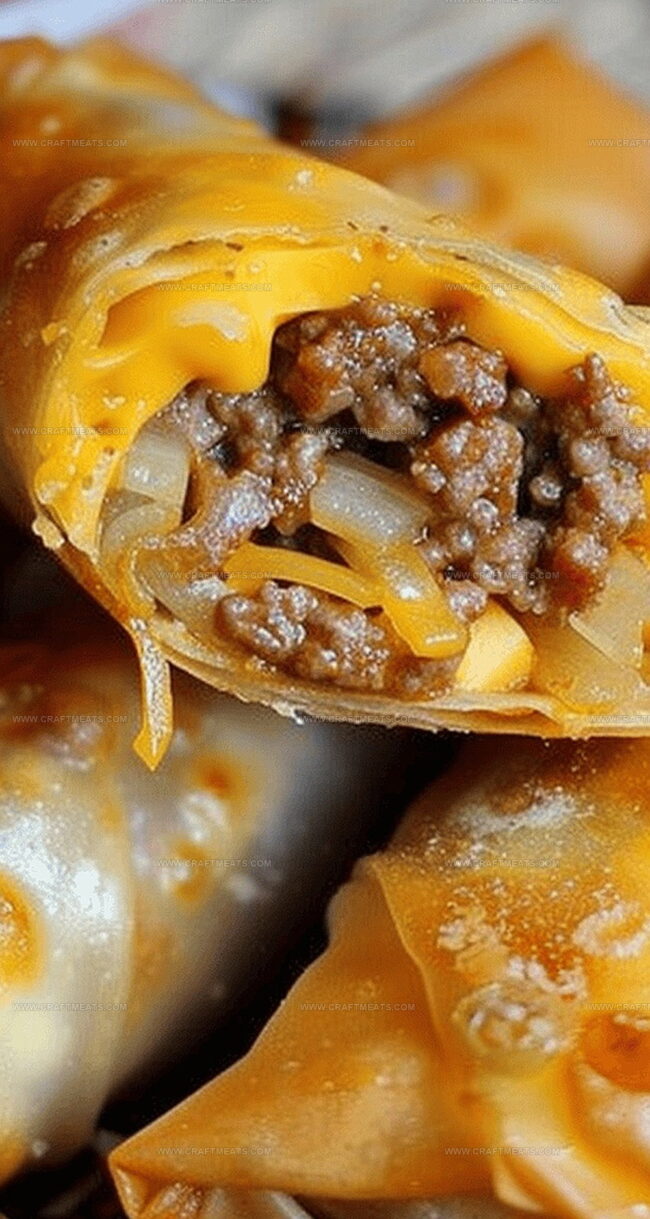
Imagine biting through a golden, crunchy exterior into a molten center bursting with savory burger flavors.
These delightful rolls reimagine traditional ingredients through a creative lens that challenges conventional cooking boundaries.
You can find the combination surprisingly harmonious, with melted cheese and seasoned meat nestled inside delicate, crisp pastry.
Rich, indulgent fillings contrast beautifully with the light, crackling wrapper, creating a textural symphony that delights the palate.
Each bite promises a playful twist on familiar favorites that will leave you eager to experiment in the kitchen.
Cheeseburger Spring Rolls – A Game Day Hit
Ingredients for Cheeseburger-Style Rolls
Main Protein and Cheese:Wrapper and Binding Ingredients:Fresh Flavor Enhancers:Cooking Support Ingredients:Cooking Instructions for Crunchy Spring Rolls

Step 1: Sizzle The Ground Beef
Brown the ground beef in a skillet over medium heat. Drain excess fat and let the meat cool slightly. Ensure the beef is fully cooked and has a rich, savory color.
Step 2: Create The Flavor Blend
Gather your ingredients:Mix all ingredients in a mixing bowl. Stir thoroughly to distribute flavors evenly and create a delicious filling.
Step 3: Wrap The Delightful Bundles
Lay out spring roll wrappers on a clean surface. Spoon the beef mixture onto the center of each wrapper. Fold the wrapper carefully, tucking in sides to prevent filling from escaping. Seal edges by brushing with water, creating a tight seal.
Step 4: Prepare The Sizzling Bath
Select a deep pot or skillet. Pour vegetable or canola oil to a depth of 2-3 inches. Heat oil to 350°F (175°C). Test oil temperature by dropping a small wrapper piece – it should immediately sizzle and bubble.
Step 5: Crisp To Golden Perfection
Gently slide spring rolls into hot oil. Fry in small batches to maintain oil temperature. Cook each side for 3-4 minutes until they transform into a beautiful golden brown. Avoid overcrowding the pan.
Step 6: Drain And Plate
Remove spring rolls using a slotted spoon or spider strainer. Place on paper towels to absorb excess oil. Let them rest for a minute to cool slightly. Serve immediately with ketchup, ranch, or your favorite dipping sauce.
Expert Tips for Rolling and Frying
Keeping Rolls Fresh After Serving
What Goes Best with These Spring Rolls
Fun Filling Variations to Explore
Spring Roll Questions You Might Ask
Yes! You can prepare the spring rolls and store them uncooked in the refrigerator for up to 24 hours before frying. Just cover them with plastic wrap to prevent drying out.
Cheddar cheese is recommended, but you can also use monterey jack or pepper jack for extra flavor. Shredded cheese melts nicely and blends well with the ground beef.
Seal the edges carefully with water and ensure the filling isn’t too wet. Also, make sure the oil is at the right temperature (around 350°F) and don’t overcrowd the pan when frying.
Absolutely! Brush the spring rolls with olive oil and bake at 425°F for about 15-20 minutes, turning halfway through to get a crispy exterior. They’ll be a bit less greasy but still delicious.
Print
Cheeseburger Spring Rolls Recipe
- Total Time: 40 minutes
- Yield: 4 1x
Description
Crispy cheeseburger spring rolls deliver classic American comfort wrapped in delicate Asian-inspired pastry. Melted cheese, savory ground beef, and golden crunch combine for an irresistible fusion bite you’ll crave again and again.
Ingredients
Main Protein:
- 1 lb ground beef (or turkey)
Cheese and Vegetables:
- 1 cup shredded cheddar cheese
- ½ cup diced red onions
- ½ cup diced dill pickles
Wrapper and Cooking Ingredients:
- 12 spring roll wrappers
- Vegetable oil or canola oil for frying
- Ketchup or preferred dipping sauce for serving
Instructions
- Transform ground beef into a savory filling by browning it thoroughly in a skillet, ensuring complete cooking and removing any excess fat. Allow the meat to cool slightly for optimal handling.
- Create a flavor-packed mixture by blending the cooled beef with sharp cheddar cheese, zesty red onions, and tangy dill pickles in a mixing bowl. Stir until ingredients are evenly distributed.
- Position the spring roll wrapper on a clean surface, strategically placing a generous portion of the beef mixture in the center. Carefully fold the wrapper, encasing the filling completely and sealing the edges with a light water wash to prevent any leakage.
- Prepare a deep frying vessel by filling it with oil, heating to an optimal temperature where a test wrapper piece sizzles immediately upon contact. The oil should be hot enough to create a crisp exterior quickly.
- Gently lower the prepared spring rolls into the hot oil, working in small batches to maintain proper oil temperature. Rotate the rolls to ensure uniform golden-brown coloration and a perfectly crisp texture.
- Extract the fried spring rolls using a slotted spoon, allowing excess oil to drip away on absorbent paper towels. Transfer to a serving plate and accompany with classic ketchup or a complementary dipping sauce for an extra flavor dimension.
Notes
- Prep these rolls ahead of time and refrigerate for up to 2 hours before frying to help them hold their shape and prevent filling from leaking.
- Ground beef must be completely cooled and drained to avoid soggy wrappers and ensure crispy texture during frying.
- Seal spring roll edges carefully with water to prevent filling from spilling out during deep-frying.
- Use medium-high heat for perfect golden-brown color, checking oil temperature with a small wrapper test to avoid burning.
- Drain fried spring rolls on paper towels to remove excess oil and maintain a crispy exterior.
- Serve immediately with classic condiments like ketchup, ranch, or spicy mustard for maximum flavor enjoyment.
- Prep Time: 10 minutes
- Cook Time: 30 minutes
- Category: Appetizer, Snacks
- Method: Frying
- Cuisine: American
Nutrition
- Serving Size: 4
- Calories: 350
- Sugar: 2g
- Sodium: 600mg
- Fat: 20g
- Saturated Fat: 8g
- Unsaturated Fat: 10g
- Trans Fat: 0g
- Carbohydrates: 30g
- Fiber: 1g
- Protein: 18g
- Cholesterol: 70mg
Isabella Rossi
Founder & Culinary Content Creator
Expertise
Recipe Development, Traditional Irish and European Cuisines, Food Styling and Photography, Culinary Education
Education
Dublin Institute of Technology (DIT) – School of Culinary Arts and Food Technology
Ballymaloe Cookery School
Liam is the voice behind many of Craft Meats’ most flavorful features. With roots in Dublin’s smoky barbecue scene and a culinary degree from the Dublin Institute of Technology, he brings time-tested cooking techniques to life.
His training at Ballymaloe Cookery School sharpened his farm-to-table approach, giving him a deep respect for every ingredient he writes about.
He’s not about overcomplicating the process, just helping you cook meat that’s worth talking about. When he’s not writing or grilling, he’s out foraging or nerding out on regional spice blends to add to his next recipe.