
Cinnamon-Dusted Caramel Apple Dessert Cups Recipe
Sweet autumn nights call for a decadent caramel apple dessert cups that blend nostalgia with pure indulgence.
Crisp apples and golden caramel create a symphony of flavors dancing across your palate.
Buttery pastry cups cradle a luscious filling that promises comfort and joy in every bite.
Each serving delivers a perfect balance of tart fruit and rich, velvety caramel sauce.
Delicate and elegant, these dessert cups transform a classic combination into an irresistible treat.
Simple ingredients and straightforward techniques make this recipe accessible to bakers of all skill levels.
You’ll love how these elegant cups become the star of any gathering, leaving everyone craving just one more bite.
Quick Recipe Overview
Everything Inside Caramel Apple Dessert Cups
For Apple Layer:For Creamy Layer:For Toppings and Finishing:Tools To Layer Caramel Apple Dessert Cups
How To Assemble Caramel Apple Dessert Cups Simply
In a cozy skillet, warm butter until golden. Toss in fresh apples with a sprinkle of brown sugar, cinnamon, and a splash of lemon. Let the mixture dance and soften for several minutes until apples become tender and fragrant. Set aside to cool naturally.
Whip cream cheese with powdered sugar and vanilla until silky smooth. In another bowl, transform heavy cream into billowy peaks. Gently marry the two mixtures, creating a luxurious, airy filling that feels like clouds on your tongue.
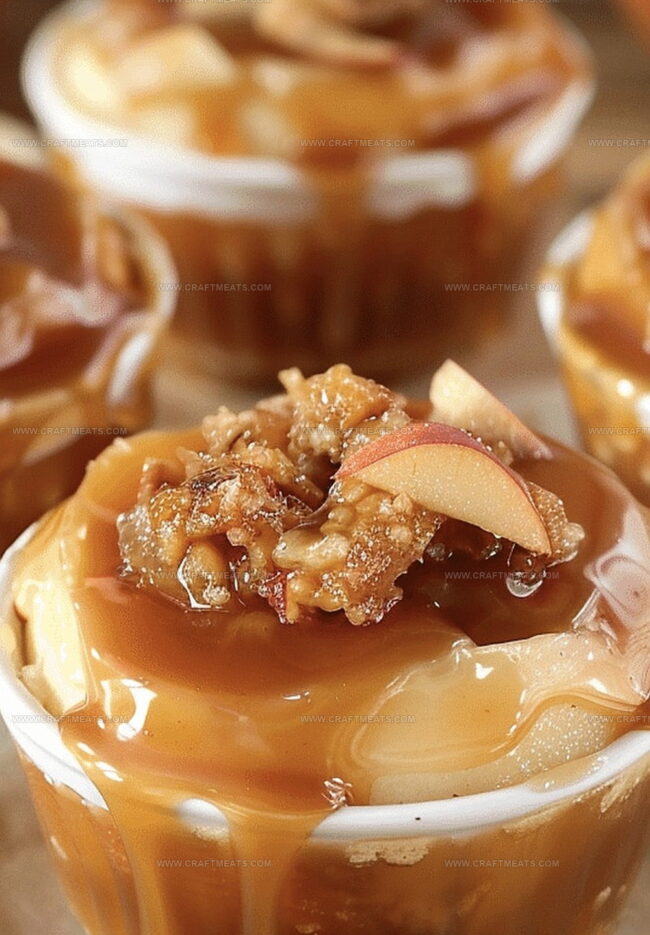
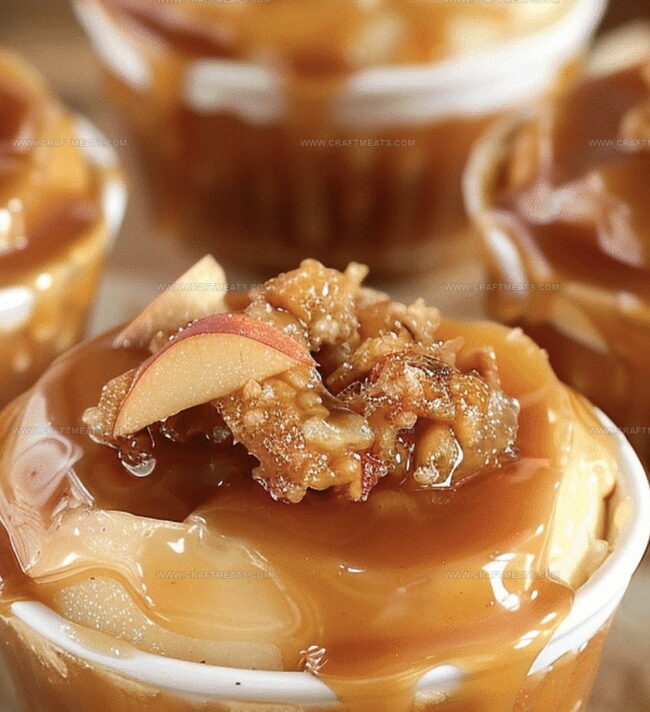
Select charming small cups as your canvas. Begin with a generous spoonful of caramelized apple goodness. Follow with a pillowy layer of creamy mixture. Repeat these delightful layers, ending with a cloud-like cream top that beckons to be devoured.
Drizzle rich caramel sauce in elegant streams across the surface. Sprinkle with crushed graham crackers or toasted nuts for a delightful crunch that adds texture and excitement.
Tuck your creation into the refrigerator for one hour. This resting time allows flavors to mingle and develop a perfect harmony. Serve chilled and watch faces light up with pure dessert joy.
Flavor Twists For Caramel Apple Dessert Cups
Serving Caramel Apple Dessert Cups At Parties
How To Chill And Store Caramel Apple Dessert Cups
Print
Dreamy Caramel Apple Dessert Cups Recipe
- Total Time: 27 minutes
- Yield: 3 1x
Description
Homemade caramel apple dessert cups blend autumn’s richest flavors into a delightful handheld treat. Crisp pastry shells cradle warm spiced apples drizzled with smooth caramel, offering sweet comfort in each delectable bite.
Ingredients
- 1 cup (240 ml) heavy whipping cream
- 4 oz (113 g) cream cheese, softened
- 3 medium apples, peeled, cored, and diced
- ½ cup (120 ml) caramel sauce, store-bought or homemade
- 2 tbsps (30 ml) brown sugar
- ¼ cup (60 ml) powdered sugar
- 1 tbsp (15 ml) butter
- 1 tsp (5 ml) lemon juice
- 1 tsp (5 ml) cinnamon
- 1 tsp (5 ml) vanilla extract
- ¼ tsp (1.25 ml) nutmeg
- Crushed graham crackers or chopped nuts (optional, for garnish)
Instructions
- Caramelize Apples: Melt butter in a skillet over medium heat. Add diced apples, brown sugar, cinnamon, nutmeg, and lemon juice. Simmer for 5-7 minutes until apples are tender yet structured. Cool the mixture completely.
- Prepare Cream Filling: Beat cream cheese until smooth. Mix in powdered sugar and vanilla extract. Whip heavy cream to soft peaks. Fold whipped cream into cream cheese mixture, creating a light, airy filling.
- Assemble Dessert Layers: Layer caramelized apples into individual serving cups. Add cream filling, creating textural contrast. Repeat layering, finishing with a cream topping.
- Enhance and Garnish: Drizzle caramel sauce over each cup. Sprinkle crushed graham crackers or toasted nuts on top for added crunch and visual appeal.
- Chill and Serve: Refrigerate dessert cups for at least one hour, allowing flavors to meld and layers to set. Serve chilled, presenting a refreshing and indulgent dessert.
Notes
- Choose Fresh Apples: Select crisp, firm apples like Granny Smith or Honeycrisp for the best caramelization and texture, ensuring they hold their shape during cooking.
- Control Caramelization Temperature: Keep heat at medium and stir frequently to prevent burning, allowing apples to softly caramelize without becoming mushy or bitter.
- Prevent Cream Separation: Ensure cream cheese is at room temperature before mixing and fold whipped cream gently to maintain a smooth, light consistency without deflating the mixture.
- Customize Dietary Needs: Swap graham crackers with gluten-free alternatives, use low-fat cream cheese for lighter version, or replace heavy cream with coconut cream for dairy-free option.
- Prep Time: 20 minutes
- Cook Time: 7 minutes
- Category: Desserts
- Method: Mixing
- Cuisine: American
Nutrition
- Serving Size: 3
- Calories: 320
- Sugar: 28 g
- Sodium: 150 mg
- Fat: 24 g
- Saturated Fat: 14 g
- Unsaturated Fat: 8 g
- Trans Fat: 0 g
- Carbohydrates: 30 g
- Fiber: 2 g
- Protein: 3 g
- Cholesterol: 70 mg
Liam O’Sullivan
Founder & Culinary Content Creator
Expertise
Recipe Development, Traditional Irish and European Cuisines, Food Styling and Photography, Culinary Education
Education
Dublin Institute of Technology (DIT) – School of Culinary Arts and Food Technology
Ballymaloe Cookery School
Isabella brings a global spark to the Craft Meats table. Born in Florence and trained at the Apicius International School of Hospitality, she blends classic Italian flavor with modern writing that’s easy to follow and hard to forget.
Her additional training at the Italian Chef Academy fueled her love for well-crafted dishes, especially ones that spotlight beautiful cuts of meat.
She’s a food writer with heart, and a deep love for storytelling through single recipes. Her goal? To help you cook with more confidence and a little more joy, no matter where you start.