Cookie Dough Preparation Mixing butter, sugars, and eggs creates a delightful base for our delicious treats. Cream together softened butter with both sugars until the mixture looks light and airy, which takes about 2-3 minutes.
Ingredient Blending Gently incorporate eggs one at a time, ensuring smooth incorporation. Add vanilla extract for an extra flavor boost.
Dry Ingredient Magic Whisk flour, baking soda, and salt in a separate bowl. Slowly fold dry ingredients into wet mixture, being careful not to overmix. Sprinkle chocolate chips throughout the dough.
Baking Setup Position oven rack in the middle and warm to 350F. Cover baking sheets with parchment paper for easy cookie removal.
Dough Portioning Scoop small mounds of cookie dough, keeping them approximately 2 inches apart. This allows cookies space to spread beautifully during baking.
Baking Performance Slide sheets into preheated oven. Bake for 10-12 minutes until edges turn golden and centers remain slightly soft. Allow cookies to rest on baking sheets for 5 minutes before transferring to cooling rack.
Ice Cream Flavor Variations To Pair With Chocolate Chip Cookies
Chilling Dough Magic: Refrigerate cookie dough for 30 minutes before baking to prevent excessive spreading and create thicker, chewier cookies with more concentrated flavor.
Dairy-Free Delight: Swap butter with coconut oil or vegan margarine and use dairy-free chocolate chips to create a delicious plant-based version of these ice cream sandwiches.
Size Matters: For uniform cookies, use a cookie scoop or ice cream scoop to ensure consistent sizing and perfect sandwich matching when assembling the final treat.
Flavor Exploration: Experiment with different ice cream flavors like mint chocolate chip, coffee, or salted caramel to create unique and exciting ice cream sandwich combinations that surprise and delight taste buds.
Make-Ahead Brilliance: Bake cookies in advance and freeze them between layers of parchment paper, allowing you to assemble sandwiches quickly when a sweet craving strikes or unexpected guests arrive.
Serving Chocolate Chip Ice Cream Sandwiches Without Mess
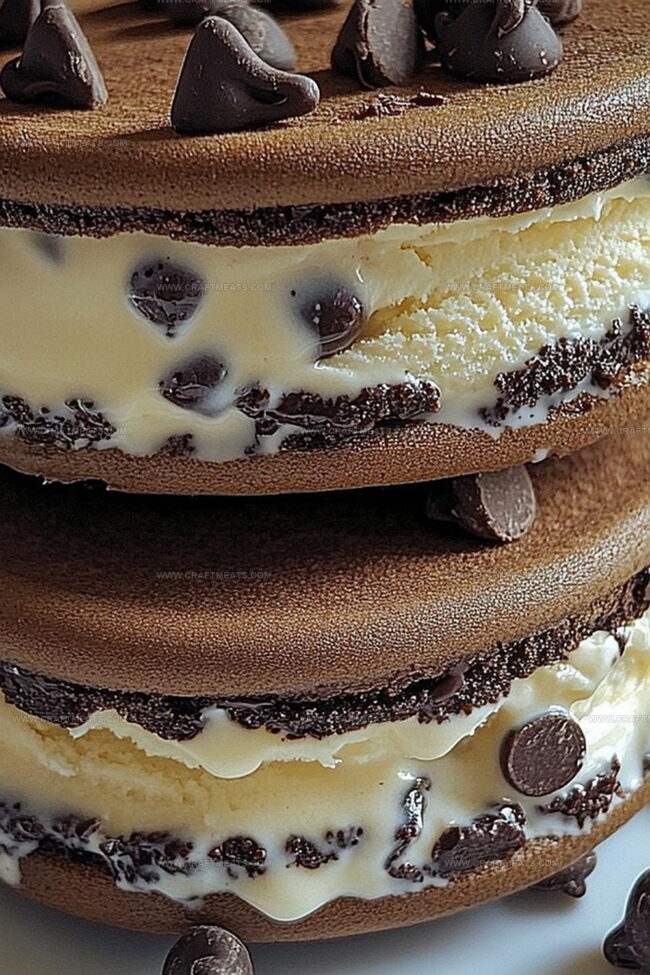
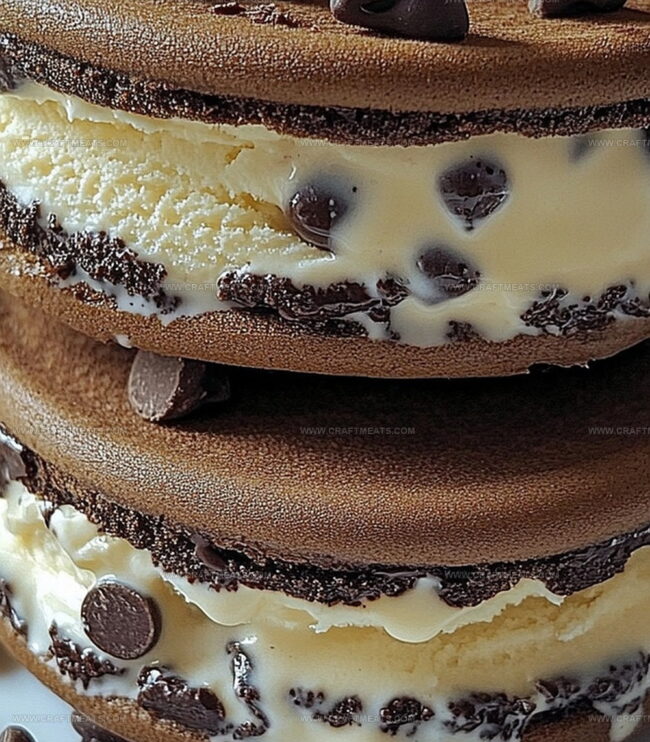
Frozen Flavor Explosion: Sandwich two cooled chocolate chip cookies around a scoop of your favorite ice cream flavor for a classic treat.
Gourmet Twist: Experiment with premium ice cream flavors like salted caramel, mint chocolate chip, or rich vanilla bean to elevate the dessert.
Decadent Dip: Roll the edges of the ice cream sandwich in mini chocolate chips, chopped nuts, or colorful sprinkles for extra texture and visual appeal.
Party-Ready Prep: Make these sandwiches ahead of time and wrap individually in plastic wrap, then freeze for up to a week for easy entertaining or quick dessert options.
Freezing Chocolate Chip Ice Cream Sandwiches The Right Way
Smart Freezing Strategy: Wrap individual ice cream sandwiches tightly in plastic wrap or wax paper, then store them in a freezer-safe container to prevent freezer burn and maintain their delicious texture.
Refrigerator Timing: Cookies can stay fresh in an airtight container at room temperature for up to 5 days, ensuring maximum flavor and softness before assembling the ice cream sandwiches.
Batch Preparation Magic: Make a large batch of cookies ahead of time and freeze them separately. When ready to serve, simply soften ice cream and create sandwiches for quick and easy dessert assembly.
Temperature Control Trick: Keep assembled ice cream sandwiches frozen at 0°F (-18°C) for maximum quality. Consume within 2 weeks for the best taste and texture, preventing ice crystals from forming and maintaining the cookies’ crisp edges.
Homemade chocolate chip ice cream sandwiches merge classic cookie magic with creamy frozen delight. Cool summer treats satisfy sweet cravings with minimal kitchen effort. Guests will devour these nostalgic desserts.
Ingredients
Scale
1 quart (4 cups / 960 ml) vanilla ice cream
2 cups (350 g / 12.3 oz) semi-sweet chocolate chips
1 cup (230 g / 8.1 oz) unsalted butter, softened
1 cup (200 g / 7 oz) granulated sugar
1 cup (220 g / 7.8 oz) brown sugar, packed
3 cups (375 g / 13.2 oz) all-purpose flour
2 large eggs
2 tsps vanilla extract
1 tsp baking soda
½ tsp salt
Instructions
Preheat Preparation: Configure oven to 350F (175C) and line baking sheets with parchment paper for optimal cookie development.
Mixture Fusion: Utilize electric mixer to whip butter and sugars until light and fluffy, creating a smooth foundational base for the cookie dough.
Liquid Integration: Introduce eggs one at a time, blending thoroughly, then infuse vanilla extract to elevate flavor profile and enhance overall taste complexity.
Dry Component Blend: Meticulously sift flour, baking soda, and salt in a separate bowl, ensuring uniform distribution and eliminating potential clumping.
Dough Compilation: Delicately combine wet and dry ingredients, minimizing mixing to maintain tenderness, then gently incorporate chocolate chips throughout the mixture.
Cookie Formation: Scoop dough onto prepared sheets, spacing strategically to allow natural spreading during the baking process, creating uniform cookies.
Baking Transformation: Roast in preheated oven for 10-12 minutes until edges turn golden brown while preserving a soft, pillowy center, indicating perfect doneness.
Cooling Protocol: Rest cookies briefly on baking sheets to stabilize structure, then transfer to cooling rack, allowing complete temperature equalization.
Sandwich Construction: Once cookies reach room temperature, assemble decadent ice cream sandwiches by nestling premium frozen filling between two perfectly crafted cookie layers.
Notes
Prevent Overmixing: Stir ingredients gently to maintain a soft, tender cookie texture without developing tough gluten strands.
Temperature Matters: Let butter and eggs reach room temperature for smoother mixing and better cookie consistency.
Consistent Cookie Size: Use a tablespoon or cookie scoop to create uniform cookies that bake evenly and look professionally made.
Cooling Technique: Allow cookies to rest on baking sheet for 2-3 minutes before transferring to wire rack, preventing potential breakage and helping them set properly.
Recipe Development, Traditional Irish and European Cuisines, Food Styling and Photography, Culinary Education
Education
Dublin Institute of Technology (DIT) – School of Culinary Arts and Food Technology
Degree: Bachelor of Arts in Culinary Arts
Focus: Comprehensive training in classical and modern cooking techniques, kitchen management, and menu development.
Ballymaloe Cookery School
Program: 12-Week Certificate Course
Focus: Intensive, hands-on experience emphasizing farm-to-table cooking and sustainable practices.
Isabella brings a global spark to the Craft Meats table. Born in Florence and trained at the Apicius International School of Hospitality, she blends classic Italian flavor with modern writing that’s easy to follow and hard to forget.
Her additional training at the Italian Chef Academy fueled her love for well-crafted dishes, especially ones that spotlight beautiful cuts of meat.
She’s a food writer with heart, and a deep love for storytelling through single recipes. Her goal? To help you cook with more confidence and a little more joy, no matter where you start.


Liam O’Sullivan
Founder & Culinary Content Creator
Expertise
Recipe Development, Traditional Irish and European Cuisines, Food Styling and Photography, Culinary Education
Education
Dublin Institute of Technology (DIT) – School of Culinary Arts and Food Technology
Ballymaloe Cookery School
Isabella brings a global spark to the Craft Meats table. Born in Florence and trained at the Apicius International School of Hospitality, she blends classic Italian flavor with modern writing that’s easy to follow and hard to forget.
Her additional training at the Italian Chef Academy fueled her love for well-crafted dishes, especially ones that spotlight beautiful cuts of meat.
She’s a food writer with heart, and a deep love for storytelling through single recipes. Her goal? To help you cook with more confidence and a little more joy, no matter where you start.