Party-Perfect Birthday Cookie Bars Recipe for Sweet Celebrations
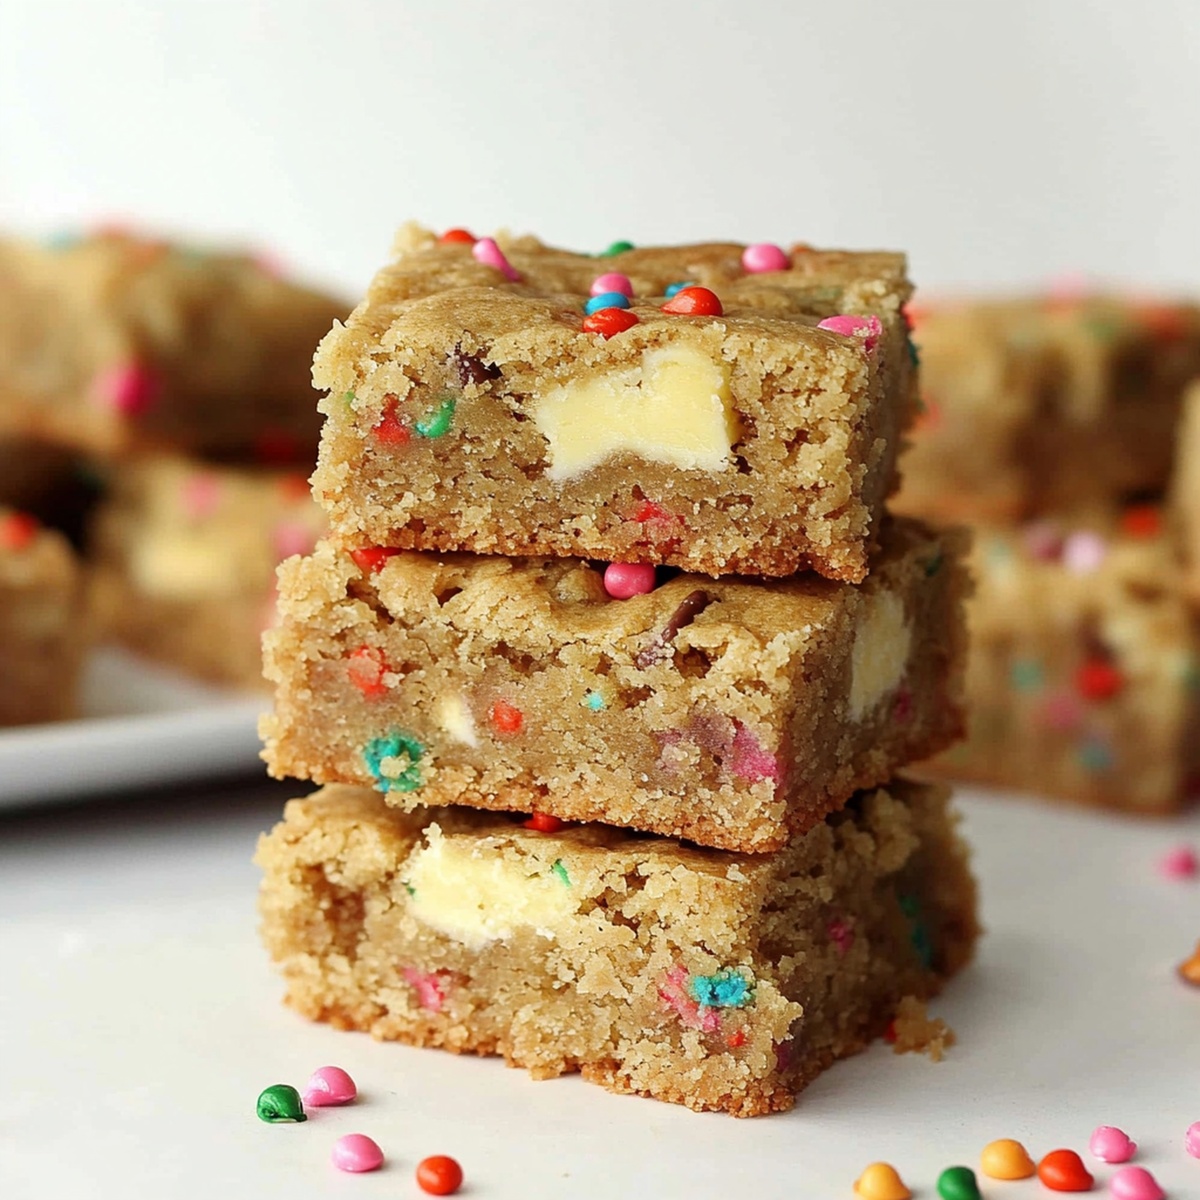
Celebrating special moments calls for something sweet and irresistible like these decadent birthday cookie bars that blend childhood nostalgia with pure indulgence.
Packed with colorful sprinkles and a rich, buttery base, these bars capture the essence of birthday joy.
Soft yet slightly crisp edges give way to a chewy center bursting with festive flavor.
The combination of classic chocolate chip and birthday cake elements creates a treat that sparks instant happiness.
Creamy and rich, these bars promise to turn any ordinary day into a celebration.
Each bite delivers a perfect balance of sweetness and texture that will have everyone asking for seconds.
Dive into this delightful recipe and watch as smiles light up the room.
Quick Recipe Overview
What Goes Into Birthday Cookie Bars
For Dry Ingredients:For Wet Ingredients:For Mix-Ins and Toppings:Tools For Baking Birthday Cookie Bars With Ease
Steps To Make Birthday Cookie Bars Pop With Color
Warm up your kitchen companion to a cozy 350 degrees. Grab a rectangular baking vessel and line it with a smooth parchment blanket, ensuring every corner is covered.
In a roomy bowl, dance together flour, rising agents, and a pinch of salt. These dry friends will create magic later.
Melt butter into a golden pool, then welcome sugar crystals. Whisk until they become best friends. Introduce eggs and vanilla, creating a silky smooth landscape that promises deliciousness.
Gently marry the dry and wet worlds, folding them together with tender care. Sprinkle in colorful confetti and white chocolate treasures, spreading joy throughout the mixture.
Press your dazzling creation into the prepared pan, smoothing it like a gentle landscape. Scatter extra sprinkles on top for a playful finish.
Slide the pan into the heated embrace of the oven. Watch for golden edges and a center that whispers “I’m ready” – about 20 magical minutes.
Allow your creation to cool completely. Lift the parchment, slice into celebration squares, and enjoy the burst of birthday cheer in every bite.
Tips To Bake Birthday Cookie Bars That Wow
How To Serve Birthday Cookie Bars At Every Celebration
Store Birthday Cookie Bars Without Drying Out
Print
Festive Birthday Cookie Bars Recipe
- Total Time: 40 minutes
- Yield: 15 1x
Description
Indulgent birthday cookie bars combine classic chocolate chip cookies with festive birthday cake flavors. Sprinkles and rich frosting create a celebratory dessert you’ll love to share with friends and family.
Ingredients
- 1 cup (226 g) unsalted butter, melted and slightly cooled
- 2 ¼ cups (280 g) all-purpose flour
- 1 cup (200 g) granulated sugar
- ½ cup (100 g) packed light brown sugar
- 1 large egg
- 1 large egg yolk
- 2 tsps vanilla extract
- ½ tsp baking powder
- ¼ tsp baking soda
- ¼ tsp salt
- ½ cup (80 g) rainbow sprinkles (plus extra for topping)
- Optional: ½ cup (85 g) white chocolate chips or birthday cake-flavored chips
Instructions
- Preheat Preparation: Position oven rack to center and warm to 350F (175C), while lining a 9×13-inch pan with parchment paper for effortless extraction.
- Dry Ingredient Fusion: Whisk flour, baking powder, baking soda, and salt in a bowl until perfectly blended, creating a uniform dry foundation.
- Wet Mixture Development: Melt butter and combine with granulated and brown sugars, whisking until achieving a smooth, glossy consistency.
- Liquid Base Enhancement: Integrate whole egg, additional egg yolk, and vanilla extract, blending thoroughly to create a rich, cohesive mixture.
- Dough Formation: Gently fold dry ingredients into wet components, minimizing stirring to maintain a tender, delicate texture, creating a soft cookie dough.
- Flavor and Texture Incorporation: Carefully fold white chocolate chips and vibrant sprinkles throughout the dough, ensuring even distribution for maximum taste and visual excitement.
- Pan Preparation and Baking: Spread dough evenly in prepared pan, generously scatter additional sprinkles on top, then bake for 20-25 minutes until edges turn golden and center sets firmly.
- Cooling and Cutting: Allow bars to cool completely in the pan, which helps them stabilize and become easily sliceable, then lift out using parchment paper edges and cut into precise, elegant squares.
Notes
- Prevent Overmixing: Stir the dry and wet ingredients minimally to maintain a tender, soft texture and avoid tough, dense cookie bars.
- Temperature Control: Allow melted butter to cool slightly before mixing to prevent cooking the eggs and ensure a smooth, cohesive batter.
- Sprinkle Distribution: Gently fold chocolate chips and sprinkles to prevent color bleeding and maintain their vibrant appearance throughout the bars.
- Cooling Technique: Let the bars cool completely in the pan to set the structure, making cutting cleaner and preventing crumbling during slicing.
- Prep Time: 15 minutes
- Cook Time: 20-25 minutes
- Category: Desserts, Snacks
- Method: Baking
- Cuisine: American
Nutrition
- Serving Size: 15
- Calories: 250
- Sugar: 18 g
- Sodium: 90 mg
- Fat: 12 g
- Saturated Fat: 7 g
- Unsaturated Fat: 4 g
- Trans Fat: 0 g
- Carbohydrates: 36 g
- Fiber: 1 g
- Protein: 2 g
- Cholesterol: 40 mg
Liam O’Sullivan
Founder & Culinary Content Creator
Expertise
Recipe Development, Traditional Irish and European Cuisines, Food Styling and Photography, Culinary Education
Education
Dublin Institute of Technology (DIT) – School of Culinary Arts and Food Technology
Ballymaloe Cookery School
Isabella brings a global spark to the Craft Meats table. Born in Florence and trained at the Apicius International School of Hospitality, she blends classic Italian flavor with modern writing that’s easy to follow and hard to forget.
Her additional training at the Italian Chef Academy fueled her love for well-crafted dishes, especially ones that spotlight beautiful cuts of meat.
She’s a food writer with heart, and a deep love for storytelling through single recipes. Her goal? To help you cook with more confidence and a little more joy, no matter where you start.