
Jolly Rudolph Christmas Cheese Ball Recipe: A Festive Party Hit!
This festive holiday cheese ball sparkles with playful rudolph christmas cheese ball recipe charm that delights guests at every seasonal gathering.
Red-nosed reindeer enthusiasts will adore this whimsical appetizer perfect for Christmas parties.
Creamy cheese blends with zesty seasonings to create a reindeer-themed treat that stands out on any appetizer spread.
Guests will marvel at the clever design that captures the spirit of beloved holiday characters.
Decorated with pretzels, olives, and creative details, this cheese ball transforms an ordinary snack into a memorable celebration centerpiece.
Bring some extra cheer to your holiday table with this delightful and crowd-pleasing recipe that promises to become a new tradition.
Quick Recipe Overview
Rudolph Christmas Cheese Ball Ingredient List
For Cheese Base:For Seasoning Blend:For Decoration and Texture:Supplies For Rudolph Christmas Cheese Ball
How To Shape Rudolph Christmas Cheese Ball
Blend creamy ingredients together in a mixing bowl until smooth and consistent. The key is getting a perfect texture that will hold its shape when chilled. Mix everything thoroughly so no lumps remain, creating a delightful base for your festive appetizer.
Wrap the mixture tightly in plastic and let it rest in the refrigerator. This cooling period helps the cheese ball firm up and makes it easier to shape. Give it at least an hour to set completely, allowing flavors to meld and consistency to become perfect.
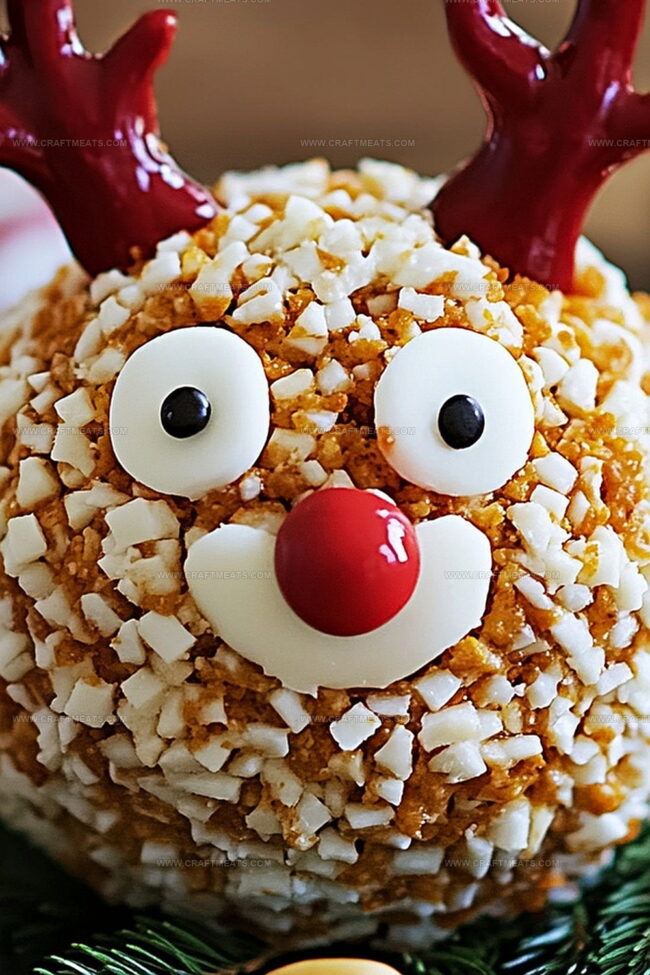
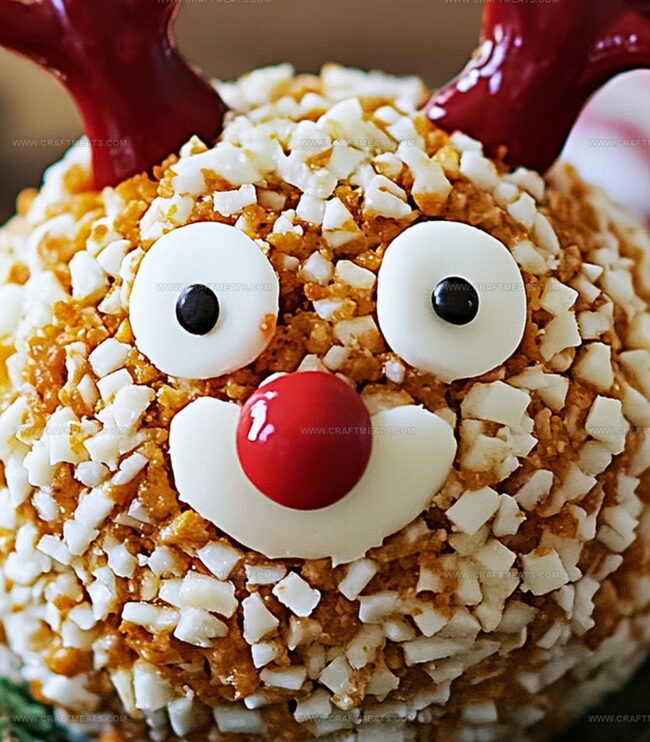
Cover the chilled cheese ball with crushed nuts, creating a textured exterior that looks like furry reindeer skin. Carefully place pretzel sticks as antlers, positioning them just right to capture Rudolph’s playful spirit. Add candy eyes and a bright red accent to bring the character to life.
Transfer your adorable Rudolph cheese ball to a festive serving plate. Arrange crackers or veggie sticks around the edge, inviting guests to dive into this whimsical holiday treat. Watch as people smile and enjoy this creative seasonal appetizer.
Tips For Rudolph Christmas Cheese Ball Fun
How To Serve Rudolph Christmas Cheese Ball Festive
How To Store Rudolph Christmas Cheese Ball Safely
Print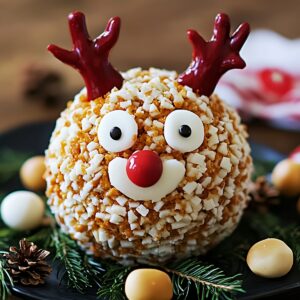
Festive Rudolph Christmas Cheese Ball Recipe
- Total Time: 1 hour 15 minutes
- Yield: 11 1x
Description
Rudolph the Red-Nosed Reindeer Cheese Ball sparkles with holiday cheer, blending cream cheese, cheddar, and festive garnishes. Peppers, olives, and nuts create a whimsical reindeer face that guests will adore and devour at seasonal gatherings.
Ingredients
- 8 oz (226 g) cream cheese, softened
- 2 cups shredded cheddar cheese
- ¼ cup sour cream
- ¼ tsp garlic powder
- ¼ tsp onion powder
- ¼ tsp smoked paprika
- Salt to taste
- Pepper to taste
- ¼ cup crushed pecans or crushed pretzels
- 2 large pretzel sticks
- 1 red candy or cherry tomato
- 2 candy eyes or small rounds of cream cheese/olives
Instructions
- Mixing: Vigorously combine cream cheese, cheddar, sour cream, garlic powder, onion powder, paprika, salt, and pepper until achieving a silky, homogeneous texture.
- Shaping: Mold the creamy mixture into a compact, smooth spherical form, eliminating any air pockets for a dense consistency.
- Chilling: Wrap the cheese ball securely in plastic film and refrigerate for one hour to allow flavors to intensify and structure to solidify.
- Coating: Meticulously roll the chilled sphere through crushed pecans or pretzels, ensuring an even, crunchy exterior coverage.
- Decorating: Playfully transform the cheese ball into Rudolph by carefully positioning candy eyes, inserting pretzel stick antlers at a natural angle, and crowning with a vibrant red candy or cherry tomato to represent his signature glowing nose.
- Serving: Artfully arrange on a festive platter alongside an array of crisp crackers, pretzels, or fresh vegetable sticks for an interactive holiday appetizer experience.
Notes
- Chill Thoroughly: Refrigerate the cheese ball for at least 1 hour to ensure firm texture and melded flavors, preventing crumbly consistency.
- Smooth Blending Technique: Mix ingredients gradually and evenly, using a spatula or electric mixer to eliminate lumps and create a perfectly smooth base.
- Coating Precision: Roll the cheese ball gently through nuts or pretzels, ensuring complete and even coverage without breaking the delicate sphere.
- Decorative Flexibility: Swap red candy or cherry tomato with alternative red elements like roasted red pepper or small red bell pepper piece for different visual appeal.
- Prep Time: 15 minutes
- Cook Time: 1 hour
- Category: Appetizer, Snacks
- Method: Mixing
- Cuisine: American
Nutrition
- Serving Size: 11
- Calories: 200
- Sugar: 2 g
- Sodium: 300 mg
- Fat: 15 g
- Saturated Fat: 8 g
- Unsaturated Fat: 5 g
- Trans Fat: 0 g
- Carbohydrates: 10 g
- Fiber: 1 g
- Protein: 7 g
- Cholesterol: 40 mg
Liam O’Sullivan
Founder & Culinary Content Creator
Expertise
Recipe Development, Traditional Irish and European Cuisines, Food Styling and Photography, Culinary Education
Education
Dublin Institute of Technology (DIT) – School of Culinary Arts and Food Technology
Ballymaloe Cookery School
Isabella brings a global spark to the Craft Meats table. Born in Florence and trained at the Apicius International School of Hospitality, she blends classic Italian flavor with modern writing that’s easy to follow and hard to forget.
Her additional training at the Italian Chef Academy fueled her love for well-crafted dishes, especially ones that spotlight beautiful cuts of meat.
She’s a food writer with heart, and a deep love for storytelling through single recipes. Her goal? To help you cook with more confidence and a little more joy, no matter where you start.