
Joyful Christmas Fudge Recipe for Gifting and Sharing
Sweet memories melt together with this classic christmas fudge recipe that brings warmth to every holiday gathering.
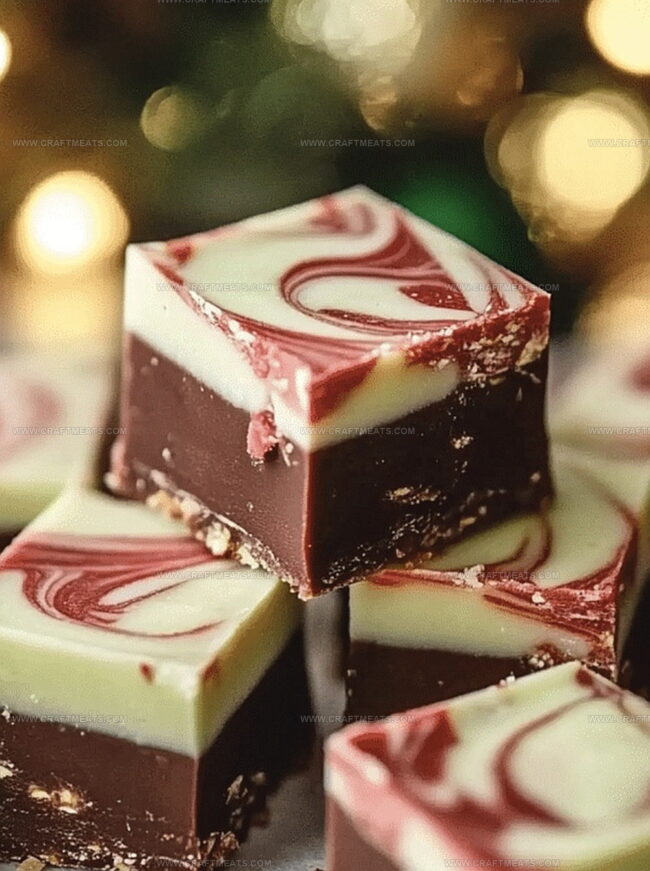
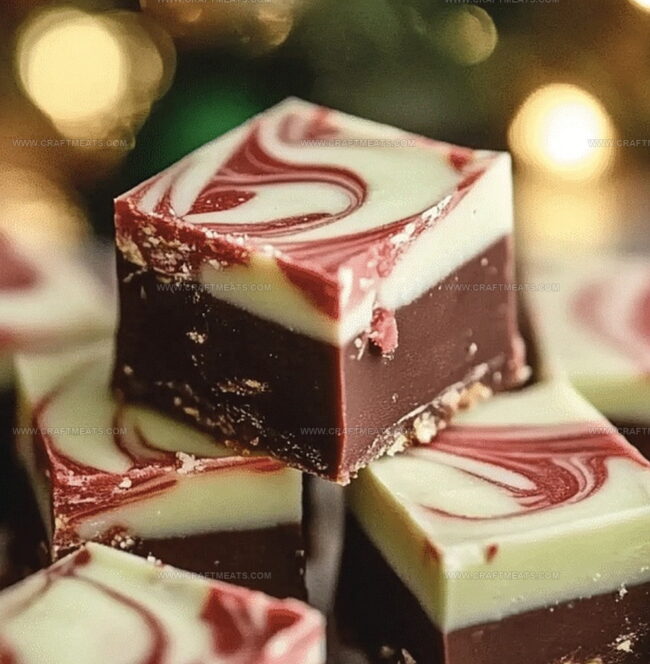
Creamy chocolate swirls create a decadent treat everyone craves during festive seasons.
Rich and smooth, the fudge captures the essence of Christmas celebrations.
Each bite transports you to cozy moments filled with laughter and joy.
The simple ingredients blend seamlessly to create a dessert that sparks nostalgia and delight.
Indulgent and comforting, this fudge promises to become a cherished tradition at your holiday table.
Dive into this delectable recipe and spread some sweet cheer this season.
Quick Recipe Overview
Ingredients In The Joy Of Christmas Fudge
For Fudge Base:For Mix-Ins and Optional Add-Ins:For Serving and Presentation:What Tools You’ll Need For The Joy Of Christmas Fudge
How To Make The Joy Of Christmas Fudge
Create a cozy kitchen area with clean surfaces and all your chocolate-making gear ready. Make sure you have a comfortable space to craft your sweet treat.
Grab a medium saucepan and combine chocolate chips, sweetened condensed milk, and butter. Gently melt these ingredients over low heat, stirring until everything transforms into a silky smooth mixture. Remove from heat when perfectly blended.
Splash in some vanilla extract, stirring gently to infuse the entire mixture with rich, warm flavor. This secret ingredient adds depth to your chocolate creation.
Pour the glossy chocolate mixture into a lined baking pan. If you’re feeling adventurous, sprinkle crushed peppermint, colorful sprinkles, or chopped nuts across the top. Press them gently into the surface so they stick.
Slide your pan into the refrigerator and let the fudge chill for a couple of hours until it’s firm and set. Once ready, lift the fudge out using the parchment paper and slice into bite-sized squares.
Arrange your chocolate squares on a festive platter or wrap individual pieces in pretty paper for gifting. Watch as friends and family’s eyes light up with delight.
Festive Tips For The Joy Of Christmas Fudge
How To Serve The Joy Of Christmas Fudge
Store The Joy Of Christmas Fudge Right
Print
Heavenly Christmas Fudge Recipe
- Total Time: 2 hours 10 minutes
- Yield: 11 1x
Description
Christmas fudge delivers a rich, creamy delight of holiday cheer. Chocolate, marshmallow, and festive sprinkles combine for a sweet treat that delights families and friends during seasonal celebrations.
Ingredients
- 3 cups (525 g) semi-sweet chocolate chips
- 1 can (14 oz/397 g) sweetened condensed milk
- ¼ cup (60 g) unsalted butter, cut into pieces
- ½ cup chopped nuts (walnuts, pecans, or almonds)
- ½ cup crushed peppermint candies or candy canes
- 1 tsp vanilla extract
- ¼ cup red and green sprinkles
- Mini marshmallows
Instructions
- Preparation: Line a rectangular baking pan with parchment paper, allowing slight overhang for easy removal. Lightly grease the paper with cooking spray to prevent sticking.
- Chocolate Fusion: In a medium saucepan, combine chocolate chips, sweetened condensed milk, and butter. Melt ingredients over low heat, stirring continuously until achieving a smooth, glossy consistency. Remove from heat and incorporate vanilla extract, ensuring thorough blending.
- Texture Enrichment: Optional step involves gently folding chopped nuts or miniature marshmallows into the molten chocolate mixture, creating delightful textural contrast.
- Molding and Decoration: Pour the fudge mixture into the prepared pan, spreading evenly with a spatula. Embellish the surface with crushed peppermint candies or festive sprinkles, gently pressing to secure toppings.
- Setting and Serving: Refrigerate for a minimum of two hours until completely firm. Remove from pan using parchment paper edges, then slice into precise, bite-sized squares with a sharp knife. Display on an elegant platter or package individually for a festive holiday gift.
Notes
- Melt Carefully: Use low, gentle heat to prevent chocolate from burning or seizing, which can ruin the smooth texture of the fudge.
- Prevent Sugar Crystallization: Stir consistently during melting to ensure even heat distribution and avoid grainy texture in the final product.
- Customize Creatively: Experiment with different mix-ins like crushed cookies, dried fruits, or alternative extracts to personalize your fudge flavor profile.
- Chill Completely: Allow full refrigeration time to achieve the perfect firm consistency and clean, crisp cutting lines for professional-looking squares.
- Prep Time: 10 minutes
- Cook Time: 2 hours
- Category: Desserts, Snacks
- Method: Mixing
- Cuisine: American
Nutrition
- Serving Size: 11
- Calories: 310
- Sugar: 35 g
- Sodium: 70 mg
- Fat: 15 g
- Saturated Fat: 9 g
- Unsaturated Fat: 6 g
- Trans Fat: 0 g
- Carbohydrates: 39 g
- Fiber: 1 g
- Protein: 3 g
- Cholesterol: 20 mg
Liam O’Sullivan
Founder & Culinary Content Creator
Expertise
Recipe Development, Traditional Irish and European Cuisines, Food Styling and Photography, Culinary Education
Education
Dublin Institute of Technology (DIT) – School of Culinary Arts and Food Technology
Ballymaloe Cookery School
Isabella brings a global spark to the Craft Meats table. Born in Florence and trained at the Apicius International School of Hospitality, she blends classic Italian flavor with modern writing that’s easy to follow and hard to forget.
Her additional training at the Italian Chef Academy fueled her love for well-crafted dishes, especially ones that spotlight beautiful cuts of meat.
She’s a food writer with heart, and a deep love for storytelling through single recipes. Her goal? To help you cook with more confidence and a little more joy, no matter where you start.