
Holiday Candy Recipe That Brings Big Cheer
Sweet holiday delights capture the magical essence of seasonal celebrations with irresistible charm.
candy crafting becomes an art form that connects generations through delectable memories.
Sugary confections sparkle with festive potential, inviting creativity and warmth into your kitchen.
Magical ingredients blend together, promising moments of pure joy and indulgence.
Homemade treats symbolize love, care, and the special spirit of shared happiness.
Crafting these delightful sweets allows you to sprinkle excitement into traditional gatherings.
Imagine the smiles and excitement as these delicious morsels bring everyone closer together.
Explore this recipe and create something truly memorable that will become a cherished tradition.
Why Holiday Delight Candy Is So Popular
Ingredients List for Holiday Delight Candy
Base and Crunch Layer:Sweet Coating Ingredients:Chocolate Topping:Additional Supporting Ingredients:Instructions for Holiday Delight Candy
Step 1: Prepare the Baking Pan
Preheat the oven to 400°F (204°C). Line a 10×15-inch jelly roll pan with nonstick aluminum foil, making sure the foil covers the edges completely. If using regular foil, lightly spray with baking spray to prevent sticking.
Step 2: Lay Out the Cracker Base
Create a single layer of saltine crackers across the pan’s bottom. Arrange them snugly, ensuring they cover the entire surface without gaps.
Step 3: Craft the Caramel Sauce
In a medium saucepan, combine:Heat the mixture over medium flame, stirring constantly. Watch for the butter to melt and the mixture to start bubbling. Boil for 30 seconds, making sure the sugar completely dissolves. Remove from heat and stir in vanilla extract.
Step 4: Bake the Cracker Base
Pour the hot caramel evenly over the crackers. Slide the pan into the preheated oven and bake for 5 minutes. Look for energetic bubbling across the caramel surface.
Step 5: Melt the Chocolate
Use a microwave-safe bowl to melt the chopped chocolate. Heat in 30-second bursts, stirring between each interval until smooth and glossy.
Step 6: Create the Chocolate Layer
Once the caramel base cools slightly, spread the melted chocolate evenly across the surface. Use a spatula to ensure a smooth, consistent coating.
Step 7: Chill and Slice
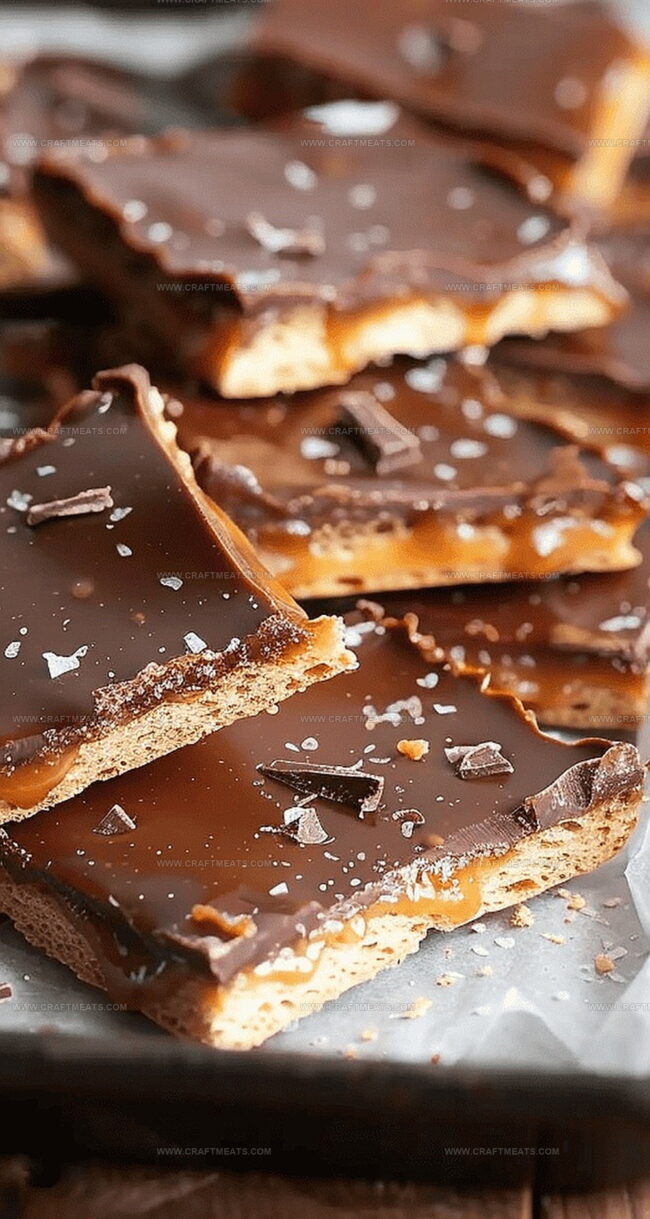
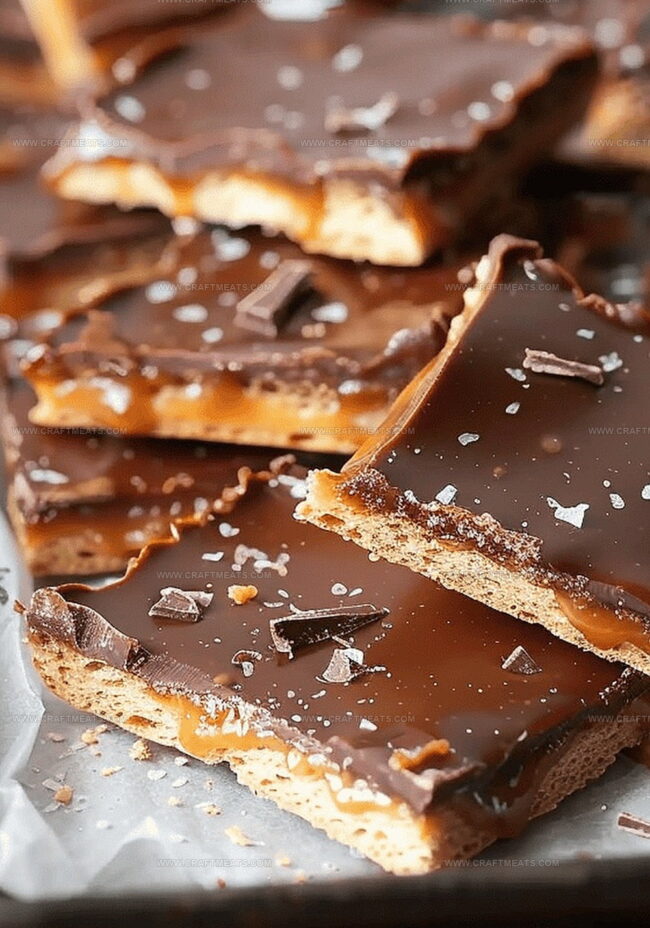
Let the pan cool to room temperature. Refrigerate overnight to set completely. Remove the candy slab, peel away the foil, and cut into delightful bite-sized pieces.
Serving Tip: Store in an airtight container in the refrigerator for up to one week. Bring to room temperature before serving for the best flavor and texture.
Holiday Delight Candy Tips and Tricks
Storing Holiday Delight Candy
Perfect Pairings for Holiday Delight Candy
Holiday Delight Candy Variations
FAQs for Holiday Delight Candy
Saltine crackers work best due to their thin, crispy texture. Alternatives might change the final taste and texture, so it’s recommended to stick with saltines.
Store in an airtight container in the refrigerator for up to 7-10 days. For best flavor and texture, keep them chilled.
Yes! Wrap pieces individually in plastic wrap, then store in a freezer-safe container for up to 3 months. Thaw in the refrigerator before serving.
Ensure you stir constantly and let the sugar fully dissolve. If it looks grainy, continue cooking and stirring until smooth and glossy.
Print
Holiday Delight Candy Recipe
- Total Time: 20 minutes
- Yield: 12 1x
Description
Festive holiday magic sparkles through this irresistible candy, blending rich chocolate and creamy peppermint into seasonal perfection. Sweet memories melt together, inviting you to savor each delightful bite of winter’s most cherished treat.
Ingredients
Main Ingredients:
- 1 cup (225 g or 2 sticks) unsalted butter
- 2 cups (10 to 12 ounces) chopped good-quality semi-sweet chocolate
- 28 to 35 saltine crackers (about one sleeve)
Sweetening Ingredients:
- 1 cup (220 g) firmly packed dark brown sugar
Flavoring and Seasoning:
- 1 teaspoon vanilla extract
- ¼ teaspoon kosher salt
Instructions
- Position an oven rack at the center and heat to 400°F (204°C). Create a non-stick surface in a 10×15-inch jelly roll pan by carefully lining it with aluminum foil, ensuring complete edge coverage.
- Create a solid foundation by arranging saltine crackers in a precise, uninterrupted layer across the pan’s bottom, eliminating any gaps between crackers.
- Construct a rich caramel sauce by combining dark brown sugar, unsalted butter, and kosher salt in a medium saucepan. Apply medium heat, stirring consistently until the mixture transforms into a smooth, bubbling liquid. Allow brief boiling to ensure complete sugar dissolution, then immediately incorporate vanilla extract and remove from heat.
- Drench the cracker base with the molten caramel, ensuring uniform distribution. Transfer the pan to the preheated oven and bake for 5 minutes, watching for vigorous caramel bubbling.
- Simultaneously, transform chocolate into a silky consistency using microwave technique. Heat in short 30-second bursts, stirring between intervals until achieving a completely smooth texture.
- After base slightly cools, generously spread the liquefied chocolate across the caramel layer, using a spatula to create a flawless, even coating.
- Allow the confection to settle at room temperature, then refrigerate overnight. Once completely solidified, carefully extract the candy slab, gently remove foil, and slice into elegant, bite-sized pieces.
Notes
- Versatile Treat Perfect for Gifting: This holiday candy combines sweet and salty flavors, making it an impressive homemade gift that looks professionally crafted.
- Precise Pan Preparation Matters: Nonstick foil or well-greased standard foil prevents sticking and ensures clean removal of the finished candy.
- Caramel Technique is Critical: Watch the caramel carefully while boiling to achieve a smooth, glossy texture without burning the sugar.
- Chocolate Melting Requires Gentle Handling: Use short microwave intervals and stir frequently to prevent chocolate from seizing or burning.
- Overnight Chilling Ensures Perfect Texture: Refrigerating allows the layers to set completely, creating a crisp, clean-breaking candy with distinct layers.
- Storage Tip for Longevity: Store in an airtight container in the refrigerator for up to two weeks, allowing you to prepare this treat well in advance of holiday gatherings.
- Prep Time: 15 minutes
- Cook Time: 5 minutes
- Category: Snacks, Desserts
- Method: Baking
- Cuisine: American
Nutrition
- Serving Size: 12
- Calories: 175
- Sugar: 15g
- Sodium: 50mg
- Fat: 12g
- Saturated Fat: 7g
- Unsaturated Fat: 5g
- Trans Fat: 0g
- Carbohydrates: 19g
- Fiber: 1g
- Protein: 1g
- Cholesterol: 30mg
Isabella Rossi
Founder & Culinary Content Creator
Expertise
Recipe Development, Traditional Irish and European Cuisines, Food Styling and Photography, Culinary Education
Education
Dublin Institute of Technology (DIT) – School of Culinary Arts and Food Technology
Ballymaloe Cookery School
Liam is the voice behind many of Craft Meats’ most flavorful features. With roots in Dublin’s smoky barbecue scene and a culinary degree from the Dublin Institute of Technology, he brings time-tested cooking techniques to life.
His training at Ballymaloe Cookery School sharpened his farm-to-table approach, giving him a deep respect for every ingredient he writes about.
He’s not about overcomplicating the process, just helping you cook meat that’s worth talking about. When he’s not writing or grilling, he’s out foraging or nerding out on regional spice blends to add to his next recipe.