
Holiday Delight Cookie Platter Recipe: Festive Joy on a Plate
Festive cookie platters spark joy during seasonal celebrations with their irresistible charm and delectable variety.
Sweet treats become magical centerpieces that draw people together in moments of shared happiness.
Delicate, crisp, and beautifully decorated cookies tell stories of tradition and creativity.
Crafting these edible masterpieces requires imagination, precision, and a sprinkle of culinary passion.
Skilled bakers understand that each cookie represents more than just a dessert—it’s an expression of love and connection.
Intricate designs and carefully selected flavors reimagine simple ingredients into memorable experiences.
Surprising combinations and unexpected textures will make you the star of any gathering.
You can create a stunning platter that becomes the highlight of your celebration.
How to Assemble a Showstopping Cookie Platter
All the Cookies You’ll Need for a Platter
Chocolates and Coatings:Cookie Base:Decorative Elements:How to Arrange and Present Your Cookies
Step 1: Melt Chocolate Magic
Gently warm chocolate in a microwave-safe bowl, stirring every 30 seconds until silky smooth. Use a rubber spatula to prevent scorching and ensure a glossy finish. Dark chocolate, milk chocolate, or white chocolate work wonderfully.
Step 2: Dunk Wafer Cookies
Carefully submerge wafer cookies into the melted chocolate, coating about three-quarters of each cookie. Use a fork to lift and tap off excess chocolate, creating a clean, even layer.
Ingredients for decorating:Step 3: Embellish With Festive Flair
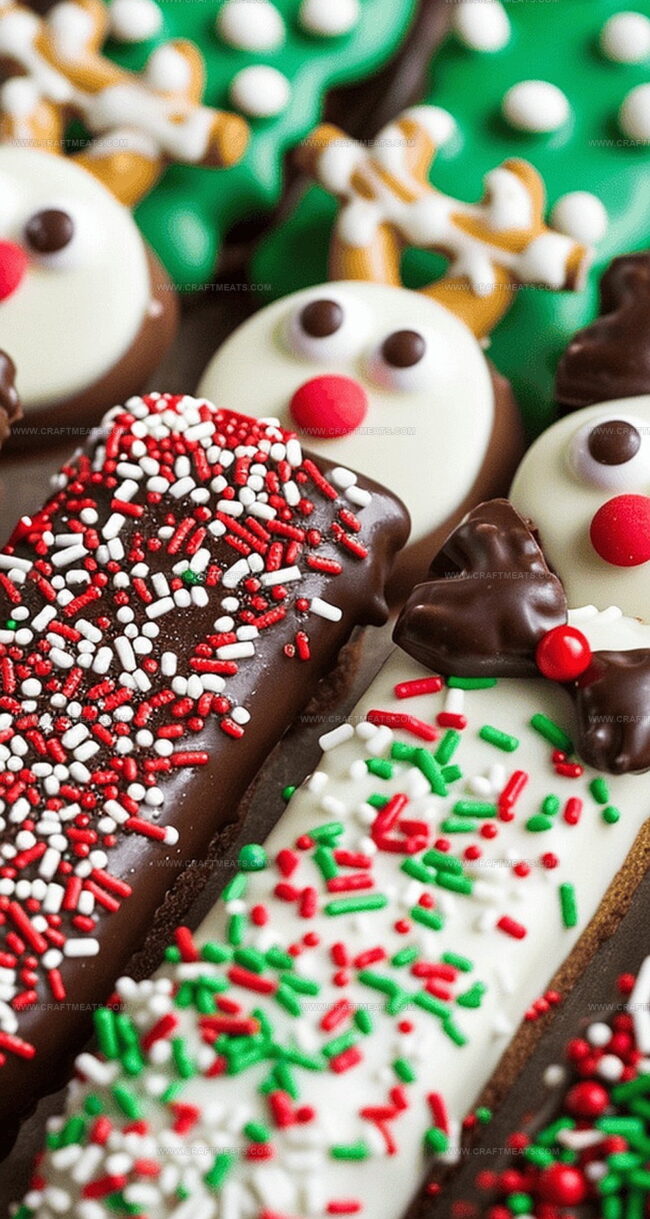
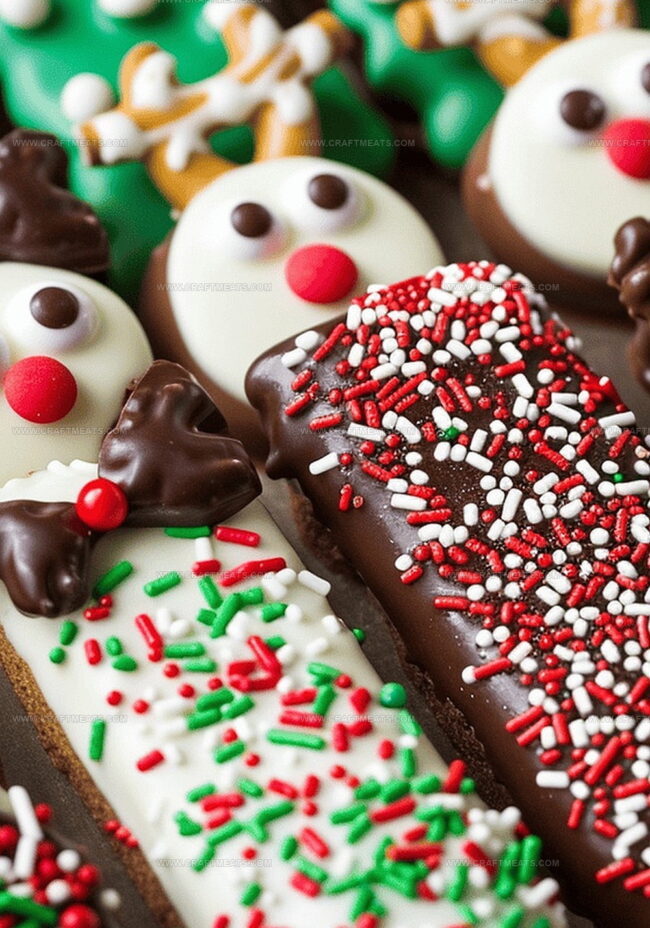
Quickly add decorations before the chocolate sets. Sprinkle toppings with a light touch, creating unique designs. Place decorated cookies on a parchment-lined tray to cool and harden.
Step 4: Craft Playful Reindeer Treats
Transform cookies into adorable reindeer faces using:Carefully attach each element to create whimsical characters.
Step 5: Create Vibrant Green Delights
Melt green candy melts using the same gentle technique as chocolate. Dip cookies and immediately add festive accents like:Step 6: Prepare Peppermint Bark Sensation
Spread melted chocolate on a parchment-lined baking sheet. Sprinkle crushed candy canes or peppermint pieces across the surface. Allow to completely set at room temperature or in the refrigerator.
Tips to Keep Cookies Fresh on the Platter
Storage Tips for Holiday Cookie Platters
Pairing Ideas for Platter Perfection
Cookie Platter Styling and Flavor Variations
Cookie Platter FAQs for Entertainers
The cookies will remain delicious for about 5-7 days when stored in an airtight container at room temperature, away from direct sunlight and heat.
Absolutely! You can prepare these cookies 2-3 days before your holiday party. Just keep them in a sealed container and they’ll stay fresh and festive.
No worries! You can use white chocolate with green food coloring as a perfect substitute. The result will be just as colorful and fun.
Yes! These cookies are perfect for family baking. Kids will love helping with dipping, decorating, and creating the cute reindeer faces using pretzels and candy.
Print
Holiday Delight Cookie Platter Recipe
- Total Time: 40 minutes
- Yield: 12 1x
Description
Festive Mexican wedding cookies sparkle with buttery richness and delicate powdered sugar coating. Crisp almond-infused circles melt gracefully, delivering sweet comfort that connects family traditions and holiday cheer.
Ingredients
Main Ingredients:
- 30 sugar wafer cookies
- 1 cup peppermint pieces
- 12 ounces (340 grams) pretzels
Chocolate and Candy Ingredients:
- 12 ounces (340 grams) melting chocolate wafers
- 12 ounces (340 grams) milk or dark chocolate
- 12 ounces (340 grams) green candy melts
- Red M&M candies
- Candy eyes
Decorative Ingredients:
- Sprinkles
- Green sanding sugar
- Red heart sprinkles
Instructions
- Chocolate Preparation
Gently melt the chocolate using a double boiler or microwave, stirring frequently to prevent burning. Ensure the chocolate reaches a smooth, glossy consistency with no visible lumps.
- Wafer Cookie Transformation
Submerge each wafer cookie into the molten chocolate, coating approximately three-quarters of its surface. Carefully lift and allow excess chocolate to drip back into the bowl, creating an even layer.
- Festive Embellishment
Immediately adorn the chocolate-coated cookies with an array of decorative elements like sprinkles, edible glitter, or crushed candy canes while the chocolate remains slightly wet. Position the decorated cookies on a parchment-lined tray to set.
- Whimsical Reindeer Design
Craft playful reindeer-themed cookies by strategically placing pretzel pieces as antlers. Attach candy eyes and a vibrant red candy to complete the adorable woodland creature appearance.
- Seasonal Color Variation
Transform some cookies using green candy melts, ensuring a uniform coating. Enhance their holiday charm by sprinkling green sanding sugar and tiny red heart-shaped decorations across the surface.
- Peppermint Bark Creation
Layer melted chocolate onto a parchment sheet, creating a smooth foundation. Generously scatter crushed peppermint pieces over the chocolate surface. Allow the mixture to completely solidify before fragmenting into delightful shards.
Notes
- Ensure chocolate is completely melted and smooth for perfect coating consistency.
- Use parchment paper or silicone mats to prevent cookies from sticking during decoration.
- Work quickly while chocolate is warm to achieve neat and clean dipping results.
- Select high-quality white and dark chocolates for rich, authentic flavor profiles.
- Allow decorated cookies to set at room temperature or briefly chill for faster hardening.
- Keep extra sprinkles and decorative elements nearby for spontaneous creative touches.
- Prep Time: 25 minutes
- Cook Time: 15 minutes
- Category: Desserts, Snacks
- Method: Mixing
- Cuisine: American
Nutrition
- Serving Size: 12
- Calories: 100
- Sugar: 10 g
- Sodium: 50 mg
- Fat: 5 g
- Saturated Fat: 3 g
- Unsaturated Fat: 2 g
- Trans Fat: 0 g
- Carbohydrates: 15 g
- Fiber: 1 g
- Protein: 1 g
- Cholesterol: 0 mg
Isabella Rossi
Founder & Culinary Content Creator
Expertise
Recipe Development, Traditional Irish and European Cuisines, Food Styling and Photography, Culinary Education
Education
Dublin Institute of Technology (DIT) – School of Culinary Arts and Food Technology
Ballymaloe Cookery School
Liam is the voice behind many of Craft Meats’ most flavorful features. With roots in Dublin’s smoky barbecue scene and a culinary degree from the Dublin Institute of Technology, he brings time-tested cooking techniques to life.
His training at Ballymaloe Cookery School sharpened his farm-to-table approach, giving him a deep respect for every ingredient he writes about.
He’s not about overcomplicating the process, just helping you cook meat that’s worth talking about. When he’s not writing or grilling, he’s out foraging or nerding out on regional spice blends to add to his next recipe.