
Perfect 3-Ingredient Peanut Butter Oreo Cookie Balls Recipe
Oreo cookie balls burst with irresistible charm, combining peanut butter magic in a three-ingredient wonder that delights taste buds.
Sweet, creamy textures mingle perfectly in this no-bake treat.
Crushing cookies releases pure dessert potential with minimal effort.
Each bite promises decadent richness that melts smoothly on your tongue.
No complicated techniques stand between you and these delectable morsels.
Simple ingredients dance together, creating a dessert that looks impressively sophisticated yet requires zero culinary expertise.
Whip up these crowd-pleasing bites and watch everyone’s eyes light up with pure sweet satisfaction.
Quick Recipe Overview
Everything In 3-Ingredient Peanut Butter Oreo Cookie Balls
For Cookie Base:For Binding and Flavor:For Coating and Finish:Tools That Help With 3-Ingredient Peanut Butter Oreo Cookie Balls
How To Shape 3-Ingredient Peanut Butter Oreo Cookie Balls
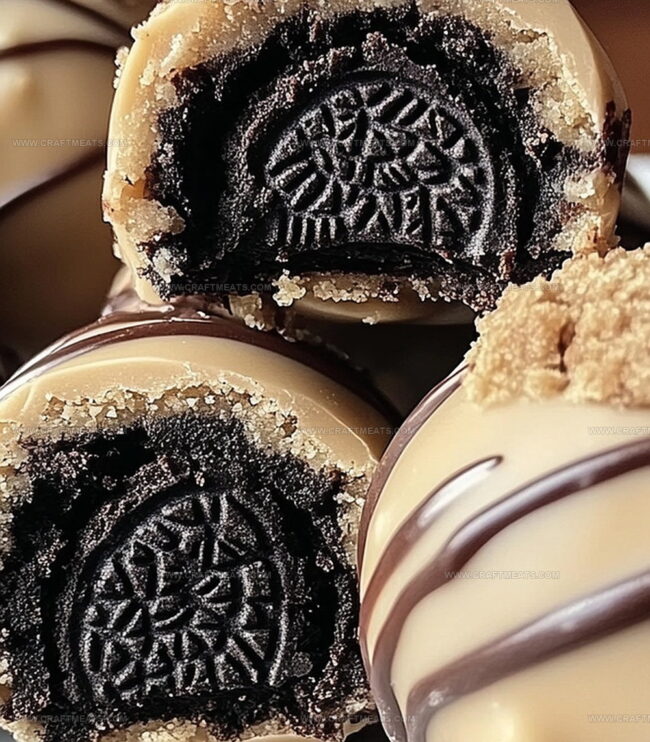
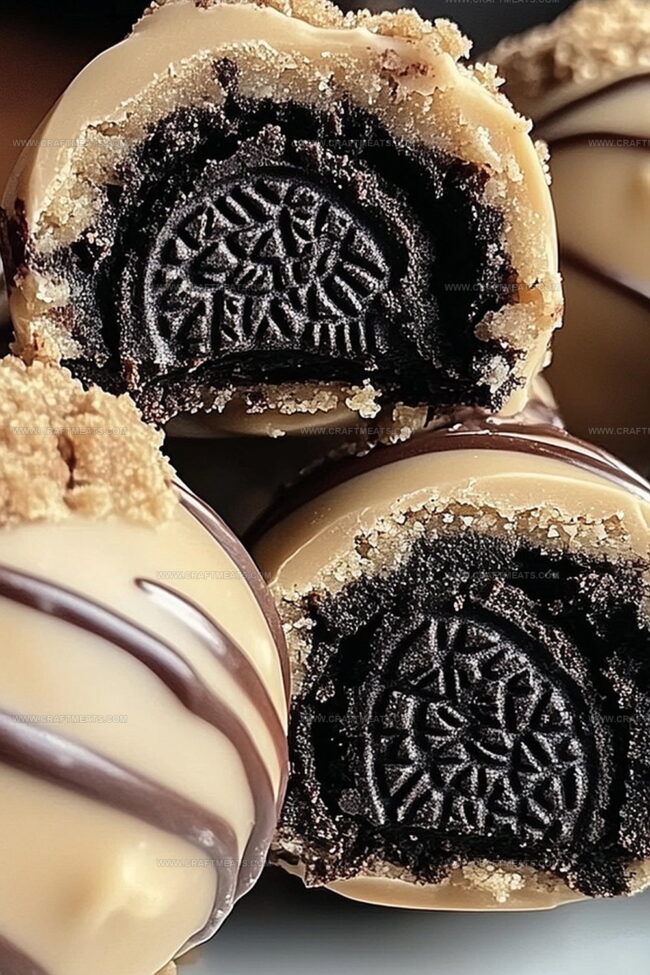
Grab your Oreos and transform them into a delightful crumbly landscape. Pulverize the cookies into fine, delicate particles using a food processor or by sealing them in a bag and rolling with enthusiasm.
Blend the Oreo crumbs with smooth peanut butter, creating a rich, decadent mixture that promises pure indulgence. Stir until the texture resembles a luscious dough that begs to be shaped.
Lovingly roll the mixture into small, perfect spheres. Nestle these little treasures onto a parchment-lined tray and send them for a quick chill in the freezer to firm up their charming form.
Dunk each chilled bite into melted chocolate, ensuring a luxurious coating that glistens and promises pure pleasure. Let excess chocolate cascade off before placing them back on the tray.
Allow the chocolate to set by giving these treats a quick rest in the refrigerator. These irresistible bites are now ready to delight taste buds and spark joy.
Quick Tips For 3-Ingredient Peanut Butter Oreo Cookie Balls
Ideas For Serving 3-Ingredient Peanut Butter Oreo Cookie Balls
How To Store 3-Ingredient Peanut Butter Oreo Cookie Balls
Print
Incredible 3-Ingredient Peanut Butter Oreo Cookie Balls Recipe
- Total Time: 50 minutes
- Yield: 11 1x
Description
Creamy 3-ingredient peanut butter oreo cookie balls blend classic cookies with smooth peanut butter for an irresistible treat. Rich chocolate coating and simple preparation make this dessert perfect for quick sweet cravings you can enjoy anytime.
Ingredients
- 10 oz (280 g) semi-sweet or milk chocolate, melted
- 1 cup (240 g) creamy peanut butter
- 1 package (14 oz / 400 g) Oreo cookies
- Additional melted chocolate for coating (optional)
Instructions
- Oreo Preparation: Crush Oreos into fine, uniform crumbs using a food processor or sealed bag with rolling pin, eliminating any substantial fragments.
- Mixture Creation: Combine crushed Oreos with peanut butter, mixing thoroughly to develop a smooth, compact dough that holds together seamlessly.
- Ball Formation: Mold the mixture into perfectly rounded spheres approximately one inch in diameter, arranging them carefully on a parchment-lined tray.
- Chilling Phase: Freeze the formed balls for 25 minutes to stabilize their structure and enhance chocolate coating potential.
- Chocolate Enrobing: Submerge each chilled ball completely in melted chocolate, using a fork to ensure precise, even coverage and allow excess chocolate to drip off elegantly.
- Setting Process: Place chocolate-coated balls back on parchment paper, maintaining spacing to prevent adhesion, then refrigerate for 15-20 minutes until chocolate hardens into a glossy, crisp shell.
- Serving: Remove cookie balls from refrigerator and serve either slightly chilled or at room temperature for optimal taste and texture experience.
Notes
- Crush Oreos Completely: Ensure no large chunks remain by processing thoroughly to create fine, even crumbs for a smooth texture and consistent binding.
- Balance Peanut Butter Ratio: Mix peanut butter gradually to achieve a moldable consistency that holds shape without being too wet or dry.
- Freeze for Stability: Chilling balls before chocolate coating helps maintain structural integrity and prevents crumbling during dipping process.
- Chocolate Coating Technique: Use a fork when dipping to allow excess chocolate to drip off, creating a thin, even shell that looks professional and prevents pooling.
- Prep Time: 20 minutes
- Cook Time: 30 minutes
- Category: Desserts, Snacks
- Method: Mixing
- Cuisine: American
Nutrition
- Serving Size: 11
- Calories: 170
- Sugar: 12 g
- Sodium: 100 mg
- Fat: 9 g
- Saturated Fat: 3.5 g
- Unsaturated Fat: 4.5 g
- Trans Fat: 0 g
- Carbohydrates: 19 g
- Fiber: 1 g
- Protein: 3 g
- Cholesterol: 0 mg
Liam O’Sullivan
Founder & Culinary Content Creator
Expertise
Recipe Development, Traditional Irish and European Cuisines, Food Styling and Photography, Culinary Education
Education
Dublin Institute of Technology (DIT) – School of Culinary Arts and Food Technology
Ballymaloe Cookery School
Isabella brings a global spark to the Craft Meats table. Born in Florence and trained at the Apicius International School of Hospitality, she blends classic Italian flavor with modern writing that’s easy to follow and hard to forget.
Her additional training at the Italian Chef Academy fueled her love for well-crafted dishes, especially ones that spotlight beautiful cuts of meat.
She’s a food writer with heart, and a deep love for storytelling through single recipes. Her goal? To help you cook with more confidence and a little more joy, no matter where you start.