
Butterfinger Mini Pie Recipe with Sweet Caramel Crunch
Decadent desserts often surprise us with unexpected flavor combinations that dance on our taste buds.
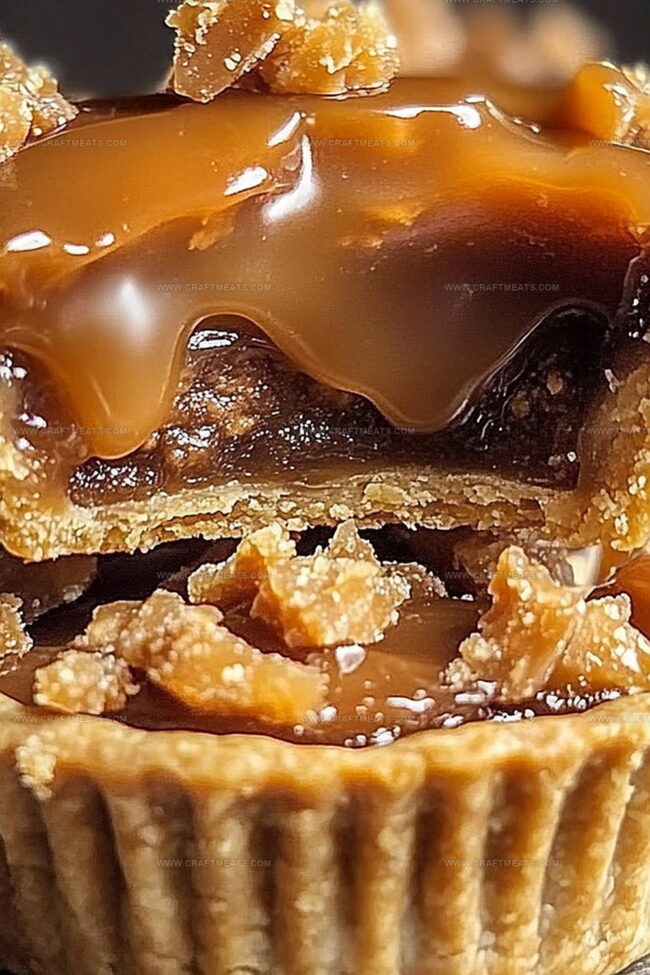
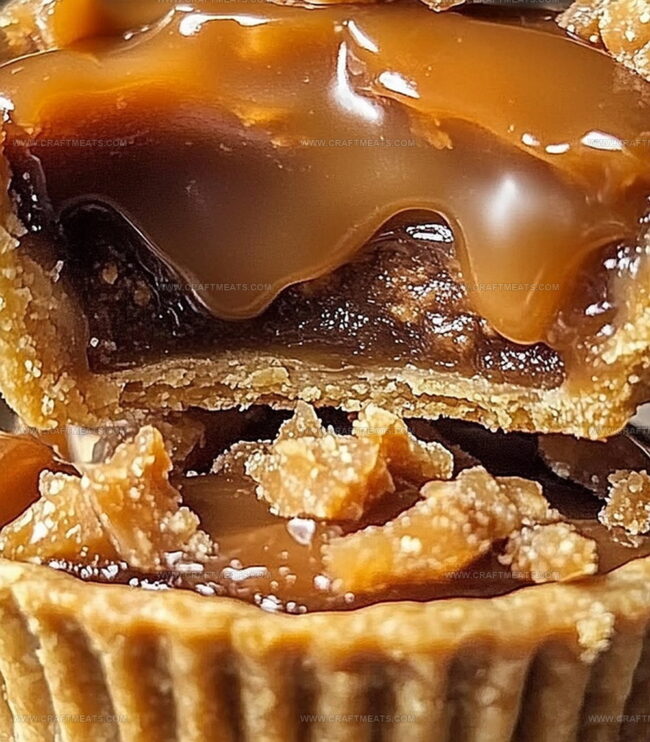
These butterfinger caramel crunch mini pies blend rich, sweet notes with irresistible texture in every delightful bite.
Creamy caramel swirls through a crunchy butterfinger landscape, creating a dessert that’s both elegant and playful.
Miniature pies offer the perfect personal-sized indulgence for any gathering or quiet evening treat.
Layers of chocolate, caramel, and crushed butterfinger pieces transform a simple dessert into a memorable experience.
The contrast between smooth filling and crisp candy pieces makes each mini pie a small work of culinary art.
Dive into this recipe and unleash a symphony of flavors that will leave everyone craving more.
Quick Recipe Overview
What’s In Butterfinger Caramel Crunch Mini Pies
For Crust Ingredients:For Filling Ingredients:For Topping and Garnish Ingredients:Tools Required For Butterfinger Caramel Crunch Mini Pies
Steps To Make Butterfinger Caramel Crunch Mini Pies

Craft a delectable base using graham cracker crumbs mixed with buttery goodness. Press the mixture into mini muffin cups, creating a golden shell that’ll cradle the luscious filling.
Blend smooth sweetened condensed milk with rich caramel sauce, creating a silky mixture that whispers decadence. Fold in cloud-like whipped cream to transform the filling into a heavenly texture.
Shower each mini pie with crunchy Butterfinger fragments, adding a delightful texture that’ll make taste buds dance. The candy pieces bring a nostalgic snap to every delicate bite.
Slide these mini wonders into the refrigerator, allowing them to set and develop deeper flavors. After a couple of hours, they’ll emerge as cool, creamy treasures ready to enchant dessert lovers.
Tips For Better Butterfinger Caramel Crunch Mini Pies
Serving Butterfinger Caramel Crunch Mini Pies Just Right
Keep Butterfinger Caramel Crunch Mini Pies Tasting Fresh
Print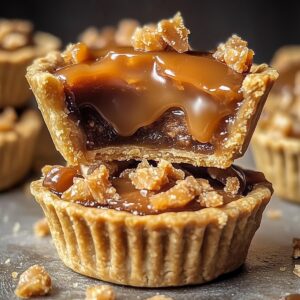
Irresistible Butterfinger Caramel Crunch Mini Pies
- Total Time: 2 hours 30 minutes
- Yield: 7 1x
Description
Butterfinger caramel crunch mini pies deliver a delightful dessert experience with layers of creamy, crunchy goodness. Sweet chocolate crusts cradle rich caramel and chopped candy, creating a perfect bite-sized treat you’ll crave again and again.
Ingredients
- 1 ½ cups (150 g) graham cracker crumbs
- 1 cup (about 6) Butterfinger candy bars
- 1 can (14 oz/397 g) sweetened condensed milk
- ½ cup (115 g) unsalted butter
- ½ cup (120 mL/4 fl oz) caramel sauce
- ½ cup (125 mL/4.2 fl oz) heavy whipping cream
- ¼ cup (50 g) granulated sugar
- ¼ cup (60 mL/2 fl oz) caramel sauce (for drizzling)
- ¼ tsp salt
- Whipped cream (optional)
Instructions
- Crust Preparation: Pulverize graham crackers with sugar and melted butter into a fine, sandy texture. Press the mixture firmly into muffin liners, creating a compact base with slightly elevated edges.
- Baking Foundation: Position the crusts in a preheated oven at 350°F, baking until edges turn golden and crisp, roughly 8-10 minutes. Cool completely to establish a sturdy base for the filling.
- Caramel Cream Composition: Blend sweetened condensed milk, caramel sauce, and a hint of salt until achieving a velvety consistency. Gently fold in whipped cream, maintaining a light, airy texture throughout the mixture.
- Filling and Topping: Spoon the caramelized cream into each cooled crust, filling nearly to the rim. Crush Butterfinger candy bars into delicate fragments, generously sprinkling the crumbs across the surface of each mini pie.
- Chilling and Setting: Refrigerate the mini pies for at least two hours, allowing the filling to solidify and flavors to harmonize. This critical resting period transforms the dessert into a perfectly structured delicacy.
- Final Flourish: Just before serving, embellish with an artistic drizzle of caramel sauce and an optional cloud of whipped cream to elevate the indulgence.
Notes
- Crumb Consistency Matters: Pulse graham crackers until they resemble fine sand, which ensures a compact and stable crust that holds together perfectly.
- Prevent Soggy Bottoms: Cool crusts completely before adding filling to maintain a crisp texture and prevent unwanted moisture absorption.
- Gentle Folding Technique: Incorporate whipped cream using a light, folding motion to preserve air pockets, creating a cloud-like caramel cream filling.
- Chill for Structure: Allow minimum two-hour refrigeration to help mini pies set firmly, intensifying flavors and creating a delightful, sliceable dessert.
- Prep Time: 20 minutes
- Cook Time: 10 minutes
- Category: Desserts, Snacks
- Method: Baking
- Cuisine: American
Nutrition
- Serving Size: 7
- Calories: 450
- Sugar: 35 g
- Sodium: 150 mg
- Fat: 25 g
- Saturated Fat: 15 g
- Unsaturated Fat: 10 g
- Trans Fat: 0 g
- Carbohydrates: 52 g
- Fiber: 1 g
- Protein: 4 g
- Cholesterol: 50 mg
Liam O’Sullivan
Founder & Culinary Content Creator
Expertise
Recipe Development, Traditional Irish and European Cuisines, Food Styling and Photography, Culinary Education
Education
Dublin Institute of Technology (DIT) – School of Culinary Arts and Food Technology
Ballymaloe Cookery School
Isabella brings a global spark to the Craft Meats table. Born in Florence and trained at the Apicius International School of Hospitality, she blends classic Italian flavor with modern writing that’s easy to follow and hard to forget.
Her additional training at the Italian Chef Academy fueled her love for well-crafted dishes, especially ones that spotlight beautiful cuts of meat.
She’s a food writer with heart, and a deep love for storytelling through single recipes. Her goal? To help you cook with more confidence and a little more joy, no matter where you start.