
Lemon Dream No-Bake Pie Recipe for Sunny Days
When lemon dream no-bake pie enters the culinary scene, refreshing citrus magic happens.
Imagine a dessert that whispers cool sophistication without requiring an oven.
Creamy textures merge with bright, zesty flavors in this delightful treat.
Silky smooth and incredibly easy, the recipe promises minimal effort with maximum satisfaction.
Summer gatherings and casual dinner parties welcome this elegant yet simple confection.
Chilled and light, the pie delivers a tangy-sweet experience that dances across your palate.
You can fall in love with how quickly this dessert comes together.
Explore a slice of pure, lemony bliss that guarantees smiles all around.
Why Lemon Dream No-Bake Pie Feels Like Sunshine in a Bite
What Goes Into a Perfect Lemon Dream No-Bake Pie
Pie Base:Filling Liquids:Thickening and Binding Ingredients:Enriching Ingredients:Zesty Aromatics:Optional Garnish:How to Make Lemon Dream No-Bake Pie Without the Oven
Step 1: Prepare Creamy Lemon Base
In a medium saucepan, gather these ingredients:Combine everything over medium-high heat, stirring frequently until the mixture starts bubbling with excitement.
Step 2: Develop Smooth Texture
Lower the heat to medium once the mixture simmers. Whisk constantly for one minute, preventing any burning. The mixture will begin to thicken and look luxuriously smooth.
Step 3: Carefully Blend Egg Yolks
Prevent egg scrambling by gently introducing hot liquid to egg yolks. Slowly add spoonfuls of the hot lemon mixture to the yolks, whisking continuously. This technique creates a silky, seamless blend.
Step 4: Create Luxurious Filling
Return the combined mixture to medium heat. Cook for about 90 seconds, stirring consistently until the filling reaches a perfect, velvety consistency.
Step 5: Enhance Flavor Profile
Remove from heat and introduce:Stir until butter melts completely, creating a glossy, rich filling.
Step 6: Build Pie Foundation
Pour the luscious lemon filling into a prepared graham cracker crust. Use a spatula to spread evenly, creating a smooth, inviting surface.
Step 7: Chill and Set
Refrigerate the pie for at least 2 hours. This crucial step allows the filling to firm up and develop deep, harmonious flavors.
Step 8: Final Presentation
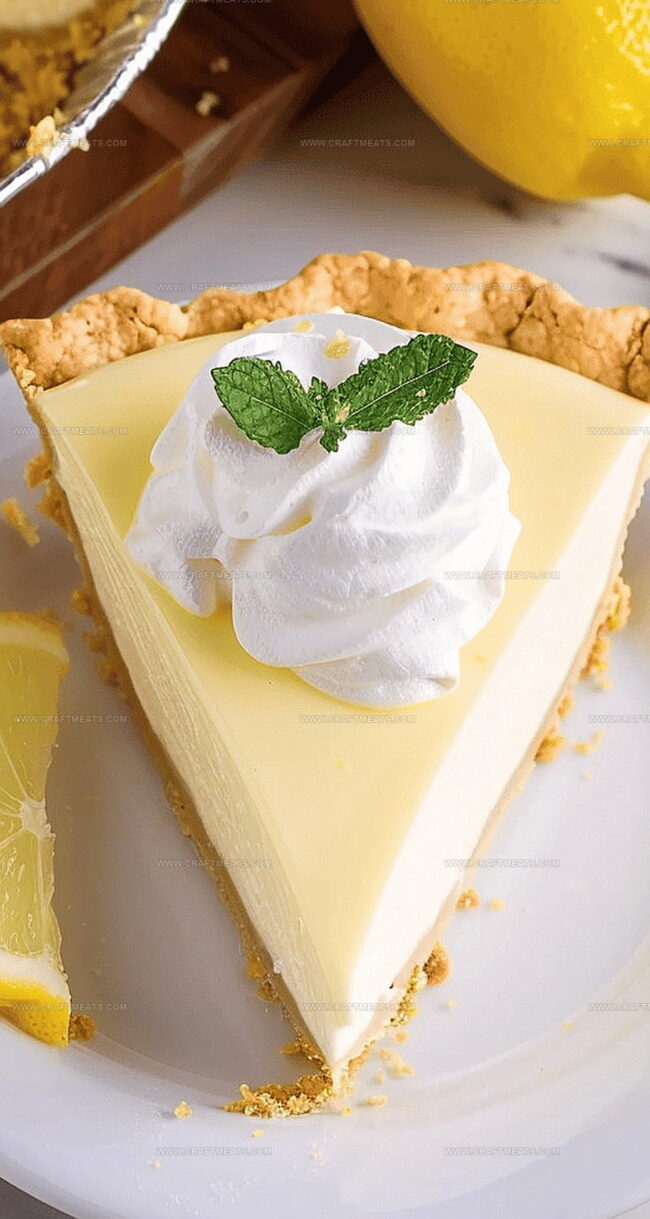
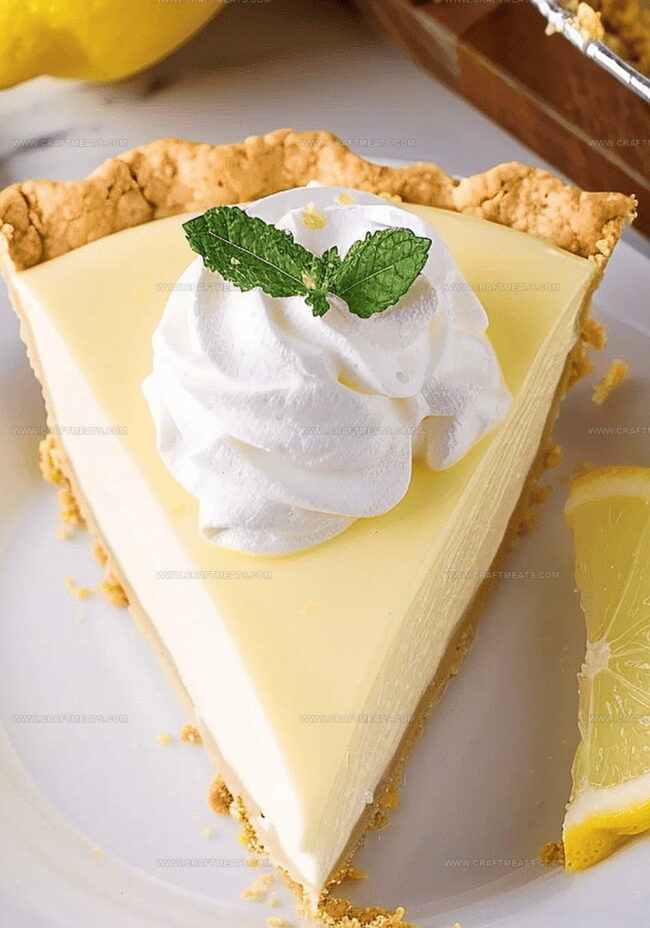
Once chilled, decorate with:Serve chilled and watch everyone swoon over this dreamy dessert!
Pro Tips for a Smooth and Creamy Lemon Dream Finish
Keeping Lemon Dream Pie Fresh After Serving
Best Pairings for a Slice of Lemon Dream No-Bake Pie
Variations to Brighten Your Lemon Dream Pie
Answers to All Your Lemon Dream No-Bake Pie Curiosities
Absolutely! This no-bake lemon pie can be prepared up to 2 days in advance and stored covered in the refrigerator, making it perfect for party planning or busy schedules.
You can substitute with whole milk or heavy cream. The key is using a full-fat dairy product to maintain the creamy texture of the pie filling.
The mixture should coat the back of a spoon and leave a clear path when you run your finger through it. It will continue to set as it cools in the refrigerator.
Yes, you can freeze the pie for up to 1 month. Wrap it tightly in plastic wrap and aluminum foil. Thaw in the refrigerator overnight before serving.
Print
Lemon Dream No-Bake Pie Recipe
- Total Time: 30 minutes
- Yield: 8 1x
Description
Creamy lemon dream no-bake pie delivers tangy sunshine on a plate, promising cool refreshment without heating up kitchens. Rich graham cracker crust cradles silky lemon filling, inviting sweet escape with each perfect slice.
Ingredients
Main Ingredients:
- 2 cups half and half
- 3 large egg yolks
- 1 9-inch graham cracker pie crust (homemade or store-bought; regular or gluten-free)
- 0.75 cup fresh lemon juice (about 3 large lemons)
- 2 tablespoons lemon zest (about 2 large lemons)
Sweeteners and Thickeners:
- 0.75 cup granulated sugar
- 0.25 cup cornstarch
Flavor Enhancers and Toppings:
- 2 tablespoons cold unsalted butter
- 1 teaspoon vanilla extract
- Whipped cream for topping (optional)
- Optional garnishes: lemon slices, additional lemon zest, fresh mint
Instructions
- Prepare a medium non-reactive saucepan and combine sugar, cornstarch, half and half, lemon zest, and lemon juice over medium-high heat, stirring frequently until the mixture reaches a bubbling point.
- Reduce heat to medium and continue cooking for one minute, whisking vigorously to prevent scorching, then carefully remove from heat.
- Create a tempering technique for egg yolks by slowly introducing small amounts of hot lemon mixture while continuously whisking to prevent curdling, ensuring a smooth incorporation.
- Return the saucepan to medium heat and cook the combined mixture for approximately 90 seconds, maintaining constant stirring to develop a consistent texture.
- Remove the pan from heat and fold in cold butter and vanilla extract, stirring until the butter completely dissolves and the mixture achieves a silky, uniform consistency.
- Transfer the glossy lemon filling into the prepared graham cracker crust, using a spatula to create an even, pristine surface.
- Place the pie in the refrigerator and allow it to chill for a minimum of two hours, enabling the filling to solidify and develop its signature creamy texture.
- Prior to serving, enhance the pie’s presentation by decorating with delicate whipped cream, elegant lemon slice accents, sprinkled zest, and optional fresh mint garnish.
Notes
- Quick and effortless dessert that requires no oven, perfect for hot summer days or when you want a hassle-free treat.
- Tempering eggs is crucial to prevent scrambling and ensure a smooth, silky lemon filling with no lumps.
- Whisking constantly during cooking helps create a creamy texture and prevents the mixture from burning or sticking to the pan.
- Chilling the pie for at least 2 hours allows the filling to set properly, creating a firm and sliceable consistency.
- Use fresh lemon juice and zest for the most vibrant, authentic citrus flavor that makes this pie truly memorable.
- Optional garnishes like whipped cream, lemon slices, and mint can elevate the presentation and add extra layers of flavor and freshness.
- Prep Time: 20 minutes
- Cook Time: 10 minutes
- Category: Desserts
- Method: Simmering
- Cuisine: American
Nutrition
- Serving Size: 8
- Calories: 260
- Sugar: 22 g
- Sodium: 150 mg
- Fat: 14 g
- Saturated Fat: 8 g
- Unsaturated Fat: 4 g
- Trans Fat: 0 g
- Carbohydrates: 30 g
- Fiber: 0 g
- Protein: 4 g
- Cholesterol: 70 mg
Isabella Rossi
Founder & Culinary Content Creator
Expertise
Recipe Development, Traditional Irish and European Cuisines, Food Styling and Photography, Culinary Education
Education
Dublin Institute of Technology (DIT) – School of Culinary Arts and Food Technology
Ballymaloe Cookery School
Liam is the voice behind many of Craft Meats’ most flavorful features. With roots in Dublin’s smoky barbecue scene and a culinary degree from the Dublin Institute of Technology, he brings time-tested cooking techniques to life.
His training at Ballymaloe Cookery School sharpened his farm-to-table approach, giving him a deep respect for every ingredient he writes about.
He’s not about overcomplicating the process, just helping you cook meat that’s worth talking about. When he’s not writing or grilling, he’s out foraging or nerding out on regional spice blends to add to his next recipe.