
Quick Peanut Butter Chocolate Oat Cups Recipe to Make
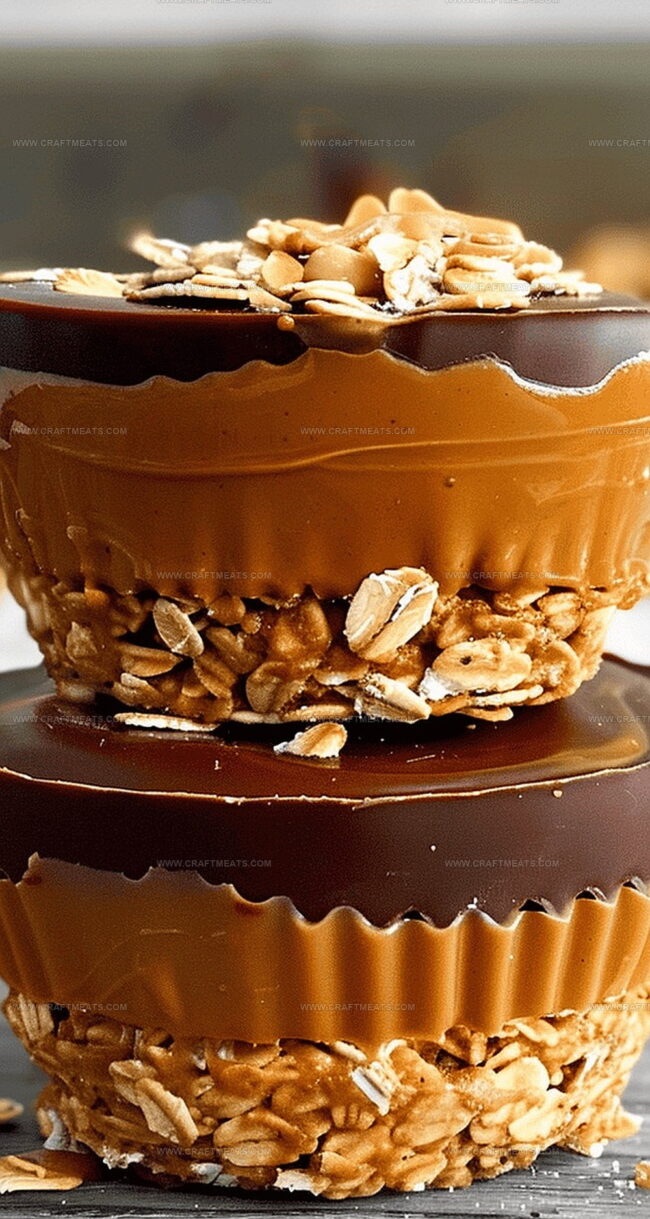
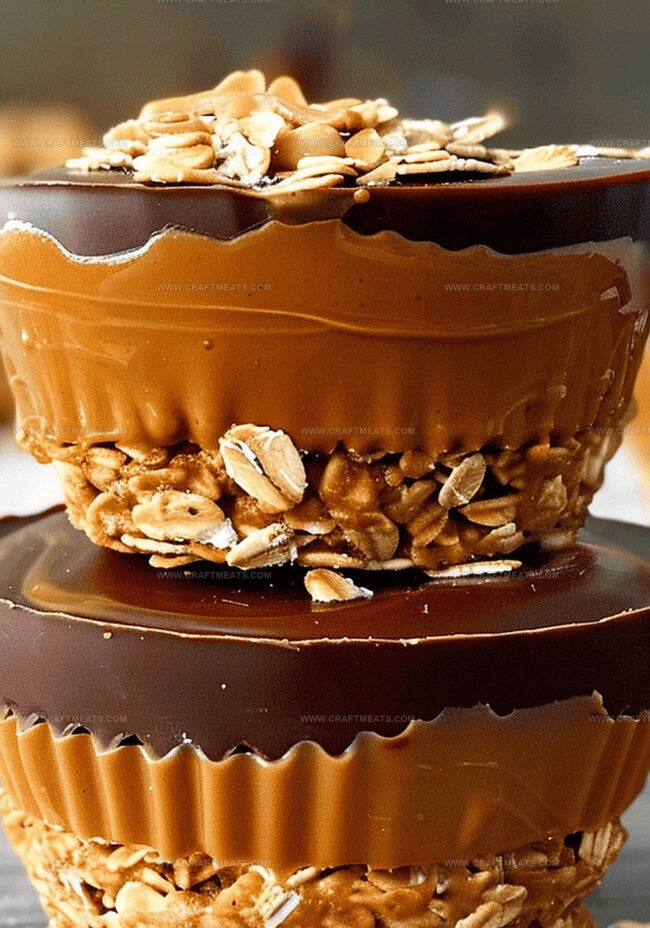
Peanut butter chocolate oat cups deliver pure indulgence in every single bite.
Creamy, rich textures blend seamlessly with sweet and nutty flavors that dance across your palate.
These delectable treats offer an irresistible combination of wholesome ingredients and decadent charm.
Smooth chocolate layers intertwine with hearty oats, creating a harmonious balance of comfort and excitement.
Home cooks adore crafting these simple yet sophisticated desserts that feel like a warm culinary hug.
The magical alchemy of ingredients changes ordinary pantry staples into something extraordinary.
Each carefully constructed cup promises a moment of pure blissful satisfaction.
Peanut Butter Chocolate Oat Cups Are Your New Favorite Snack Fix
Pantry-Friendly Ingredients for Peanut Butter Chocolate Oat Cups
Base Ingredients:Peanut Butter Layer Ingredients:Chocolate Topping Ingredients:Instructions for Building Easy No-Bake Oat Cups
Step 1: Prepare Oat Base
Grab a medium mixing bowl and combine:Mix ingredients thoroughly until you create a sticky, clumpy mixture that holds together perfectly.
Step 2: Create Base Layer
Press the oat mixture evenly into a 6-cup silicone muffin tray, ensuring each cup has a solid foundation. Pop the tray into the freezer for 15 minutes to set and firm up the base.
Step 3: Craft Creamy Peanut Butter Layer
In a small bowl, whisk together:Blend until the mixture becomes silky and well combined. This layer will add rich, nutty decadence to your treat.
Step 4: Layer Peanut Butter Goodness
Remove the tray from the freezer and spread the peanut butter mixture across each oat base. Cover every inch to guarantee maximum flavor in each delectable bite.
Step 5: Drizzle Chocolate Magic
Melt dark chocolate using a microwave or double boiler until smooth and glossy. Carefully pour the melted chocolate over the peanut butter layer, spreading evenly to create a stunning chocolate topping.
Step 6: Optional Biscoff Swirl
For extra indulgence, drizzle melted Biscoff spread across the chocolate layer. This step is totally optional but adds an incredible flavor twist.
Step 7: Chill and Devour
Place the tray in the refrigerator and let the cups set for 10-15 minutes until completely hardened. Once set, gently remove the cups from the tray and enjoy your cool, creamy creation straight from the fridge.
Pro Tip: Store these cups in an airtight container in the refrigerator for up to one week- if they last that long!
Tips for Smooth Layers and Clean Cuts
Storing and Freezing Peanut Butter Oat Cups Without the Mess
Snack Pairings and Toppings to Try with Oat Cups
Sweet and Savory Variations for Oat Cup Fans
Print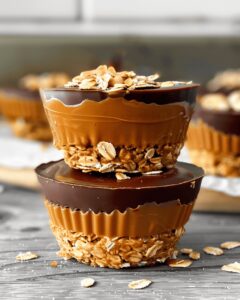
Peanut Butter Chocolate Oat Cups Recipe
- Total Time: 15 minutes
- Yield: 12 1x
Description
Irresistible peanut butter chocolate oat cups deliver a perfect blend of creamy and crunchy textures. Rich chocolatey goodness meets nutty smoothness, creating a quick dessert that satisfies sweet cravings with minimal effort and maximum flavor.
Ingredients
Main Ingredients:
- 70 grams (2.5 ounces) rolled oats
- 100 grams (3.5 ounces) smooth peanut butter
- 70 grams (2.5 ounces) dark chocolate
Sweeteners:
- 2 tablespoons maple syrup
- 1 tablespoon maple syrup
Additional Ingredients:
- 2 tablespoons smooth peanut butter
- Pinch of salt
- Optional: drizzle of Biscoff spread
Instructions
- Craft a robust foundation by thoroughly blending rolled oats with smooth peanut butter, maple syrup, and a whisper of salt. Ensure the mixture transforms into a cohesive, slightly sticky texture that will hold its shape.
- Transfer the oat mixture into a silicone muffin tray, carefully pressing and distributing the mixture to create an even, compact base layer. Utilize fingertips to firmly compact each cup’s foundation.
- Temporarily chill the oat bases in the freezer for approximately 10-12 minutes, allowing them to solidify and develop structural integrity.
- While the bases cool, prepare the peanut butter layer by whisking together smooth peanut butter and maple syrup until the mixture achieves a silky, uniform consistency.
- Retrieve the chilled tray and generously spread the peanut butter mixture across each oat base, ensuring complete and uniform coverage.
- Gently melt dark chocolate using a double boiler or microwave, stirring periodically to achieve a glossy, smooth texture without scorching.
- Carefully pour the molten chocolate over the peanut butter layer, using gentle tilting motions to create an elegant, even surface.
- For an indulgent twist, consider drizzling melted Biscoff spread across the chocolate layer, creating delightful marbled patterns.
- Return the tray to the refrigerator and allow the cups to solidify completely, typically requiring 15-20 minutes of chilling time.
- Once set, delicately extract the cups from the silicone tray and serve immediately for maximum enjoyment.
Notes
- These delightful cups pack a punch of rich, creamy flavors that melt in your mouth with each bite.
- Customize the recipe by swapping different chocolates or nut butters for unique taste combinations.
- Store leftovers in an airtight container in the refrigerator for up to a week, ensuring maximum freshness and enjoyment.
- Prep Time: 15 minutes
- Cook Time: 0 minutes
- Category: Breakfast, Snacks, Desserts
- Method: None
- Cuisine: American
Nutrition
- Serving Size: 12
- Calories: 180
- Sugar: 8g
- Sodium: 60mg
- Fat: 12g
- Saturated Fat: 3g
- Unsaturated Fat: 9g
- Trans Fat: 0g
- Carbohydrates: 15g
- Fiber: 2g
- Protein: 5g
- Cholesterol: 0mg
Isabella Rossi
Founder & Culinary Content Creator
Expertise
Recipe Development, Traditional Irish and European Cuisines, Food Styling and Photography, Culinary Education
Education
Dublin Institute of Technology (DIT) – School of Culinary Arts and Food Technology
Ballymaloe Cookery School
Liam is the voice behind many of Craft Meats’ most flavorful features. With roots in Dublin’s smoky barbecue scene and a culinary degree from the Dublin Institute of Technology, he brings time-tested cooking techniques to life.
His training at Ballymaloe Cookery School sharpened his farm-to-table approach, giving him a deep respect for every ingredient he writes about.
He’s not about overcomplicating the process, just helping you cook meat that’s worth talking about. When he’s not writing or grilling, he’s out foraging or nerding out on regional spice blends to add to his next recipe.