
Chocolate Peanut Butter Poke Cake Recipe for Dessert
Decadent desserts have a way of stealing hearts, and this chocolate peanut butter poke cake recipe promises pure indulgence.
Rich chocolate layers mingle with creamy peanut butter in a delightful dance of flavors.
Soft cake punctured with delicious holes becomes a canvas for luscious fillings that seep into every crumb.
Each slice promises a symphony of sweet and nutty notes that will make taste buds dance with joy.
The combination of chocolate and peanut butter creates a classic comfort that everyone adores.
Smooth, moist, and irresistibly delectable, this cake transforms an ordinary dessert into an extraordinary experience.
Prepare to embark on a culinary journey that guarantees smiles and second helpings.
Quick Recipe Overview
What’s In Chocolate Peanut Butter Poke Cake
For Cake Base:For Filling and Binding:For Topping and Garnish:Tools To Bake Chocolate Peanut Butter Poke Cake
Instructions For Chocolate Peanut Butter Poke Cake
Whip up a rich chocolate cake in a rectangular baking dish. Follow the package guidance, creating a smooth batter that bakes into a decadent base. After removing from the oven, let the cake rest and slightly cool.
Use a wooden spoon handle or thick straw to create delightful tunnels across the cake’s surface. Poke generously, ensuring each hole will capture the upcoming luscious filling.
Blend sweetened condensed milk with smooth peanut butter until silky and consistent. Gently cascade this mixture over the warm cake, watching it seep into every crevice and hole. Allow the cake to absorb these flavors completely.
Once the cake reaches room temperature, crown it with a pillowy layer of whipped cream. Spread evenly, creating a soft blanket across the surface.
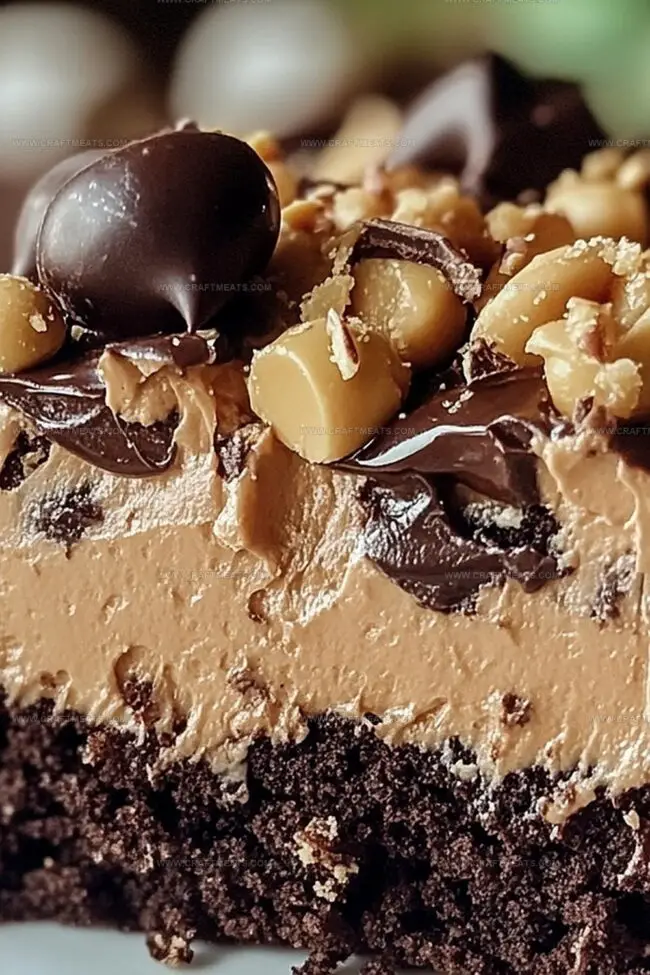
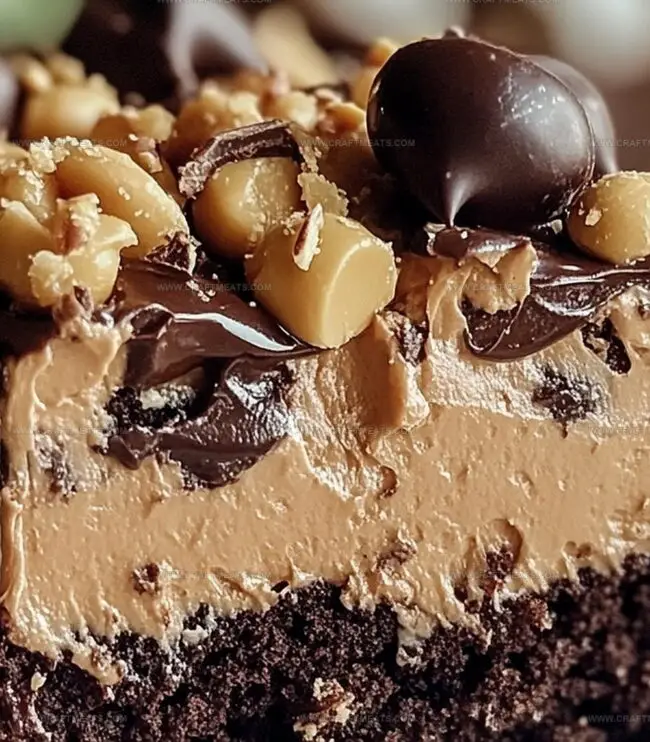
Sprinkle the top with mini chocolate chips and chopped peanut butter cups. These delectable morsels will add texture and visual appeal to your masterpiece.
Refrigerate the cake for one hour, allowing all flavors to harmonize. Slice and serve this decadent dessert that promises pure indulgence with every bite.
Simple Tricks For Chocolate Peanut Butter Poke Cake
How To Serve Chocolate Peanut Butter Poke Cake
Best Storage For Chocolate Peanut Butter Poke Cake
Print
Rich Chocolate Peanut Butter Poke Cake Recipe
- Total Time: 2 hours 45 minutes
- Yield: 11 1x
Description
Rich chocolate peanut butter poke cake delivers a decadent dessert experience that delights palates. Creamy layers, irresistible textures, and indulgent flavors make this cake a must-try for those seeking sweet satisfaction.
Ingredients
- 1 box (15 oz / 425 g) chocolate cake mix
- Eggs (per box instructions)
- Oil (per box instructions)
- Water (per box instructions)
- 1 cup (8.5 fl oz / 250 ml) creamy peanut butter
- ½ cup (4.2 fl oz / 125 ml) melted creamy peanut butter
- 1 can (14 oz / 397 g) sweetened condensed milk
- 1 container (8 oz / 225 g) thawed whipped topping
- ½ cup (1.75 oz / 50 g) mini chocolate chips or chocolate shavings
- ½ cup (2.6 oz / 75 g) chopped Reeses or peanut butter cups
Instructions
- Cake Preparation: Preheat oven and prepare rectangular baking dish. Mix chocolate cake batter according to package instructions, ensuring smooth consistency. Pour batter into dish and bake until toothpick emerges clean.
- Hole Creation: While cake is still warm, craft systematic holes across entire surface using wooden spoon handle or thick straw. Distribute holes evenly to maximize flavor absorption potential.
- Peanut Butter Infusion: Whisk sweetened condensed milk and creamy peanut butter into silky liquid. Methodically pour mixture over warm cake, guaranteeing complete penetration through prepared holes.
- Cooling Process: Allow cake to rest at room temperature, enabling peanut butter and condensed milk to thoroughly saturate cake’s interior. Ensure complete cooling before proceeding.
- Topping Application: Spread whipped topping generously across cake’s surface, creating uniform layer that encompasses previous ingredients. Ensure complete and even coverage.
- Decorative Finish: Garnish cake with miniature chocolate chips and chopped Reeses peanut butter cups. Strategically place toppings to create visually appealing presentation.
- Chilling and Serving: Refrigerate decorated cake for minimum one hour to solidify layers and intensify flavor profile. Slice and serve chilled for optimal taste experience.
Notes
- Choose Precise Holes: Puncture consistent, evenly spaced holes across the cake surface to maximize flavor absorption and ensure each bite is equally delicious.
- Warm Cake Technique: Pour peanut butter and condensed milk mixture over slightly warm cake for optimal liquid penetration and deeper flavor infusion.
- Temperature Control: Allow cake to cool completely at room temperature before adding whipped topping to prevent melting and maintain structural integrity.
- Chilling Strategy: Refrigerate the cake for at least one hour to help layers set and develop a more intense, harmonious flavor profile.
- Prep Time: 15 minutes
- Cook Time: 2 hours
- Category: Desserts
- Method: Baking
- Cuisine: American
Nutrition
- Serving Size: 11
- Calories: 350
- Sugar: 25 g
- Sodium: 250 mg
- Fat: 20 g
- Saturated Fat: 6 g
- Unsaturated Fat: 14 g
- Trans Fat: 0 g
- Carbohydrates: 38 g
- Fiber: 2 g
- Protein: 7 g
- Cholesterol: 30 mg
Liam O’Sullivan
Founder & Culinary Content Creator
Expertise
Recipe Development, Traditional Irish and European Cuisines, Food Styling and Photography, Culinary Education
Education
Dublin Institute of Technology (DIT) – School of Culinary Arts and Food Technology
Ballymaloe Cookery School
Isabella brings a global spark to the Craft Meats table. Born in Florence and trained at the Apicius International School of Hospitality, she blends classic Italian flavor with modern writing that’s easy to follow and hard to forget.
Her additional training at the Italian Chef Academy fueled her love for well-crafted dishes, especially ones that spotlight beautiful cuts of meat.
She’s a food writer with heart, and a deep love for storytelling through single recipes. Her goal? To help you cook with more confidence and a little more joy, no matter where you start.