Chewy Chocolate Crinkle Cookie Recipe with a Fudgy Center
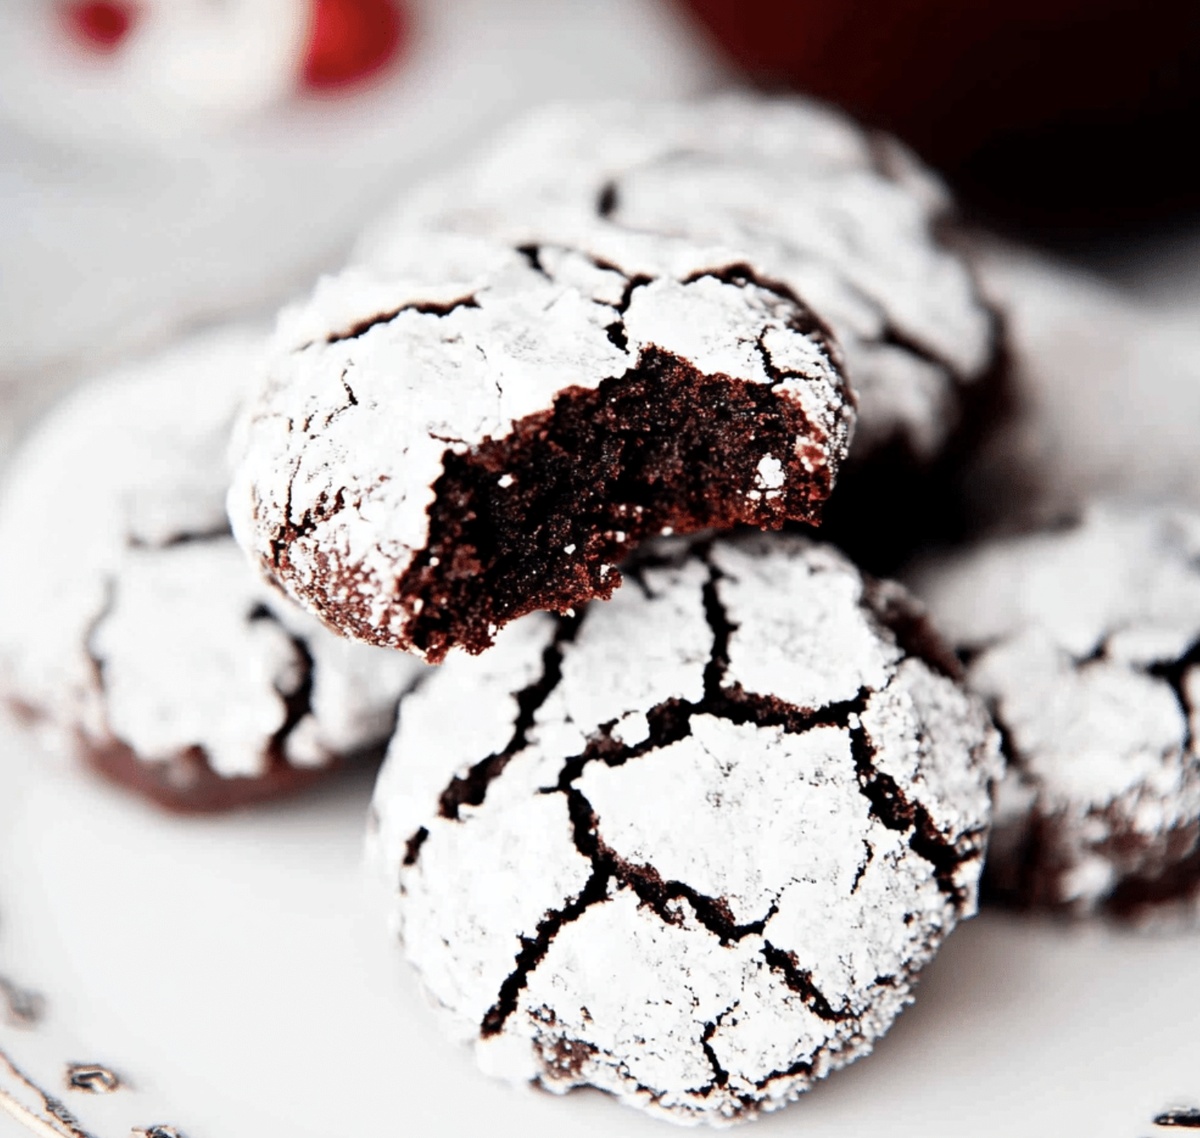
Delectable chocolate crinkle cookies emerge as a delightful winter treat that blends rich cocoa with powdered sugar magic.
These soft, fudgy delights melt in your mouth with each irresistible bite.
Dark chocolate lovers rejoice as these cookies deliver intense flavor and a stunning crackled exterior.
The pillowy texture contrasts beautifully with the crisp sugar coating.
Powdered sugar dances across the surface, creating an elegant winter wonderland on your plate.
Each cookie promises a decadent chocolate experience that transforms an ordinary moment into something special.
Dive into this simple recipe and discover a new dessert favorite that will have everyone asking for seconds.
Quick Recipe Overview
What’s In Chewy Chocolate Crinkle Cookies
For Base Ingredients:For Dry Mixture:For Finishing:Tools To Bake Chewy Chocolate Crinkle Cookies
Step-By-Step Baking For Chewy Chocolate Crinkle Cookies
Mix granulated sugar and vegetable oil until smooth. Add eggs one by one, stirring in vanilla. In another bowl, combine flour, cocoa powder, baking powder, and salt. Blend dry ingredients into wet mixture until a soft dough forms.
Wrap the dough and place in refrigerator for a minimum of two hours. This helps solidify the mixture and enhances flavor development.
Heat oven to 350F. Cover baking sheets with parchment paper for easy cookie removal.
Scoop small portions of chilled dough and roll into round balls. Generously coat each ball with powdered sugar, ensuring complete coverage. Arrange on prepared baking sheets with space between each cookie.
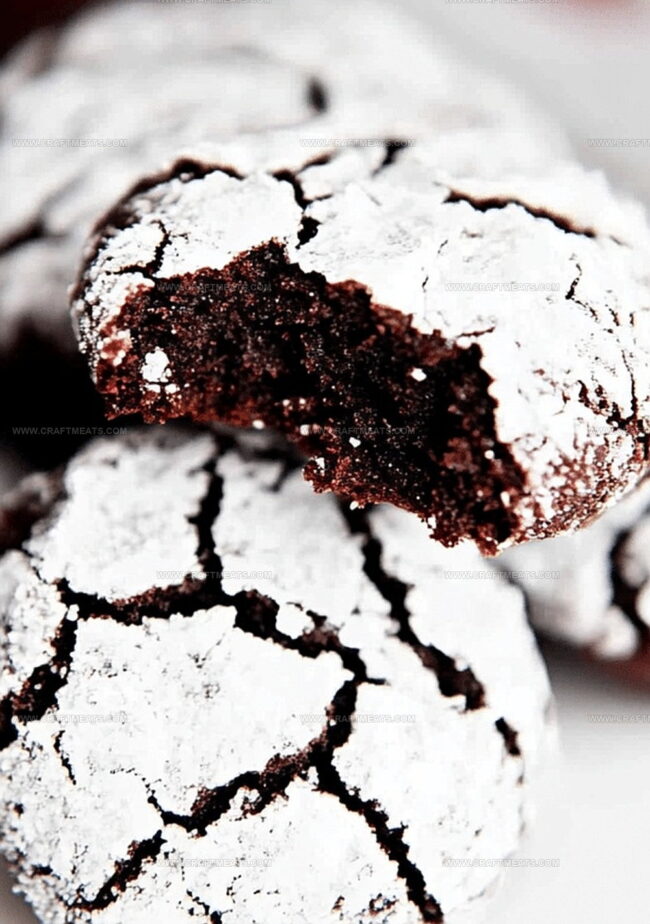
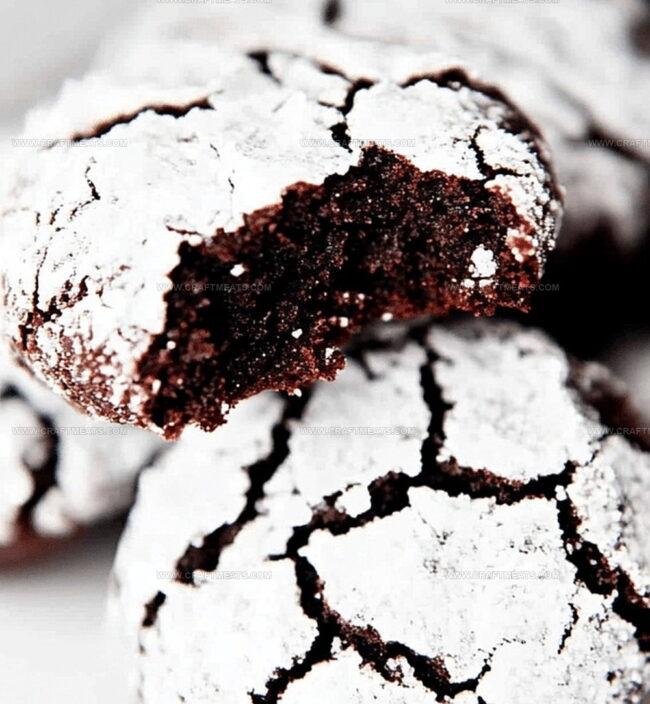
Slide cookies into preheated oven. Bake for 10-12 minutes until edges look set and surfaces develop beautiful crackled sugar coating. Centers should remain soft and tender.
Allow cookies to rest on baking sheets for five minutes. Transfer to wire rack for complete cooling. Serve alongside cold milk or hot coffee for a delightful treat.
Tips For Fudgy Chewy Chocolate Crinkle Cookies
How To Serve Chewy Chocolate Crinkle Cookies
Smart Storage For Chewy Chocolate Crinkle Cookies
Print
Soft Chocolate Crinkle Cookies Recipe
- Total Time: 2 hours 27 minutes
- Yield: 23 1x
Description
Scrumptious chocolate crinkle cookies promise pure chocolate bliss with powdered sugar-dusted exteriors. Crumbly yet chewy centers melt in your mouth, delivering classic holiday cookie perfection that everyone will adore.
Ingredients
- 1 cup (200 g) granulated sugar
- 2 large eggs
- ⅓ cup (80 ml) vegetable oil
- 1 tsp vanilla extract
- ½ cup (40 g) unsweetened cocoa powder
- 1 cup (125 g) all-purpose flour
- 1 tsp baking powder
- ¼ tsp salt
- ½ cup (60 g) powdered sugar (for coating)
Instructions
- Prepare Wet Base: Whisk granulated sugar and vegetable oil in a large bowl until smooth, creating a glossy foundation for the cookie dough.
- Incorporate Eggs and Flavor: Add eggs one at a time, blending thoroughly, then mix in vanilla extract to elevate the aromatic complexity of the mixture.
- Combine Dry Ingredients: Sift flour, cocoa powder, baking powder, and salt together, ensuring a lump-free, uniform dry ingredient blend.
- Create Dough: Gently fold dry ingredients into wet mixture, stirring until a cohesive, slightly tacky dough forms.
- Chill and Prepare: Wrap dough in plastic and refrigerate for 2 hours. When ready, preheat oven to 350F (175C) and line baking sheets with parchment paper or silicone mats.
- Shape and Coat: Roll chilled dough into tablespoon-sized balls, thoroughly coating each in powdered sugar to achieve the signature crackled exterior.
- Bake to Perfection: Arrange sugar-dusted cookies on prepared sheets, spacing 2 inches apart. Bake 10-12 minutes until edges are set and surfaces show characteristic cracking.
- Cool and Serve: Let cookies rest on baking sheet for 5 minutes, then transfer to a wire rack to cool completely. Enjoy at room temperature, potentially paired with milk or coffee.
Notes
- Chill Dough Thoroughly: Refrigerate for at least 2 hours to prevent spreading and ensure a rich, fudgy texture that holds its shape during baking.
- Prevent Powdery Sugar Mess: Roll dough balls in powdered sugar just before baking to create a crisp, crackled exterior without absorbing too much sugar.
- Control Cookie Size Consistently: Use a tablespoon or cookie scoop to create uniform balls, ensuring even baking and consistent appearance across all cookies.
- Moisture is Key: Don’t overbake – cookies should look slightly underdone when removed from oven, as they’ll continue setting while cooling and maintain that desirable chewy center.
- Prep Time: 15 minutes
- Cook Time: 12 minutes
- Category: Desserts, Snacks
- Method: Baking
- Cuisine: American
Nutrition
- Serving Size: 23
- Calories: 130
- Sugar: 10 g
- Sodium: 40 mg
- Fat: 6 g
- Saturated Fat: 0.5 g
- Unsaturated Fat: 5.5 g
- Trans Fat: 0 g
- Carbohydrates: 17 g
- Fiber: 0.5 g
- Protein: 2 g
- Cholesterol: 20 mg
Liam O’Sullivan
Founder & Culinary Content Creator
Expertise
Recipe Development, Traditional Irish and European Cuisines, Food Styling and Photography, Culinary Education
Education
Dublin Institute of Technology (DIT) – School of Culinary Arts and Food Technology
Ballymaloe Cookery School
Isabella brings a global spark to the Craft Meats table. Born in Florence and trained at the Apicius International School of Hospitality, she blends classic Italian flavor with modern writing that’s easy to follow and hard to forget.
Her additional training at the Italian Chef Academy fueled her love for well-crafted dishes, especially ones that spotlight beautiful cuts of meat.
She’s a food writer with heart, and a deep love for storytelling through single recipes. Her goal? To help you cook with more confidence and a little more joy, no matter where you start.