
Red Velvet White Chocolate Cheesecake Recipe to Indulge
Decadent desserts never fail to impress, and this white chocolate red velvet cheesecake stands as a true showstopper.
Rich layers of crimson cake merge seamlessly with a creamy white chocolate filling that melts in your mouth.
Every bite promises a luxurious experience that combines classic southern charm with elegant pastry techniques.
The vibrant red hue catches the eye, making this dessert a stunning centerpiece for any celebration.
Silky smooth textures and balanced flavors create a memorable culinary moment.
Each carefully crafted slice tells a story of indulgence and passion.
Prepare to dive into a dessert that will leave your guests speechless and craving more.
Quick Recipe Overview

Everything In Red Velvet White Chocolate Cheesecake
For Crust Ingredients:For Cheesecake Filling Ingredients:For Decoration and Finishing Ingredients:Tools You’ll Use For Red Velvet White Chocolate Cheesecake
How To Make Red Velvet White Chocolate Cheesecake

Create a sturdy base by crushing red velvet cake and mixing with butter. Press the mixture firmly into a springform pan, forming a rich, textured foundation that will hold your delectable cheesecake.
Melt white chocolate until silky smooth. In a mixing bowl, blend cream cheese until luxuriously soft. Carefully incorporate eggs and vanilla, creating a velvety mixture that will transform into a dreamy filling. Gently fold in the melted white chocolate, allowing the flavors to dance together.
Pour the luscious filling over the prepared crust, ensuring an even surface. Slide the pan into a preheated oven, watching as the cheesecake slowly sets. After baking, let the cake rest inside the oven with the door slightly open, allowing it to cool gradually and prevent cracking.
Refrigerate the cheesecake for several hours, letting it firm up and develop its rich flavors. Before serving, adorn with a sprinkle of white chocolate shavings or a delicate swirl of whipped cream. Slice carefully and indulge in each decadent bite of this luxurious dessert.
Helpful Hints For Red Velvet White Chocolate Cheesecake
Serving Red Velvet White Chocolate Cheesecake The Easy Way
Storage Tips For Red Velvet White Chocolate Cheesecake
Print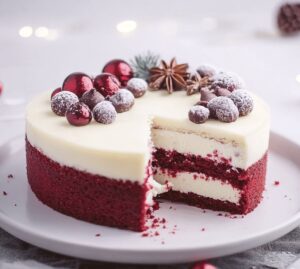
Velvety Red Velvet White Chocolate Cheesecake Recipe
- Total Time: 7 hours 20 minutes
- Yield: 11 1x
Description
Red velvet white chocolate cheesecake delivers a luxurious dessert experience that combines rich cocoa layers with creamy white chocolate filling. Rich, velvety textures and deep crimson hues make this indulgent treat irresistible for anyone craving a sophisticated sweet encounter.
Ingredients
- 3 packages cream cheese (8 oz/225 g each), softened
- 1 cup granulated sugar (200 g)
- 3 large eggs
- 8 oz (225 g) white chocolate, melted and slightly cooled
- ½ cup sour cream (120 ml)
- 1.5 cups red velvet cake crumbs (150 g), homemade or store-bought
- ¼ cup unsalted butter (60 g), melted
- 1 tsp vanilla extract
- Whipped cream
- Red velvet crumbs or sprinkles
- Shaved white chocolate
Instructions
- Crust Preparation: Pulverize red velvet cake crumbs and blend with melted butter, pressing the mixture firmly into a lined springform pan to create a compact, uniform base.
- Crust Toasting: Crisp the crust in a preheated 325F (160C) oven for 10 minutes, allowing it to develop a golden, crunchy texture. Cool completely after removal.
- Chocolate Melting: Carefully liquefy white chocolate using short microwave bursts, stirring until achieving a smooth, glossy consistency. Allow to cool slightly to prevent seizing.
- Cream Cheese Blending: Whip cream cheese and sugar in a large mixing bowl until achieving a silky, lump-free texture that promises a luxurious cheesecake experience.
- Egg and Flavor Integration: Incorporate eggs one at a time, mixing thoroughly after each addition. Introduce vanilla extract to elevate the flavor profile and create a harmonious blend.
- Chocolate Incorporation: Gently fold cooled white chocolate into the cream cheese mixture, creating delicate marbling and ensuring complete flavor distribution.
- Filling Refinement: Stir in sour cream to introduce a subtle tanginess and enhance the filling’s velvety smooth consistency.
- Baking Preparation: Pour the filling over the prepared crust, using a spatula to spread evenly and eliminate potential air pockets.
- Baking Process: Position the cheesecake in the oven’s center rack, baking for 50-60 minutes until edges appear set and the center maintains a gentle jiggle.
- Cooling Technique: After baking, leave the cheesecake in the oven with the door slightly open, allowing gradual temperature reduction to prevent surface cracking.
- Chilling and Setting: Refrigerate for a minimum of 6 hours, enabling complete setting and flavor melding.
- Final Presentation: Garnish with delicate whipped cream, scattered red velvet crumbs, and white chocolate shavings to create an elegant, visually stunning dessert.
- Serving: Slice with a heated knife for clean edges, serving chilled to showcase the perfect fusion of red velvet and white chocolate flavors.
Notes
- Prevent Crust Crumbling: Press red velvet cake crumbs and butter mixture firmly and evenly to create a stable, compact base that won’t fall apart when cutting.
- Smooth Out Cream Cheese: Beat cream cheese and sugar extensively to eliminate lumps, ensuring a silky-smooth cheesecake texture without grainy inconsistencies.
- Control Chocolate Melting: Use short microwave intervals and stir white chocolate consistently to avoid burning, maintaining a glossy, perfect melted consistency.
- Avoid Cheesecake Cracking: Allow gradual cooling by leaving oven door slightly open after baking, which helps prevent sudden temperature changes that cause unsightly surface cracks.
- Prep Time: 20 minutes
- Cook Time: 1 hour
- Category: Desserts
- Method: Baking
- Cuisine: American
Nutrition
- Serving Size: 11
- Calories: 430
- Sugar: 25 g
- Sodium: 320 mg
- Fat: 28 g
- Saturated Fat: 17 g
- Unsaturated Fat: 10 g
- Trans Fat: 0 g
- Carbohydrates: 40 g
- Fiber: 1 g
- Protein: 6 g
- Cholesterol: 100 mg
Liam O’Sullivan
Founder & Culinary Content Creator
Expertise
Recipe Development, Traditional Irish and European Cuisines, Food Styling and Photography, Culinary Education
Education
Dublin Institute of Technology (DIT) – School of Culinary Arts and Food Technology
Ballymaloe Cookery School
Isabella brings a global spark to the Craft Meats table. Born in Florence and trained at the Apicius International School of Hospitality, she blends classic Italian flavor with modern writing that’s easy to follow and hard to forget.
Her additional training at the Italian Chef Academy fueled her love for well-crafted dishes, especially ones that spotlight beautiful cuts of meat.
She’s a food writer with heart, and a deep love for storytelling through single recipes. Her goal? To help you cook with more confidence and a little more joy, no matter where you start.