Old-Fashioned Raisin Pie Recipe with Spiced Sweetness
Sweet memories of grandma’s kitchen come alive with this classic raisin pie that transports generations through a single slice.
Tucked away in vintage cookbooks, this old fashioned raisin pie recipe carries whispers of comfort and tradition.
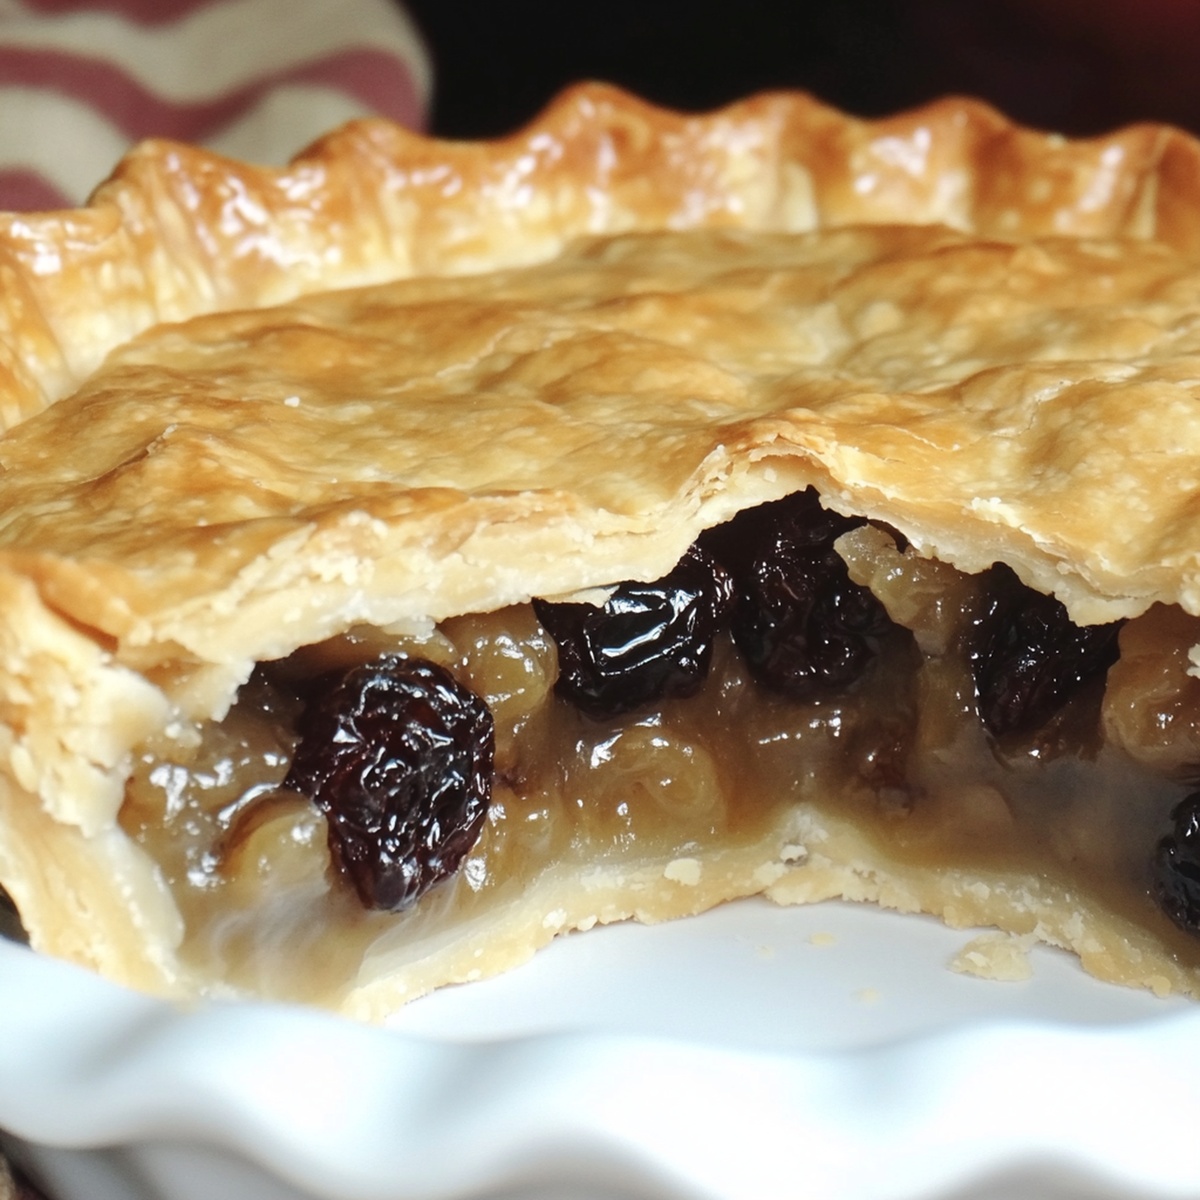
Plump raisins nestled in a flaky, buttery crust create a dessert that speaks directly to the soul.
The rich, deep flavors tell stories of simple ingredients and carefully crafted baking techniques.
Rustic and unpretentious, this pie celebrates the timeless art of home cooking.
Each bite promises a delightful journey through nostalgic flavors that connect us to cherished culinary roots.
Prepare to savor a slice of pure, unadulterated deliciousness that will become your new favorite family recipe.
Quick Recipe Overview
Old Fashioned Raisin Pie Ingredient List
For Filling Base:For Filling Thickeners and Spices:For Finishing and Enriching:Tools For Making Old Fashioned Raisin Pie
How To Bake Old Fashioned Raisin Pie
Toss plump raisins into a saucepan with water and bring to a gentle bubble. Sprinkle in a magical blend of sugar, cornstarch, warm spices, and a pinch of salt. Stir continuously as the mixture transforms into a thick, glossy filling. Pull from heat and swirl in bright lemon juice and creamy butter. Let the mixture cool and dream of deliciousness.
Drape the first pie crust into a cozy pie pan. Pour the raisin mixture into its buttery home. Crown the pie with a second crust, gently sealing the edges with playful crimped pinches. Create whimsical steam vents across the top with delicate knife cuts.
Brush the pie’s surface with a silky egg wash and dust with sparkling sugar crystals. Slide into a blazing hot oven starting at high heat, then reduce temperature for even baking. Watch as the crust turns a gorgeous golden brown, about 35-40 minutes total.
Allow the pie to rest and settle, letting flavors mingle and filling firm up. Slice into wedges of pure comfort. Serve with a cloud of whipped cream or a scoop of classic vanilla ice cream for ultimate pie happiness.
Tips For A Great Old Fashioned Raisin Pie
Serving Ideas For Old Fashioned Raisin Pie
How To Store Old Fashioned Raisin Pie
Print
Vintage Raisin Pie Recipe
- Total Time: 1 hour
- Yield: 7 1x
Description
Grandma’s classic old fashioned raisin pie delights with nostalgic Midwestern comfort. Sweet raisin filling nestles in a flaky crust, promising warm memories of home-baked tradition.
Ingredients
- 1 package (14 oz / 400 g) pie crusts (or homemade, for a double crust)
- 2 cups (300 g) raisins
- 1 ¾ cups (420 ml) water
- ¾ cup (150 g) granulated sugar
- 1 large egg, beaten (for egg wash)
- 2 tbsps cornstarch
- 2 tbsps lemon juice
- 1 tbsp unsalted butter
- 1 tsp cinnamon
- ½ tsp ground nutmeg
- ¼ tsp salt
- 1 tbsp granulated sugar (optional, for sprinkling)
Instructions
- Raisin Preparation: Combine raisins and water in a saucepan, bringing to a gentle boil. Simmer for 5 minutes until raisins become plump and tender.
- Filling Development: Whisk sugar, cornstarch, cinnamon, nutmeg, and salt. Blend into simmering raisins, stirring constantly to prevent lumping. Cook until the mixture thickens and becomes glossy, about 2-3 minutes.
- Flavor Enhancement: Incorporate lemon juice and melted butter into the raisin mixture. Set aside to cool slightly while preparing the pie crust.
- Crust Assembly: Preheat oven to 425F. Line a 9-inch pie pan with bottom crust, then pour in the cooled raisin filling. Cover with top crust, trimming and crimping edges to seal. Cut strategic vents for steam release.
- Finishing Touches: Brush top crust with beaten egg and optionally sprinkle with granulated sugar for added texture and shine.
- Baking Process: Begin with 10 minutes at 425F to crisp the crust foundation, then reduce temperature to 375F. Continue baking 25-30 minutes until the crust turns a rich golden-brown.
- Serving Preparation: Remove from oven and allow to cool completely at room temperature. Slice and serve with whipped cream or vanilla ice cream for a delectable dessert experience.
Notes
- Prevent Raisin Burning: Stir continuously during the simmering process to avoid scorching or sticking at the bottom of the saucepan.
- Master Filling Consistency: Watch for a thick, glossy texture when cooking the raisin mixture; it should coat the back of a spoon without being too runny or too stiff.
- Crust Perfection Technique: Create decorative and sealed edges by pinching the top and bottom crusts together, ensuring no filling leaks during baking.
- Temperature Control Matters: Start with high heat to create a crisp crust foundation, then lower the temperature to prevent over-browning while allowing even cooking.
- Prep Time: 20 minutes
- Cook Time: 40 minutes
- Category: Desserts
- Method: Baking
- Cuisine: American
Nutrition
- Serving Size: 7
- Calories: 300
- Sugar: 27 g
- Sodium: 150 mg
- Fat: 10 g
- Saturated Fat: 4 g
- Unsaturated Fat: 6 g
- Trans Fat: 0 g
- Carbohydrates: 50 g
- Fiber: 2 g
- Protein: 3 g
- Cholesterol: 40 mg
Liam O’Sullivan
Founder & Culinary Content Creator
Expertise
Recipe Development, Traditional Irish and European Cuisines, Food Styling and Photography, Culinary Education
Education
Dublin Institute of Technology (DIT) – School of Culinary Arts and Food Technology
Ballymaloe Cookery School
Isabella brings a global spark to the Craft Meats table. Born in Florence and trained at the Apicius International School of Hospitality, she blends classic Italian flavor with modern writing that’s easy to follow and hard to forget.
Her additional training at the Italian Chef Academy fueled her love for well-crafted dishes, especially ones that spotlight beautiful cuts of meat.
She’s a food writer with heart, and a deep love for storytelling through single recipes. Her goal? To help you cook with more confidence and a little more joy, no matter where you start.