
Adorable Little Gnome Cookies Recipe – Bake It Today!
Baking delightful gnome cookies brings pure joy to any kitchen during the festive season.
These whimsical, charming gnome cookies capture the magical essence of holiday treats.
Soft, buttery sugar cookies adorned with playful decorations make everyone smile.
You’ll love how simple ingredients come together to create these adorable little characters.
Colorful icing and creative design turn these cookies into edible art that sparks happiness.
Each gnome cookie tells a sweet story of creativity and fun.
Dive into this delightful recipe and spread some cheerful magic on your dessert plate.
Quick Recipe Overview
What You Need For The Cutest Gnome Cookies
For Cookie Base:For Binding and Flavor:For Decoration:What To Use For The Cutest Gnome Cookies
How To Bake The Cutest Gnome Cookies

Mix butter and sugar until creamy and smooth. Add egg and vanilla, blending thoroughly. Combine flour, baking powder, and salt in a separate container. Gradually fold dry ingredients into wet mixture. Separate dough into two portions, wrap snugly, and chill in refrigerator for one hour.
Heat kitchen appliance to 350F. Cover baking trays with parchment paper for easy cookie removal.
Roll chilled dough on floured surface. Create triangle shapes for pointy gnome hats. Cut circular bases representing adorable faces. Connect hat triangles to round foundations, gently pinching hat tops for charming curves.
Arrange cookie shapes on prepared trays, leaving small gaps between each. Bake until edges turn golden, approximately 10-12 minutes. Allow cookies to rest briefly on trays before transferring to cooling rack.
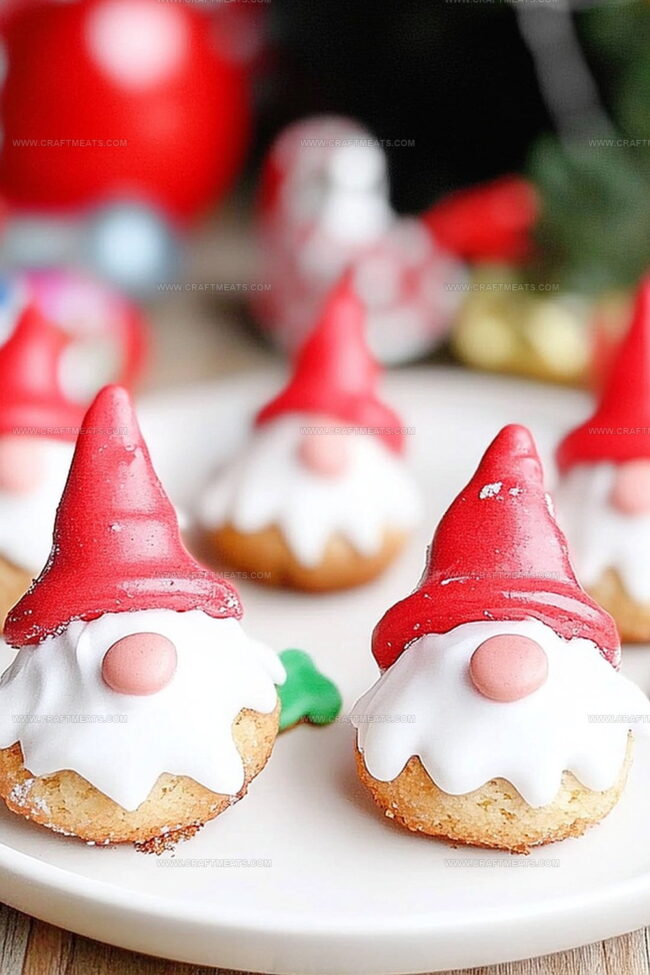
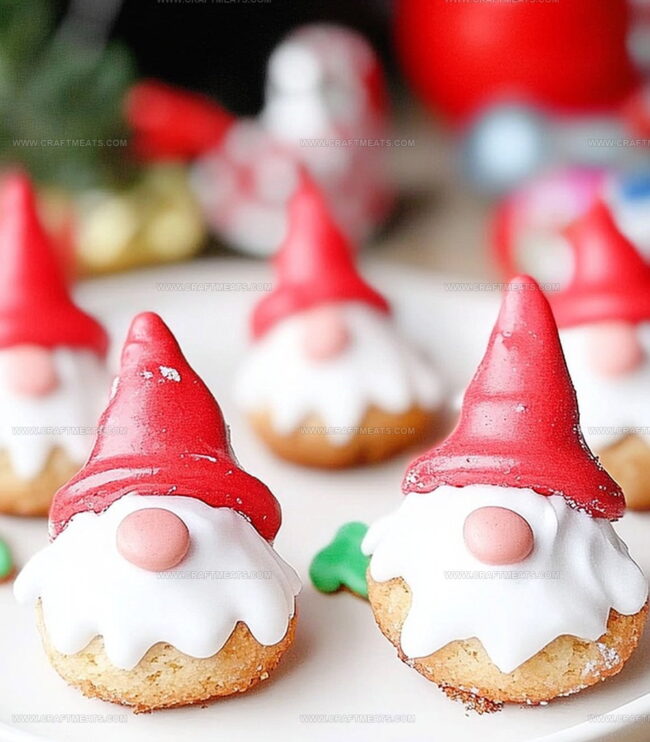
Splash vibrant red icing across gnome hats. Add fluffy marshmallow trim. Pipe white icing for textured beards. Place tiny chocolate chips as cute button noses. Optional: Draw expressive eyes with dark icing.
Let decorations set completely. These delightful gnome cookies make perfect gifts or party centerpieces that spark joy and conversation.
Extra Tips For The Cutest Gnome Cookies
Serving The Cutest Gnome Cookies At Parties
Storing The Cutest Gnome Cookies The Right Way
Print
Whimsical Gnome Cookies Recipe
- Total Time: 2 hours
- Yield: 23 1x
Description
Whimsical gnome cookies sparkle with playful charm from German baking traditions. Colorful details and sweet frosting create adorable treats that delight guests at any celebration.
Ingredients
- 1 cup (230 g/8.1 oz) unsalted butter, softened
- 2 ½ cups (315 g/11.1 oz) all-purpose flour
- ¾ cup (150 g/5.3 oz) granulated sugar
- 1 large egg
- 1 tsp vanilla extract
- ½ tsp baking powder
- ¼ tsp salt
- Royal icing (store-bought or homemade, divided into red, white, and black)
- Mini marshmallows (optional, for hat details)
- Candy or chocolate chips (for noses)
Instructions
- Dough Preparation: Cream butter and sugar until light and fluffy. Blend in egg and vanilla extract to create a smooth, consistent mixture.
- Dry Ingredient Integration: Combine flour, baking powder, and salt. Gently incorporate into the wet mixture, forming a uniform dough. Divide into two portions, wrap in plastic, and refrigerate for one hour to enhance flavor and texture.
- Dough Shaping: Preheat oven to 350F (175C). Roll chilled dough on a floured surface to 1/4 inch thickness. Cut triangular shapes for gnome hats and circular forms for faces and beards. Carefully assemble cookie components, positioning triangular hats atop round bases and pinching hat tips for a whimsical curve.
- Baking Process: Arrange shaped cookies on parchment-lined baking sheets, spacing them one inch apart. Bake for 10-12 minutes until edges turn golden. Rest on baking sheets for five minutes, then transfer to a wire rack for complete cooling.
- Decorative Finishing: Adorn gnome hats with vibrant red royal icing. Create textured white royal icing beards using a zigzag technique. Attach miniature marshmallows for hat trim and place candy or chocolate chips as noses. Add black royal icing for expressive eyes. Allow decorative elements to set completely before serving or storing.
Notes
- Chill Dough Strategically: Refrigerate cookie dough for at least an hour to prevent spreading and maintain intricate gnome shapes during baking.
- Roll with Precision: Use consistent 1/4-inch thickness when rolling dough to ensure uniform baking and perfectly shaped gnome cookies.
- Control Moisture Levels: Avoid overmixing dough to prevent tough cookies; mix just until ingredients combine for tender, delicate texture.
- Decorating Pro Tip: Let royal icing completely dry between layers to create crisp, clean gnome facial features and prevent color bleeding.
- Prep Time: 30 minutes
- Cook Time: 30 minutes
- Category: Desserts, Snacks
- Method: Baking
- Cuisine: American
Nutrition
- Serving Size: 23
- Calories: 150
- Sugar: 6 g
- Sodium: 50 mg
- Fat: 7 g
- Saturated Fat: 4 g
- Unsaturated Fat: 2 g
- Trans Fat: 0 g
- Carbohydrates: 21 g
- Fiber: 0.5 g
- Protein: 1.5 g
- Cholesterol: 20 mg
Liam O’Sullivan
Founder & Culinary Content Creator
Expertise
Recipe Development, Traditional Irish and European Cuisines, Food Styling and Photography, Culinary Education
Education
Dublin Institute of Technology (DIT) – School of Culinary Arts and Food Technology
Ballymaloe Cookery School
Isabella brings a global spark to the Craft Meats table. Born in Florence and trained at the Apicius International School of Hospitality, she blends classic Italian flavor with modern writing that’s easy to follow and hard to forget.
Her additional training at the Italian Chef Academy fueled her love for well-crafted dishes, especially ones that spotlight beautiful cuts of meat.
She’s a food writer with heart, and a deep love for storytelling through single recipes. Her goal? To help you cook with more confidence and a little more joy, no matter where you start.