
Jolly Melted Snowman Biscuits Recipe: Fun Winter Treats!
Baking delightful winter snowman biscuits sweeps you into a world of whimsical culinary creativity.
These charming treats capture the playful spirit of snowy days with their adorable melted snowman design.
Soft, buttery biscuits become the perfect canvas for a deliciously fun dessert that sparks joy at any gathering.
Each carefully crafted biscuit tells a story of winter’s magical charm and childhood memories.
Simple ingredients and clever decorating techniques bring these cute snowman treats to life with minimal effort.
Chocolate drizzles, marshmallow details, and creative icing transform ordinary biscuits into edible winter wonderlands.
Dive into this delightful recipe and watch as your kitchen becomes a playground of sweet, snowy imagination.
Quick Recipe Overview
Everything In Melted Snowman Biscuits
For Biscuit Base:For Melting Effect and Decoration:For Snowman Components:Tools That Help Make Melted Snowman Biscuits Cute
Baking Melted Snowman Biscuits Step By Step

White powdered sugar transforms into a silky smooth glaze by mixing with milk. Stir until the mixture becomes glossy and fluid, creating a perfect draping consistency.
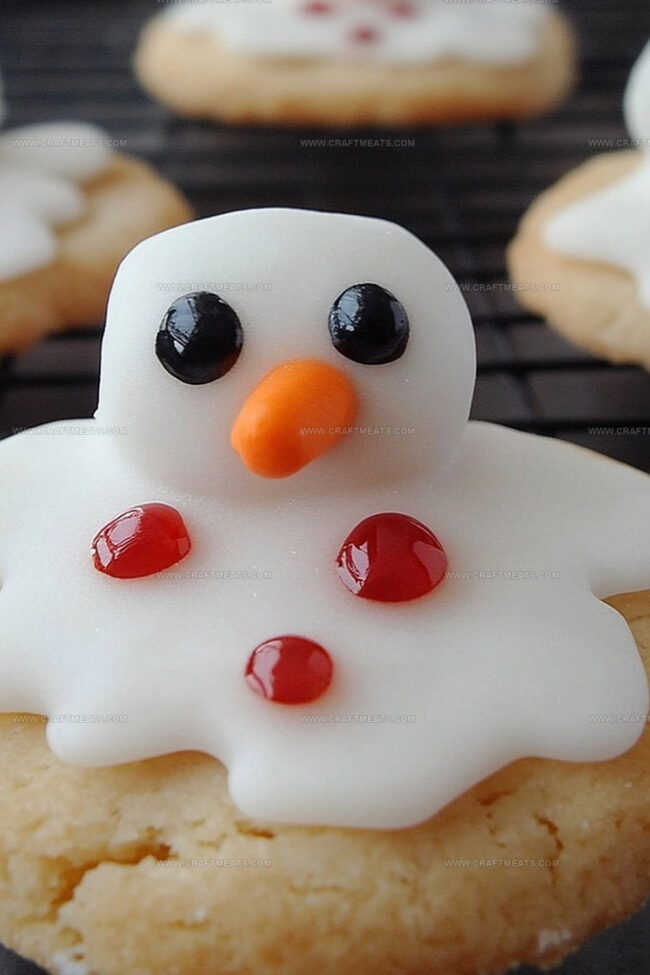
Arrange biscuits on a clean surface. Gently cascade the white icing over each biscuit, allowing soft drips to create a melting snowman illusion.
Select soft, puffy marshmallows and perch them delicately atop the iced biscuit. The marshmallow becomes the charming snowman’s head, sitting comfortably on the creamy base.
Grab dark and orange writing tools to bring your snowman to life. Craft tiny eyes, a cheerful smile, and stick arms using delicate strokes. Design a cute carrot nose and sprinkle playful buttons across the icy landscape.
Let your whimsical snowmen rest quietly, allowing the icing to set and harden. The treats will transform into adorable winter characters ready to delight friends and family.
Creative Ideas For Melted Snowman Biscuits Toppings
Serving Melted Snowman Biscuits With Fun Themes
How To Store Melted Snowman Biscuits After Decorating
Print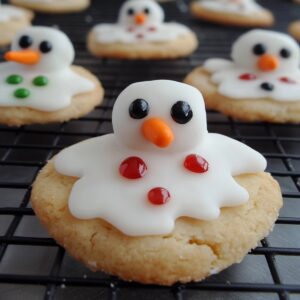
Whimsical Melted Snowman Biscuits Recipe
- Total Time: 30 minutes
- Yield: 11 1x
Description
Whimsical melted snowman biscuits delight winter dessert enthusiasts with playful charm. Creamy frosting and marshmallow details create a charming treat that sparks joy for gatherings and holiday celebrations you will fondly remember.
Ingredients
- 12 round biscuits or cookies (store-bought or homemade)
- 12 large marshmallows
- 1 cup (240 ml) powdered sugar
- 2–3 tbsps (30–45 ml) milk (for icing)
- 1 orange gel icing pen
- 1 black gel icing pen
- Assorted candies (mini M&Ms, sprinkles, or licorice for buttons and scarves)
Instructions
- Prepare Icing: Whisk powdered sugar with milk until achieving a smooth, pourable consistency that flows effortlessly over the biscuits.
- Set Up Workspace: Line a flat surface with parchment paper and arrange biscuits ready for decorating.
- Ice Biscuits: Generously pour icing over each biscuit, allowing it to drip dramatically down the sides to create a melted snow effect.
- Create Snowman Head: Microwave marshmallows briefly to soften, then carefully place one on top of each iced biscuit as the snowman’s head.
- Add Facial Features: Use black icing to carefully draw eyes and mouth on the marshmallow, bringing the snowman character to life.
- Finishing Touches: Pipe a tiny orange icing carrot nose, then embellish with small candies or sprinkles to represent buttons or a scarf.
- Set and Serve: Allow the decorated biscuits to rest for 20-30 minutes, giving the icing time to completely set before serving these whimsical winter treats.
Notes
- Icing Consistency Matters: Achieve a smooth, pourable icing by gradually adding milk to powdered sugar, ensuring it’s fluid enough to cascade but not too runny to lose definition.
- Marshmallow Technique: Microwave marshmallows for just 3-5 seconds to soften without melting completely, creating the perfect malleable texture for the snowman’s head.
- Precision in Decoration: Use a fine-tipped piping bag or toothpick for intricate facial details, allowing precise control when creating eyes, mouth, and carrot nose.
- Cooling and Setting: Let biscuits rest in a cool, dry area for 30 minutes to allow icing to set completely, preventing smudging and maintaining the delicate melted snowman design.
- Prep Time: 15 minutes
- Cook Time: 15 minutes
- Category: Breakfast, Snacks, Desserts
- Method: Mixing
- Cuisine: American
Nutrition
- Serving Size: 11
- Calories: 190
- Sugar: 22 g
- Sodium: 150 mg
- Fat: 5 g
- Saturated Fat: 2 g
- Unsaturated Fat: 3 g
- Trans Fat: 0 g
- Carbohydrates: 32 g
- Fiber: 0 g
- Protein: 2 g
- Cholesterol: 0 mg
Liam O’Sullivan
Founder & Culinary Content Creator
Expertise
Recipe Development, Traditional Irish and European Cuisines, Food Styling and Photography, Culinary Education
Education
Dublin Institute of Technology (DIT) – School of Culinary Arts and Food Technology
Ballymaloe Cookery School
Isabella brings a global spark to the Craft Meats table. Born in Florence and trained at the Apicius International School of Hospitality, she blends classic Italian flavor with modern writing that’s easy to follow and hard to forget.
Her additional training at the Italian Chef Academy fueled her love for well-crafted dishes, especially ones that spotlight beautiful cuts of meat.
She’s a food writer with heart, and a deep love for storytelling through single recipes. Her goal? To help you cook with more confidence and a little more joy, no matter where you start.