
Frosty’s Meltdown: Adorable Melted Snowman Brownies Recipe
Winter’s sweet magic comes alive with these delightful melted snowman brownies that add a playful twist to classic chocolate treats.
Chocolate lovers will adore this whimsical dessert perfect for chilly afternoons.
Snow-inspired decorations create a charming and delectable scene on each brownie square.
Marshmallow heads and candy details bring these adorable snowmen to life with surprising creativity.
Soft, fudgy brownie bases provide a rich foundation for the cute characters.
Baking these treats transforms an ordinary dessert into a delightful winter wonderland experience.
Gather your ingredients and dive into a recipe that promises smiles and delicious memories.
Quick Recipe Overview

Ingredients You Need For Melted Snowman Brownies
For Base Ingredients:For Dry Ingredients:For Decoration Ingredients:Tools For Making Melted Snowman Brownies Fun
Easy Steps For Making Melted Snowman Brownies

Whip up a batch of rich, fudgy brownies in a square pan, ensuring they’re thick and decadent. Let the brownies cool completely, creating a smooth surface perfect for your snowy design.
Craft a silky white glaze by blending powdered sugar with a splash of milk until it reaches a smooth, drippable consistency. Generously pour the glaze over each brownie, allowing it to cascade down the sides like soft snow.
Place a puffy marshmallow on top of each glazed brownie to form the snowman’s head. Use tiny dots of black and orange gel icing to create playful facial features and a cute carrot nose. Sprinkle small candies along the edges to mimic buttons and add whimsical charm.
Let the icing set for a short while, allowing your winter characters to take shape. Serve these delightful treats that capture the essence of a cheerful, melting snowman on a warm winter day.
Creative Toppings For Melted Snowman Brownies
Serving Melted Snowman Brownies With A Smile
How To Keep Melted Snowman Brownies From Getting Dry
Print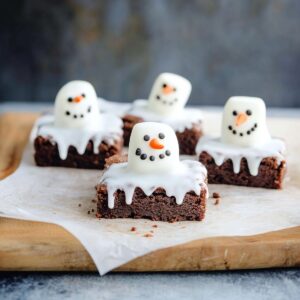
Adorable Melted Snowman Brownies Recipe
- Total Time: 1 hour
- Yield: 11 1x
Description
Melted snowman brownies bring whimsical winter charm to chocolate desserts. Rich chocolate base and marshmallow details create playful seasonal treats you’ll adore.
Ingredients
- 1 cup (240 ml) granulated sugar
- 2 large eggs
- ½ cup (113 g) unsalted butter (melted)
- ⅓ cup (35 g) cocoa powder
- ½ cup (60 g) all-purpose flour
- ¼ tsp salt
- ¼ tsp baking powder
- 12 large marshmallows
- 1 cup (120 g) powdered sugar
- 2 to 3 tbsps milk (for icing)
- Black gel icing (for eyes and arms)
- Orange gel icing (for noses)
- Mini candies or sprinkles (for buttons)
Instructions
- Prepare Chocolate Base: Preheat oven to 350F (175C). Line an 8×8-inch pan with parchment paper. Blend melted butter, sugar, eggs, and vanilla into a smooth mixture. Incorporate cocoa powder, flour, salt, and baking powder until a uniform batter forms. Spread evenly in the prepared pan and bake for 22-27 minutes. Confirm doneness with a toothpick test. Cool completely on a wire rack.
- Create Snowman Decoration: Whisk powdered sugar and milk to create a fluid white icing. Cut cooled brownies into squares. Drizzle icing over each brownie, allowing artistic drips to simulate melting snow. Position a marshmallow as the snowman’s head. Use black gel icing to add expressive facial features – carefully craft eyes and a charming smile. Accent with an orange gel nose. Embellish with candy or sprinkle “buttons”. Allow decoration to set for 15-20 minutes before serving.
Notes
- Manage Brownie Moisture: Avoid overbaking to maintain a fudgy, soft texture; check doneness early and remove when a few moist crumbs remain on the toothpick.
- Optimize Icing Consistency: Adjust milk quantity gradually to achieve the perfect drip effect; too thin will run off, too thick won’t create the melting snowman look.
- Prevent Marshmallow Dryness: Place marshmallow head immediately after icing while still slightly wet to ensure it adheres smoothly and looks naturally melted.
- Customize for Dietary Needs: Substitute gluten-free flour for classic flour, use dairy-free milk alternatives, and swap butter with coconut oil to accommodate various dietary restrictions.
- Prep Time: 25 minutes
- Cook Time: 20 minutes
- Category: Desserts, Snacks
- Method: Baking
- Cuisine: American
Nutrition
- Serving Size: 11
- Calories: 238
- Sugar: 20 g
- Sodium: 57 mg
- Fat: 10 g
- Saturated Fat: 6 g
- Unsaturated Fat: 4 g
- Trans Fat: 0 g
- Carbohydrates: 33 g
- Fiber: 1 g
- Protein: 2 g
- Cholesterol: 45 mg
Liam O’Sullivan
Founder & Culinary Content Creator
Expertise
Recipe Development, Traditional Irish and European Cuisines, Food Styling and Photography, Culinary Education
Education
Dublin Institute of Technology (DIT) – School of Culinary Arts and Food Technology
Ballymaloe Cookery School
Isabella brings a global spark to the Craft Meats table. Born in Florence and trained at the Apicius International School of Hospitality, she blends classic Italian flavor with modern writing that’s easy to follow and hard to forget.
Her additional training at the Italian Chef Academy fueled her love for well-crafted dishes, especially ones that spotlight beautiful cuts of meat.
She’s a food writer with heart, and a deep love for storytelling through single recipes. Her goal? To help you cook with more confidence and a little more joy, no matter where you start.